Content:
-
Intro to Posing
-
Targetless IK
-
Keyframes
-
Export an animation
About this Document...
What does Avastar offer?
Avastar basically creates animatable Models (Avatars&attachments) and animations. Therefore the tool adds various functions and user interface elements to Blender.
The full functionality of Avastar is a bit overwhelming on first sight. You better are ready to spend some time and patience to get it all working nicely for your projects.
What does this Document offer?
You learn how to create a simple (static) pose for your Avatar and export this pose for usage in Second Life.
Every aspect of 3D modelling IS artwork. And nothing works just in a couple of minutes. If you are new to Posing and animating, then please get ready to learn a lot of tools and keep your patience. And be aware that you won’t get perfect results on the first try.
We expect that you have basic knowledge about Blender.
The art of Posing

Further reading: The Basics of posing
Whenever you create a new Avastar character it will initially be displayed with arms pointing horizontally and sideways. And both feet are parallel to each other standing on ground. This is the T-Pose, apparently because the character forms the shape of the letter “T”. This pose is also the “Rest” pose where all bones are in their restposition (have no translation, no scale and no rotation). That is how you find the original Avastar character when it is fresh created.

Pose & Bone
The process of “posing” is nothing else than changing the Rest Pose of the character by moving, scaling and rotating the character’s bones.
Note: For this to work properly we need to map the bones to the mesh in some way so that the mesh can actually follow the bones. This is where rigging and weighting comes into play. But this is not our topic here.
Setting the Rig to Pose mode
When you create a new Avastar then it is automatically placed in Pose mode. This is already what we need in this document. However an Armature can be in other modes as well:
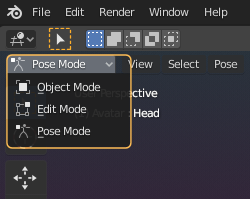
Blender’s armature modes are:
- Object mode: To move the entire Armature within Blender’s Viewport
- Edit Mode: To modify the Restpose by editing bone locations
- Pose Mode: To Pose and animate the rig (what we need in this document)
Resetting the Pose
If you want to reset your pose back to the T-Pose, then select all bones (press “a” to toggle between all/none selected) and then press:
- ALT+r to reset the rotations.
- ALT+g to reset the translations.
- ALT+s to reset scaling.
Configure the Bone Display
You can control which bones are displayed in the Viewport with the RigDisplay Panel. You find the Rig Display Panel in the Properties bar on the right side of the Viewport. If the Properties bar is closed (hidden) then Press “n” while the cursor is in the viewport.
Open the vertical tab Avastar, then scroll down in the Properties bar until you find the Rig Display. Its usage should be self explanatory.

Getting started
Fortunately the Avastar character is already “fully rigged and weighted”, so you are already ready for posing. Actually you are only 3 clicks away from starting your first pose:
- File -> Open template -> Avastar textured.
- Select the rig (armature) in object mode (actually it is already selected).
- Switch from Object mode to Pose mode.
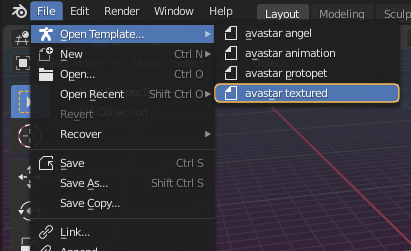
Note: You may wonder why we have not chosen the Avastar Animation template here. We did this just to keep this document as simple as possible.
Now you see “Avastar” our female pose model. Avastar displays all bones as light green circles by default. You can select the circles and move them around (use keyboard shortcut: “g”) and rotate them (use keyboard shortcut:”r”) . However, selecting and moving one bone can potentially affect other connected bones as well.
That is: Avastar has built-in constraints which will move connected (chained) bones all together in a more or less natural way. This chained movement is also named targetless IK
In practice you can now go ahead and grab the bones and move them around as you like until the character pose is right for your purpose. However we have added some helpful extra information about Targetless IK. So maybe you spend a few minutes to take a look at:
Further reading: Targetless IK
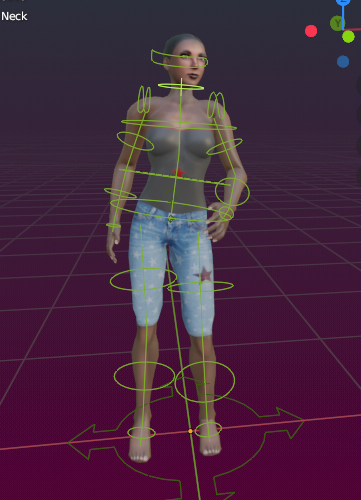
Avastar enables Targetless IK by default for a new Avastar character. For example you can see it in action when you select the left wrist bone and move it around (see image):
- Select the (green) bone controller of the left wrist – use the Left Mouse Button.
- press “g” on the keyboard then move the bone down as shown on the image.

You see that while you move the bone around, the entire arm follows the hand. Thus you not only have moved one single bone with your action, but you moved all chained arm bones as well. More precisely: All bones up to the collar-bone.
Bone Chains
But hold on, there is an issue. Take a close look at the left shoulder. When you inspect that area in detail, then you see an ugly distortion near the neck (see image). The pose has bended the mesh back into itself and it ended up intersecting its own surface. This can easily be fixed by rotating the collar-bone back a bit and all is well.

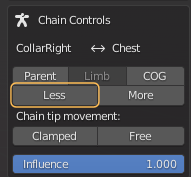
But instead of fixing the problem after it happened you could also avoid this issue completely by changing the length of the targetless IK chain, that is: exclude the collar-bone from the chain. You do this in the IK Chain controller panel:
IK Chain controller

When at least one of the now selected bones is IK enabled, then you find the Targetless IK control panel in the property sidebar of the 3D view. It is in the “Rig Properties” section. See below for further instructions.
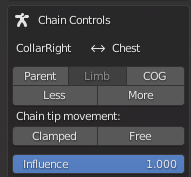
Some Details to keep in mind:
- We have 5 separate IK chains: two for the arms, two for the legs, and one for the Spine up to the head.
- Each chain starts at the outermost bones (wrist, foot bone, skull) and by default moves up to the collars, the Hips and the torso.
- You can change each chain to end at the outermost bone, or all the way up to the COG Bone (that is the Center Of Gravity bone on the Avastar’s backside, just above the Pelvis).
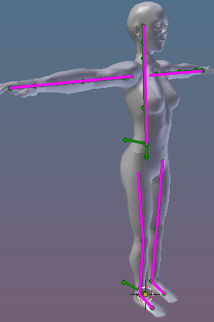
the 5 IK chains marked as pink lines.
Now back to our Chain length setting. For our purpose we want to keep the collars unaffected from our wrist movement, so what we do is this:
- Select the wrist bone.
- in the Targetless IK panel click “Less” to shorten the chain by one bone.
When you now move the wrist, then the Collar is no longer affected.
The 3D Manipulator is your friend...
The 3D Manipulator allows to move (translate) and rotate bones just by click and drag. In particular i found the Rotate manipulator very handy to quickly adjust bones.
In this context the Gimbal orientation (see next image) setting makes most sense as it aligns the manipulator always to the selected bone’s orientation and thus the rotation axes are always oriented in a meaningful way regardless of the current Viewport angle and bone angle.
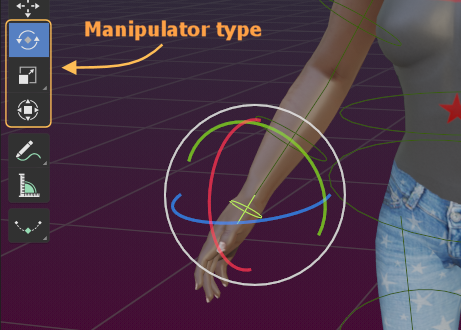
You find the 3D manipulator Settings in the footer of the 3D View. After you have set the Manipulator Orientation to Gimbal:
You rotate the wrist (green circle), wave hands up/down (red circle) and sideways (blue circle) regardless of the parent bones, the object orientation and the viewport angle.
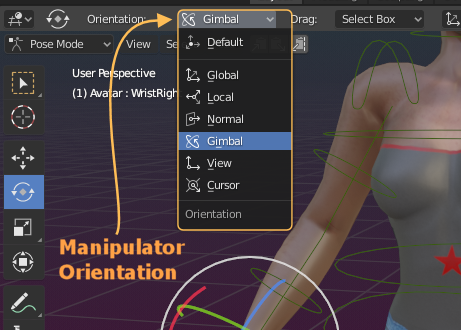
You can find a detailed description of the 3D Manipulator and its orientation modes in the Transform Orientation page in the Blender Wiki.
Finish the Posing
By now you have learned:
- How to move bones with the “r” and “g” shortcuts.
- How to use the Auto IK Chain controller.
- You know a bit about the 3D Manipulator.
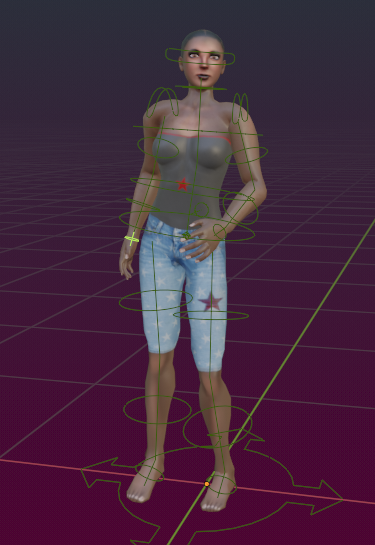
So please go ahead and tweak the hand pose further by moving and rotating the affected bones to your wishes. Then go on with posing the right hand. And at the end of your work you have created something similar to the image on the right side (or something very different of course when you prefer to create your own pose).

But please take care here. Normally you also want to adjust the Torso bone to get a bit more life into the character and let it look less static. How you pose your characters is your personal taste and from here on it is up to your artistic eye to decide how to finish this task. It is also very helpful if you have some knowledge about anatomy.
Pose and Animation
We know (or maybe just guess) that an animation is something dynamic, like a set of changing poses displayed over time. And a pose is something static, where the character does not move.
While this is in principle correct, technically a pose is exactly the same as an animation. Only that the “set of changing poses” has only one pose which gets replayed in an endless loop.
For the pose all we need to specify is which bones shall be positioned where. So we could just record all bone locations. But practically it is enough to only record the changed bones. You record the changed bones by creating Keyframes in the Timeline
Keyframes & Timeline

The Timeline: is a recording of animation changes over time. Thus whatever movement happens for whichever bone, you find the information in the timeline.You find the timeline in the lower part of the default Blender screen. There is also a timeline cursor available, a blue vertical line, initially set at position 1 (one) in the timeline. Note that timelines are always attached to Objects. In our case the timeline is attached to the Avastar Armature.
A Keyframe: is a set of bones and their transformation data (location, rotation, scales) at a specific point in time. A keyframe does not need to store all character bones. It is enough when it stores just the changed bones since the last keyframe.
Create a Keyframe
Creating a keyframe for a pose is really easy.
- Select all changed bones.
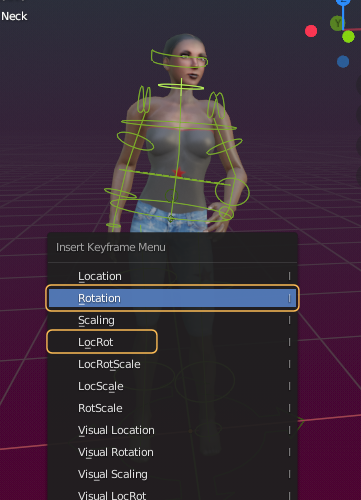
- While the mouse cursor is inside the 3D view, press the “i” key on the keyboard.
- A Pop up Box appears (see image)
- Here we can select which transformation type shall be keyframed. Since we only have changed Rotation, we will select Rotation1.
Note: After keyframing a new yellow vertical line has appeared in the timeline at the current time position (0 in our case).
Footnote 1 You may wonder why we only have changed rotation. We obviously have move the bones around, so why do we not keyframe LogRot (Location and Rotation) here? well noticed! If you want to know what goes on here, open the tab :
The truth about the Animation system ...
You probably have noticed that whenever you grab a bone and move it to a different location, all its connected bones move along because of the Auto IK chains as described further up. And the magic is that any pose you make here is always also doable by a set of bone rotations. And Blender knows how to convert all your moves into a set of Rotations. And because of this we only need to keyframe rotation in this case.
The problems raise when you later try to export your animation to SL, then your export might get rejected due to too many animated bones. The last time we looked into this SL could only handle up to 110 bones per animation (things might have changed over time). The only way to get out of this is by editing the Dope sheet and deleting all Bone which do not affect the animation. This is not a funny task! So you should avoid this situation (and never keyframe the Whole Character)
Further reading: What about posing the Head?
And finally export

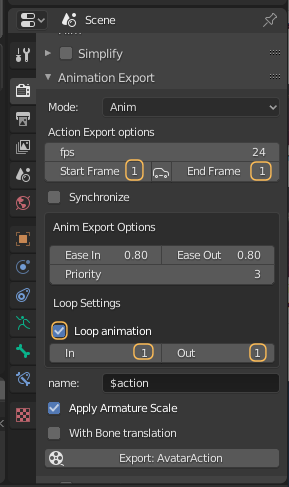
You find the Animation export panel in the render properties section. Although you can use the BVH-format here, we recommend that you use the anim-format, as that is the native format and gives you better precision for the finished animation. Here is a list of settings which is suitable for our pose:
- Start Frame = 1 ( we only have one frame ).
- End Frame = 1 ( could be 2 as well ).
- Loop Animation = enabled (to keep pose running infinitely).
- In = 1 (Ease in and Ease out. Could be made longer, typically 0.8 secs).
- Out = 1
When you click on the “Export Animation” button, you end up in a file selection window. There you can can specify the export file name and location on your disk.
Upload to your online world
You can upload your animation file like you upload any other animation. In the SL Viewer you navigate to:
Build -> Upload -> Animation

Final pose uploaded to Second Life and worn on a mesh character