In previous Avastar releases we always needed to eventually use the T-posed Character when we were creating models and attachments with human shapes. We did so to keep compatible to the SL T-Pose rig (experts may remember the Alter to Restpose Option that we provided for this purpose).
In Avastar-2 we are no longer forced to handle the T Pose. Instead of that you can now work in any Restpose (technically named: Bind Pose). Avastar can now calculate the necessary extra data that is needed by the SL Importer to handle these Rigs properly.
Besides supporting arbitrary Bind poses we also added a few extra functions so that you can create your custom rigs more efficiently…

Bind poses and Developer kits
If you try to enforce to use a restpose different from a Developer kit, you always will end up with mismatched clothes!

A Develoepr Kit using an A-Posed upper body Rig.
Some Rules of thumb
- If you use another creator’s rig for creating compatible attachments, keep with the Restpose that is provided by the creator.
- If you create your own Rig, you are free to use whichever restpose you like. But once you defined your rig, do never again change the restpose to make sure your attatments match to your Body.
- If your Rig was massively edited, avoid using Bind Pose. Prefereably Import with Joint Offsets in that case. Massive edits include:
- Scaled Avatars
- Bones moved by Unlocking Animation Bone Translation
Simple Workflow for Bind Poses
When to use Bind Poses
The use of bind poses is a somewhat confusing topic at first. This is mostly so because Blender actually does not support this feature. Avastar adds the necessary functionality but it still has to work with the Blender limitations. This makes the usage of Bind poses a bit complicated. However they are so useful in regard to SL that we strongly recommend to get familiar with the concepts and the usage scenarios.
Below we have added a more detailed document about this topic:
The Nuts&Bolts of Bind Poses
The Use Bind Pose option
When you enable the Use Bind Pose option then Avastar treats your Rig as if it has a plain vanilla (SL Default) T-posed SL rig plus an initial starting pose ( the Bind pose ). If your rig has not been edited (it is a default SL T-posed rig) then the Bind pose is the same as the rest pose. In that case enabling this option has no effect at all.
The interesting part comes when your rig is edited. Then we still are left with 2 situations:
Situation 1: Bind pose with Rotation-only
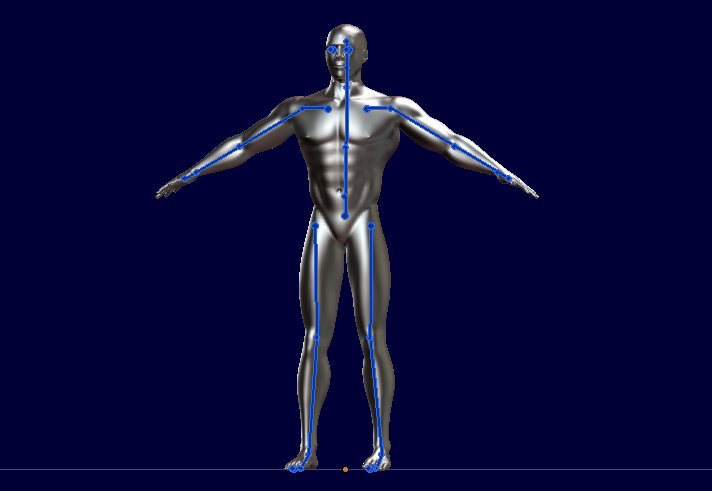
You started with the SL T-posed rig and created a new pose by only using rotations. This is a Simple rotation-only bind pose. Note that actually this rig has a lot of Joint offsets on the arms and on the legs (indicated by blue dotted lines in the image). However since the entire transformation from the T-Pose to the A-Pose can be described with one clear set of rotations, there is good news here:
This sort of Rotation-only rig can be transferred to SL without the need of Joint Offsets. This is important as we will see in a few moments.
Most common examples: A-posed rigs.
Situation 2: Bind pose with Rotation and Translation
You started with the SL T-posed rig as explained in the previous chapter (Bind pose with Rotation-only). But you then created your new rig by editing the bone locations. This editing adds translation to the joints and therefore now you have created a transloc bind pose.
In this case the differences from the T-Posed rig can be described with combinations of Rotations and translations. However now there are many different ways how this new rig can be described:
You could use translations only (as we did with older versions of Avastar) or you can use combinations of rotations and translations in order to minimze the amount of needed joint offsets (which we do since Avastar-2.6)
Again, we will explain in a moment why it is desirable to have as few Joint offsets in the rig as possible. Please keep patient.
Most common examples: Any sort of non humans (creatures)

The Joint Offsets have been indicated with blue dotted lines
A serious caveat…
Regardless of what kind of bind pose you have in your rig, Avastar will calculate the optimal Rig Data that matches perfectly to your working rig and has as few joint offsets as possible for your particular case. The calculated optimal rig is then exported to Collada and finally propagated into the SL importer.
However, while this sounds great you must know that there is a roadblock. Here we are at the heart of all confusion and why i repeatedly mentioned above that it is so desirable to have as few joint offsets as possible:
As soon as a bone needs a joint offset to get in place, its related appearance sliders change their behavior. Technically the bone no longer follows Translations (shifts in location) as imposed by the sliders. Visually the bone no longer moves. But…
Note: Sliders which only impose bone scaling still work as before. But sliders which impose Bone movement (translation) no longer apply. And this is what makes the behavior of the Appearance sliders so shady and so complicated to understand.
Sidenote: You ever wondered why sometimes the Avastar Appearance sliders turn red? The red mark indicates: Bone shifting does no longer work for one or more bones affected by this slider.
Tip: Click on the icon on the left side of the appearance slider to see which bones are affected. Bones with a red cross have joint offsets.
This issue affects mostly face expressions and hand gestures. For example when you added joint offsets to the Eye bones, then the Eye distance slider no longer works. That is why you want to have only as few Joint Offsets as possible!
An example …
Sometimes it is inevitable to edit your Rig beyond simple rotations. This happens for example when you need to adjust the hand rig (see images) and the face rig for your custom character. In this case every edit results in additional Joint offsets for the edited bone itself plus all its children!
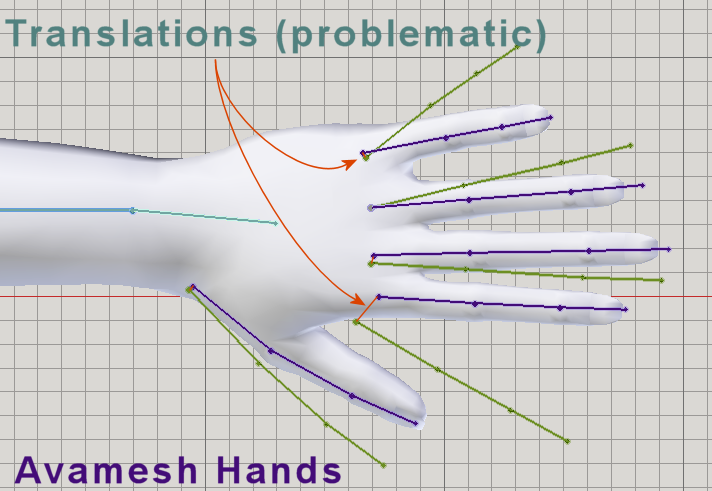
For the hand in the example image we introduce 5 joint offsets for the first finger bones. But due to the nature of how Joint Offsets are implemented in SL those 5 translations of the first finger bones make it necessary that all the child bones also get joint offsets. So we end up with 15 joint offsets for each hand!
But we got an idea…
And invented a convenient solution
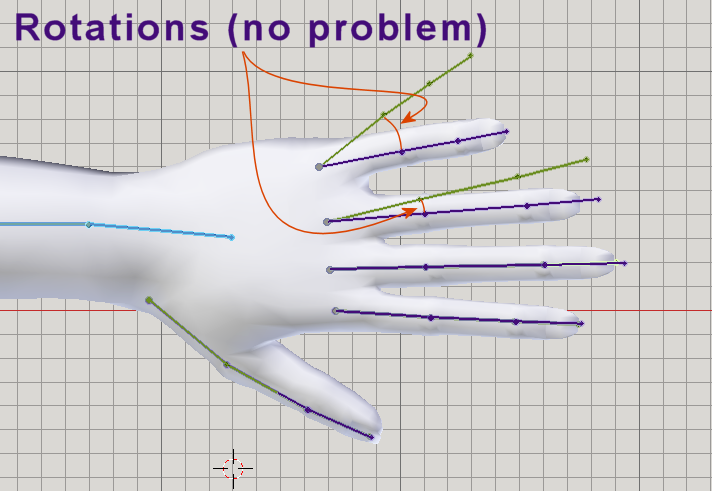
We have added an optimization to the Collada exporter which automatically minimizes the number of joint edits. For example the hand above only needs translation on the first finger bones, while all other bones can be handled with relative rotation and no need to add relative offsets. And thanks to the way how Bind poses work we can get away with only 5 joint offsets for the first finger bones.
The good news is: Our optimizer runs silently in the background, so you actually do not need to worry about how this is done. It just works. Here are some possible usage scenarios:
Scenario 1: Use Bind pose as you always did
This scenario applies also to all previous Avastar-2 versions as well:
In this case you enable the Use Bind Pose option and do not care at all about any optimizations. Just export as usual. You then import your Collada to SL only with Weights.
This option works best for slightly modified rigs (A-Pose human rigs for example are good usage candidates) especially when you have used only Pose bone rotations for editing your rig.
Only Rotations used
Note: If all works well for you and you never run into issues then this option is most likely what you want to use now and also in the future.
Scenario 2: Import with optimized Joint offsets
This scenario applies since Avastar-2-6
In this case you enable the Use Bind Pose option as well and export. And again export as usual. You then import your Collada to SL with Weights AND with Joint Offsets. This option works best when you have mostly used rotations for your edited rig but you have also added a few translations.

Hand rig edited with translations)
This option works best when you needed (for example) to move the hands to a position that could not be reached with rotations only.
Note: This option may work for a variety of cases . It even works for tinies and giants which use the Armature scaling in Object mode. However the optimization of the Joint offsets might sometimes not create the results that you anticipated. You need to experiment a bit. There is actually another pitfall waiting for you to step in.
A nasty pitfall
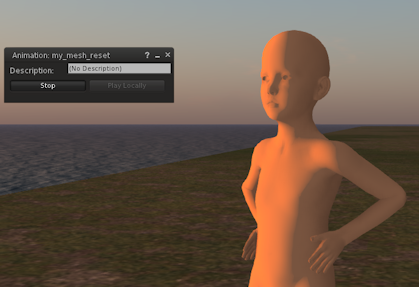
When you Use Bindpose then your meshes might initially show deformations and even distortions when you wear them. This is because SL does not know the initial locations of your bones, so it assumes they are all in regular T Pose. But this may be utterly wrong. For example in the next image you see the head is seriously deformed.

In order to avoid such distortions and deformations it may become necessary to force the SL bones into the correct place after you wear the rigged mesh and before you start your own animations on it. But we got a cure for this…
Use a restpose Animation (optional and additional)
When you enable “use Bind Pose” then it often also makes sense to apply a reset animation which enforces the Bones to be placed at their exact anticipated restpose locations. However this reset animation must run constantly as a low priority animation (priority 0) to make sure the bones always find their way back to their optimal location after any other animation has terminated.
Avastar is capable to create the Reset Animation and provide a ready made LSL script that you can add directly into your SL Rigged mesh:
Generate the Reset Animation and a Reset LSL script
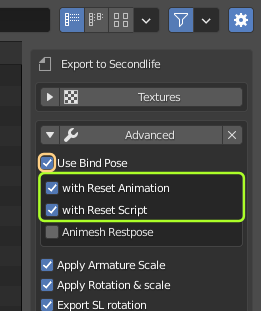
When you export to Collada, open the Advanced section and enable with Reset Animation and with Reset Script:
You will use a restpose Animation when the Bone optimizer could not place the bones correctly. This may happen when you used a custom Shape while creating your edited rig in Avastar. In that case it may be possible that SL places the bones to slightly wrong locations which can be corrected by using the Reset Animation.
Scenario 3: Leave Bind pose completely alone
You always have the option to not use Bind pose at all. You may prefer to do this when you are creating a very complicated rig that reuses the SL Bones in creative ways. Spiders and octopuses come to mind…
In such cases you actually do not want bind pose support at all. You might not even want slider support but just provide the rig as it is and unchangeable. In this case you will disable the Use Bind Pose option and always import with weights and with Joint offsets and do not care about Bind pose optimizations at all.
So, if you came here, then you are convinced that using Bind poses is what you want. If you still are in doubt what bind poses are and why you want to use them, then please read the chapter about Nuts&Bolts of Bind Poses (again). You still are OK? Then lets do it…
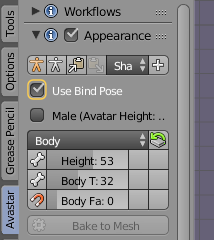
Prepare the Appearance panel
- When your Appearance Sliders are disabled, then you can not set the use bind pose options. However you still can follow this workflow for editing your rig.
- When your Appearance Sliders are enabled, then we propose that you now enable the use bind pose option. However this is not a strict requirement.
Enable Pose mode
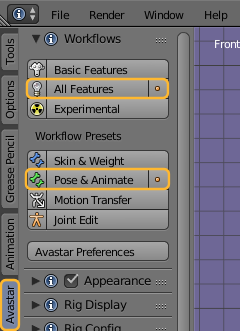
You can use the workflow presets in the Avastar Workflows Panel (see image). This makes sure that Avastar is configured correctly for the next steps:
- Select the Armature
- Open Workflows Panel
- Enable All features
- Select Pose&Animate Preset
Blender Expert...
- Select the Armature
- Set mode to Pose Mode
Pose the Rig as required
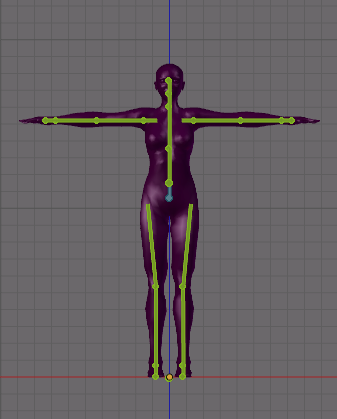
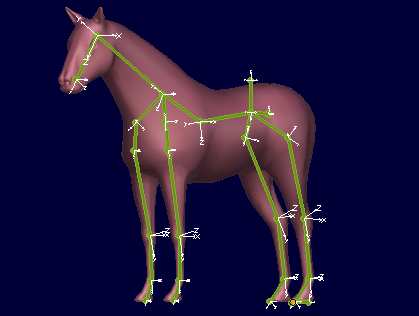
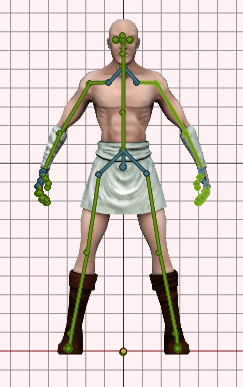
Now pose your Armature into the pose best matching to your character by using the Appearance sliders and the green animation bones(!). You can also use the gender option when you work on a male character.
Important:
- Make sure that your Mesh character (or attachment) is not yet bound to your Rig.
- Please use only the green animation bones for this step! When you use the blue and purple pose bones then you later might not get the results that you expect.
In the image aside you see how we adjusted an Avastar Rig to match a static (not bound) Mesh model. We will bind this model to the rig when the rig setup is finished (see further down)
Apply as Rest Pose
When your pose is finished (it matches perfectly to your Mesh or mesh attachment) then you are ready to define your pose as the new restpose. You do this as follows:
- Make sure your Rig is selected and in Pose mode
- Make sure your meshes are not yet bound to your Rig, see the remark below (!)
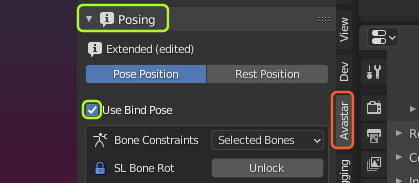
- Open the Posing Panel.
- Locate the Rig Modify Tools
- Apply as Restpose
For more details about the panel options see the Avastar Tool tips in the Posing Panel or read the pose panel documentation to get a better understanding of the options. Avastar’s default settings should be good for most situations.

Remark: In general it is advisable to prepare your Rig before you bind meshes to it. However, if your Rig has already bound meshes, then either unbind the meshes before you edit your rig, or at least make sure the Convert meshes option is enabled before you apply as restpose. If you forget to do this then the bound meshes will return back to their original restpose (T-Pose).
What happens under the hood...
When you Apply as Restpose then Avastar calculates the difference between your custom rig and a plain vanilla SL Default Rig. This difference is the Bind pose. Later when you export your work with the Use Bind Pose option enabled, the Collada exporter proceeds as follows:
- The exporter creates a plain Vanilla SL Skeleton
- Then it minimizes the number of needed Joint Offsets for your Bindpose (new since Avastar 2.6)
- And adds the optimized set of Joint Offsets to the plain vanilla rig
- Your Bindpose is also added to the export data of your Mesh(es)
Note: If your rig only used rotation when you posed your Rig, then in most cases it is sufficient to direct the SL Importer to import only with Weights. However if you have added extra joint offsets to your rig for example by editing the Rig in edit mode, then you better import your rig with weights and with joints.
Test your Rig
Please check if your rig is setup correctly. Here is a checklist:
- Make sure your rig is in its restpose (use ALT-R ALT-G ALT-S in pose mode)
- Make sure your green animation bones align perfectly to the blue Deform bones
- Make sure your Volume Bones are at the expected locations (if you intend to use fitted mesh)
- Make sure altering between “Pose Position” and “Rest Position” does not change your rig.
- Make sure your rig in Restpose matches to your character or attachment as good as possible
Bind your Mesh(es)
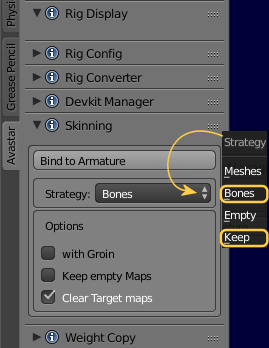
When your rig is prepared and all your checks have passed (see above) then you are ready to bind your meshes. You do this from within the Skinning panel:
- Select your Mesh(es) in Object mode
- SHIFT Select the Armature (in pose mode or object mode)
- Open the Skinning Panel
- Select the Binding strategy. Most frequently used strategies:
- use Keep if your meshes are already weighted
- use Bones if you want to get initial weights generated from the Rig
- Bind to Armature
Check your mesh(es)
Now you should test your meshes and possibly optimize your weights.
Important: You most probably have to fine adjust your weights now, regardless from where you got the weights. You will try out various poses and appearance slider combinations to make sure your Meshes behave as intended. If you see distortions then most probably your weights are not yet fully correct. This is where you need experience and a lot of patience! Be ready to take your time to get optimal results.
Export with Avastar’s Collada exporter
Select your attachments and export with the Avastar Collada exporter as usual. Avastar should automatically set the correct advanced options for the Export.
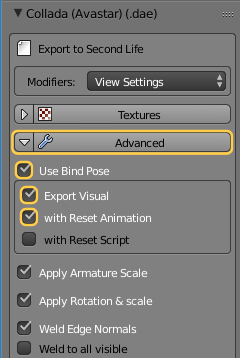
However if you are in doubt, then open the advanced section of the Collada exporter and check…
- The option Use bind Pose is enabled.
- The Option Export Visual is enabled (recommended, but optional)
- The option with Reset Anim is enabled (optional)
- The option with Reset Script is enabled (optional, only needed sometimes)
Now the Avastar Exporter knows how to convert this rig into a standard T-Pose rig without distorting the Meshes. When you have enabled the options with Reset Animation (a .anim file) and with Reset Script (a LSL script), then you get 2 additional files exported. You might need those files later when you want to wear your mesh in Secondlife, see below.
Note: Please make sure you have understood how to use Bind poses and how to import them to SL. Just as a reminder:
The Nuts&Bolts of Bind Poses
The Use Bind Pose option
When you enable the Use Bind Pose option then Avastar treats your Rig as if it has a plain vanilla (SL Default) T-posed SL rig plus an initial starting pose ( the Bind pose ). If your rig has not been edited (it is a default SL T-posed rig) then the Bind pose is the same as the rest pose. In that case enabling this option has no effect at all.
The interesting part comes when your rig is edited. Then we still are left with 2 situations:
Situation 1: Bind pose with Rotation-only
You started with the SL T-posed rig and created a new pose by only using rotations. This is a Simple rotation-only bind pose. Note that actually this rig has a lot of Joint offsets on the arms and on the legs (indicated by blue dotted lines in the image). However since the entire transformation from the T-Pose to the A-Pose can be described with one clear set of rotations, there is good news here:
This sort of Rotation-only rig can be transferred to SL without the need of Joint Offsets. This is important as we will see in a few moments.
Most common examples: A-posed rigs.
Situation 2: Bind pose with Rotation and Translation
You started with the SL T-posed rig as explained in the previous chapter (Bind pose with Rotation-only). But you then created your new rig by editing the bone locations. This editing adds translation to the joints and therefore now you have created a transloc bind pose.
In this case the differences from the T-Posed rig can be described with combinations of Rotations and translations. However now there are many different ways how this new rig can be described:
You could use translations only (as we did with older versions of Avastar) or you can use combinations of rotations and translations in order to minimze the amount of needed joint offsets (which we do since Avastar-2.6)
Again, we will explain in a moment why it is desirable to have as few Joint offsets in the rig as possible. Please keep patient.
Most common examples: Any sort of non humans (creatures)
The Joint Offsets have been indicated with blue dotted lines
A serious caveat…
Regardless of what kind of bind pose you have in your rig, Avastar will calculate the optimal Rig Data that matches perfectly to your working rig and has as few joint offsets as possible for your particular case. The calculated optimal rig is then exported to Collada and finally propagated into the SL importer.
However, while this sounds great you must know that there is a roadblock. Here we are at the heart of all confusion and why i repeatedly mentioned above that it is so desirable to have as few joint offsets as possible:
As soon as a bone needs a joint offset to get in place, its related appearance sliders change their behavior. Technically the bone no longer follows Translations (shifts in location) as imposed by the sliders. Visually the bone no longer moves. But…
Note: Sliders which only impose bone scaling still work as before. But sliders which impose Bone movement (translation) no longer apply. And this is what makes the behavior of the Appearance sliders so shady and so complicated to understand.
Sidenote: You ever wondered why sometimes the Avastar Appearance sliders turn red? The red mark indicates: Bone shifting does no longer work for one or more bones affected by this slider.
Tip: Click on the icon on the left side of the appearance slider to see which bones are affected. Bones with a red cross have joint offsets.
This issue affects mostly face expressions and hand gestures. For example when you added joint offsets to the Eye bones, then the Eye distance slider no longer works. That is why you want to have only as few Joint Offsets as possible!
An example …
Sometimes it is inevitable to edit your Rig beyond simple rotations. This happens for example when you need to adjust the hand rig (see images) and the face rig for your custom character. In this case every edit results in additional Joint offsets for the edited bone itself plus all its children!
For the hand in the example image we introduce 5 joint offsets for the first finger bones. But due to the nature of how Joint Offsets are implemented in SL those 5 translations of the first finger bones make it necessary that all the child bones also get joint offsets. So we end up with 15 joint offsets for each hand!
But we got an idea…
And invented a convenient solution
We have added an optimization to the Collada exporter which automatically minimizes the number of joint edits. For example the hand above only needs translation on the first finger bones, while all other bones can be handled with relative rotation and no need to add relative offsets. And thanks to the way how Bind poses work we can get away with only 5 joint offsets for the first finger bones.
The good news is: Our optimizer runs silently in the background, so you actually do not need to worry about how this is done. It just works. Here are some possible usage scenarios:
Scenario 1: Use Bind pose as you always did
This scenario applies also to all previous Avastar-2 versions as well:
In this case you enable the Use Bind Pose option and do not care at all about any optimizations. Just export as usual. You then import your Collada to SL only with Weights.
This option works best for slightly modified rigs (A-Pose human rigs for example are good usage candidates) especially when you have used only Pose bone rotations for editing your rig.
Only Rotations used
Note: If all works well for you and you never run into issues then this option is most likely what you want to use now and also in the future.
Scenario 2: Import with optimized Joint offsets
This scenario applies since Avastar-2-6
In this case you enable the Use Bind Pose option as well and export. And again export as usual. You then import your Collada to SL with Weights AND with Joint Offsets. This option works best when you have mostly used rotations for your edited rig but you have also added a few translations.
Hand rig edited with translations)
This option works best when you needed (for example) to move the hands to a position that could not be reached with rotations only.
Note: This option may work for a variety of cases . It even works for tinies and giants which use the Armature scaling in Object mode. However the optimization of the Joint offsets might sometimes not create the results that you anticipated. You need to experiment a bit. There is actually another pitfall waiting for you to step in.
A nasty pitfall
When you Use Bindpose then your meshes might initially show deformations and even distortions when you wear them. This is because SL does not know the initial locations of your bones, so it assumes they are all in regular T Pose. But this may be utterly wrong. For example in the next image you see the head is seriously deformed.
In order to avoid such distortions and deformations it may become necessary to force the SL bones into the correct place after you wear the rigged mesh and before you start your own animations on it. But we got a cure for this…
Use a restpose Animation (optional and additional)
When you enable “use Bind Pose” then it often also makes sense to apply a reset animation which enforces the Bones to be placed at their exact anticipated restpose locations. However this reset animation must run constantly as a low priority animation (priority 0) to make sure the bones always find their way back to their optimal location after any other animation has terminated.
Avastar is capable to create the Reset Animation and provide a ready made LSL script that you can add directly into your SL Rigged mesh:
Generate the Reset Animation and a Reset LSL script
When you export to Collada, open the Advanced section and enable with Reset Animation and with Reset Script:
You will use a restpose Animation when the Bone optimizer could not place the bones correctly. This may happen when you used a custom Shape while creating your edited rig in Avastar. In that case it may be possible that SL places the bones to slightly wrong locations which can be corrected by using the Reset Animation.
Scenario 3: Leave Bind pose completely alone
You always have the option to not use Bind pose at all. You may prefer to do this when you are creating a very complicated rig that reuses the SL Bones in creative ways. Spiders and octopuses come to mind…
In such cases you actually do not want bind pose support at all. You might not even want slider support but just provide the rig as it is and unchangeable. In this case you will disable the Use Bind Pose option and always import with weights and with Joint offsets and do not care about Bind pose optimizations at all.
A brief Import workflow
1.) Import the Model (.dae):
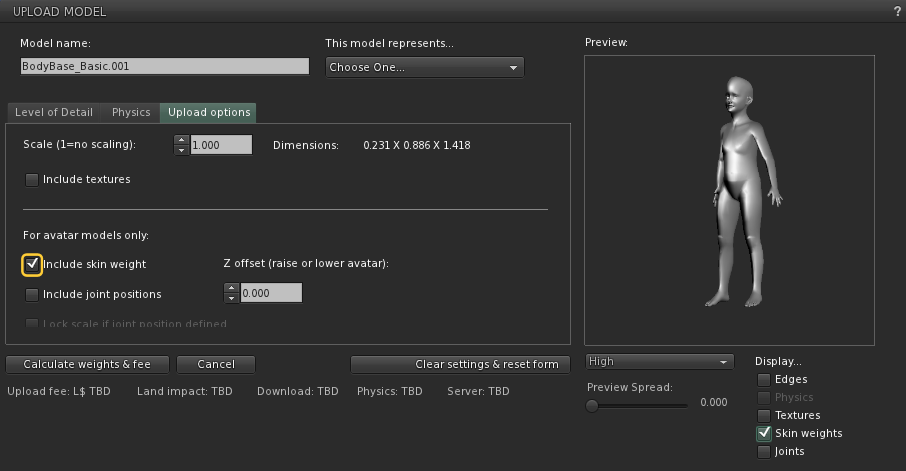
When you import your Bind Pose mesh (the .dae file) to Secondlife then make sure that you enable include skin weight in the upload options tab.
Important:
- Please make sure the option include joint positions is disabled !!!
- If you have massively edited your Rig in Blender then your imported Mesh might look deformed when you wear it! This is where the reset animation comes into play (see below)
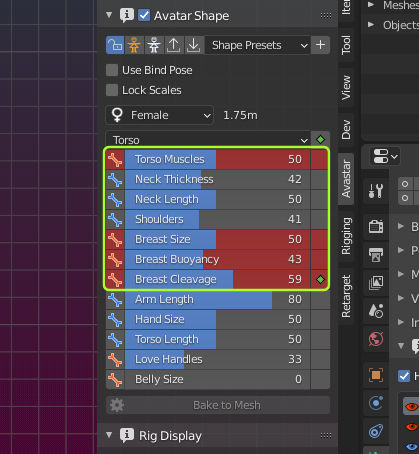
2.) Take care of your Avatar Shape (Appearance)
You might have modeled your Mesh with appearance sliders in Blender. In that case you must make sure that you wear the corresponding Appearance shape in SL as well! Otherwise you may not see exactly what you modeled in Blender.
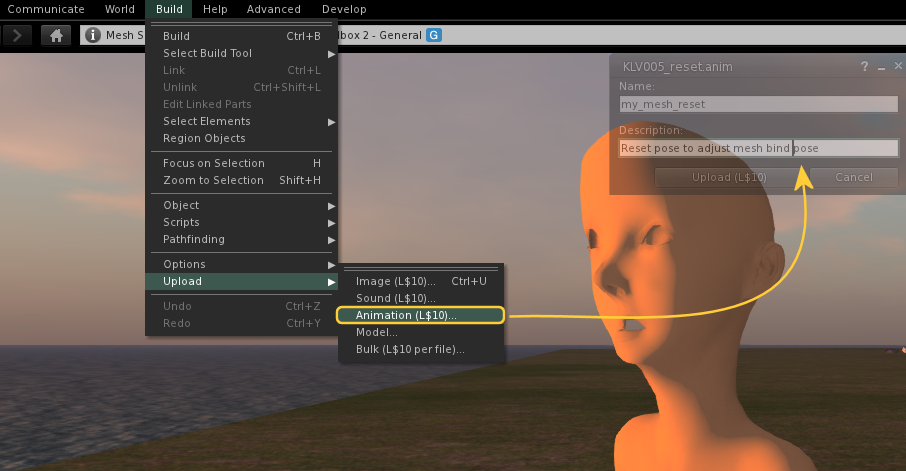
3.) Import the reset animation (optional)
Sometimes, especially when your rig has been edited a lot (for tinies, giants, creatures) you may find that your mesh is somewhat oddly deformed in the SL Preview window. This does not necessarily happen, for example when you import an A Posed Mesh where only the arms and legs have been rotated, then you will not see visible deformations.
But if you see unwanted deformations, then you may want to also import the Reset Animation (.anim file) for your mesh.
4.) Test your reset animation
That is easy: Just run the animation. The animation is a single frame loop with priority 0 (zero) which – once started – moves all bones into their Bindpose, unless the bones are moved by another animation with higher priority. So you should see exactly what you see in Blender as soon as the reset animation runs. You even can stop the animation and keep your shape clean (no deformations).
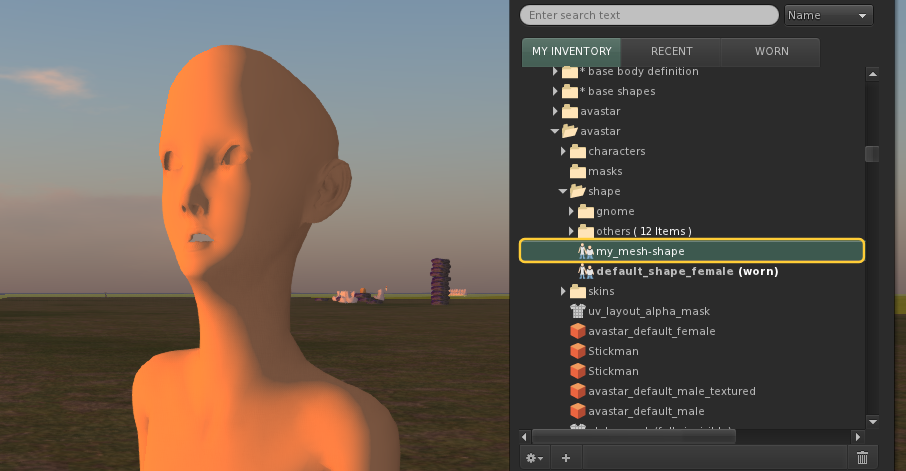
However you must do one additional step in order to get your shape also correct for all other users nearby: You need to add the reset animation to your mesh inventory and call it from a Reset Script…

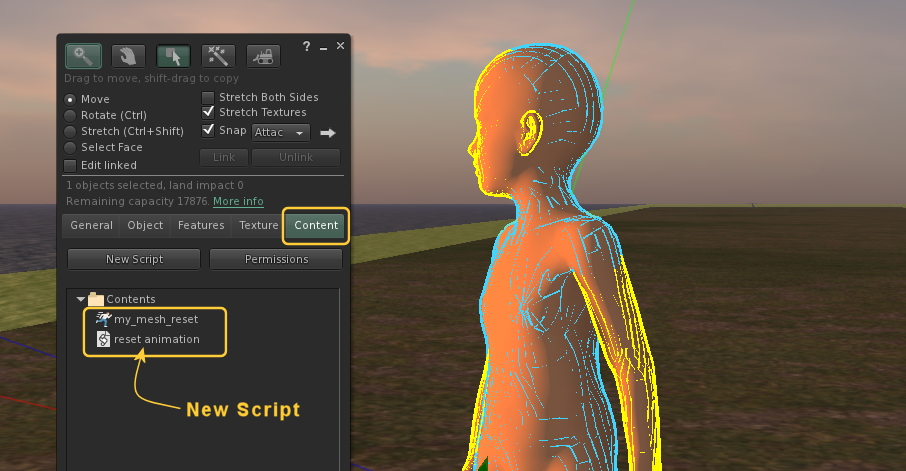
5.) Setup the Mesh Inventory
- Wear the Mesh (or rezz it on ground)
- Edit the Mesh (Content tab)
- Drag the reset animation into the inventory
- Create a new Script (name it to your likes)
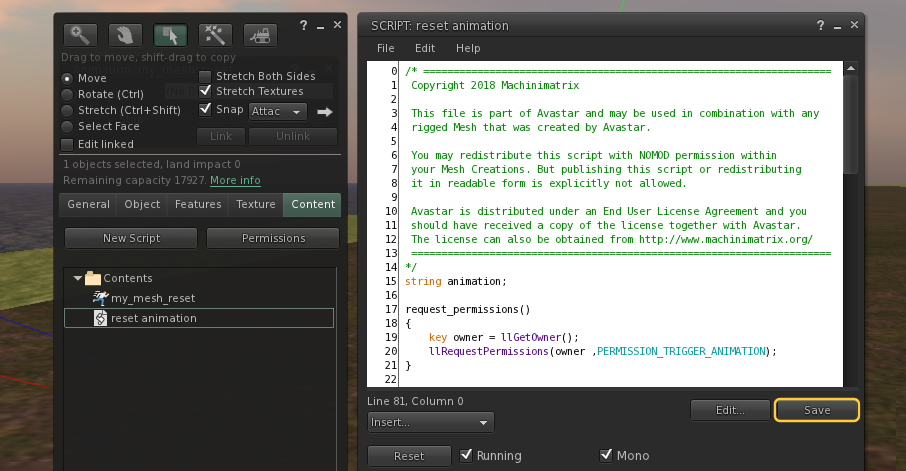
6.) Setup the Script
The Script has been generated by Avastar in the very first step above when you enabled with Reset Script during export. If necessary just export your mesh again with that option enabled.
Now open the generated LSL Script (the file is named like your .dae file but with the LSL extension) and cut/paste the file content into the reset animation script in the Secondlife Viewer. the Script has ~80 lines of code and comments.
Final words:
As soon as you have saved the script the reset animation is played constantly in the background. So you mesh should move all its rigged bones into the restpose. However as soon as you animate your mesh – for example by starting the default walk animation, you see that your mesh behaves nicely and as expected. If your mesh starts looking weird again (which should never happen) you always can get it back into form by resetting the reset animation.
When using Bind Pose fails utterly
When you use bind pose then you can imagine your model will be bent into a T-Pose upon upload. To be clear: This is not exactly what happens, but this image is good enough to explain where things start going wrong. Lets make an example:

Custom Rig in Blender
(1) In Blender you matched your bind pose perfectly to your own model.

Same Rig bent into T-Pose
(2) In SL we use the original T-Pose rig. Hence the character is forced into the T-Pose which might make your model look odd and distorted.
(3) On top of this the SL viewer applies the default gestures (stand pose, walk, etc.) to the T posed character. And consequently your model keeps the distortions…
Note: in this case the distortions happen on the chest. This is where the Skeleton was changed most from how it is setup in T Pose.
How to fix this problem
All you need to do is adding poses (single frame animations) and gestures to replace the default animations. Then you finally get back what you expected.
However as soon as the poses terminate your mesh will fall back into the distorted restpose. So you need to use an AO (animation overrider) to permanently apply your poses to your mesh.
Below you see how you can make a single frame stand pose:
How to create a Single Frame Animation
- Select the armature in Pose mode
- Create a static pose or a stand animation to your likes
- Keyframe using Locrot
- Export the animation
You maybe want to add an animation loop as well.

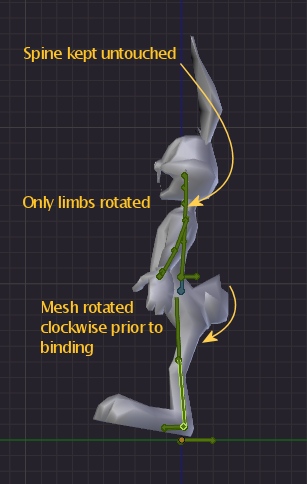
How to avoid this problem all together
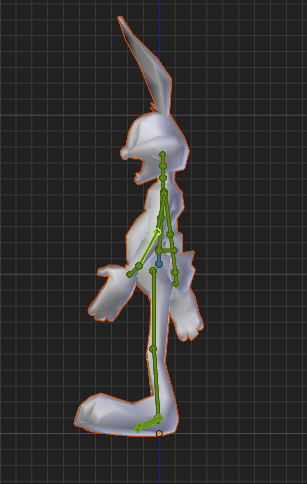
Atually in SL you want your meshes to behave just like any other T posed attachment does. So you need to provide a compatible rig. Here are some rules of thumb:
- Avoid Bone translation at any costs (only use rotations!)
- Do not rotate the Spine bones (from mPelvis up to mChest)
- If possible adjust only the mHip bones and the mShoulder bones
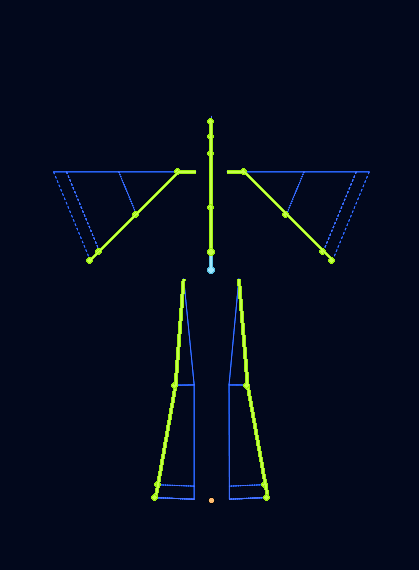
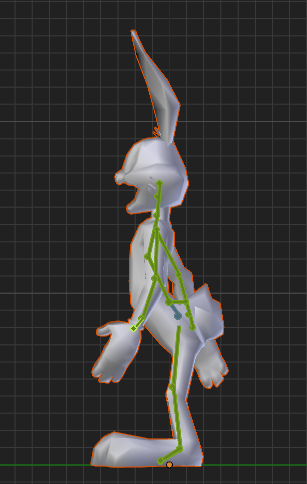
In the images below you see a compatible rig for this model. It is not optimal but at least it will work with the standard Avatar animations.
Custom Rig mostly compatible to the SL T-Pose Rig

Same Custom Rig in Front View.
Summary
Bind to Pose in general is very capable instrument for your rigging. However it works best if the modifications on the Rig are small. Ideal candidates for Bind to Pose are A posed rigs. For anything else it might be easier to Custom Rigs with joint offsets.
Gotchas (things you never wanted to know)
Unexpected rotations on the feet … to be finished