The Avastar Meshes can not be modified. As soon as you try to do this, you will get very bad distortions. This is due to how Shape keys are handled in Blender.
The freeze either creates static meshes from your rigged meshes, or modifiable versions of your selected meshes. The tool basically removes all shape keys and all Avastar control data.
The Freeze Tool is used in following situations:
Usage
- Ensure Blender is in Object Mode.
- Select all parts which you want to freeze.
- Set the freeze options (see below)
- Freeze Selected.
Note: You can apply Freeze Shape to any mesh object (unrelated to Avastar). This is practical for example when you want to apply all shape keys.
Details
Select all parts of the Avastar meshes which you want to use for your own character.
- Then set the Freeze Options
- And finally freeze Selected

Note: The frozen Meshes no longer react in the exact same way to the Avastar sliders as the original Avastar character does. However, the meshes behave exactly in the same way as they will behave when imported into SL, OpenSim or other compatible virtual environments.
What you should know
- When you select to Keep the Original, then the original mesh and your frozen mesh will overlap and you might not be able to see that there are actually 2 meshes now.
- When you select to Delete the Original, then the Original Avastar mesh is fully replaced by your frozen version.
- When you select to Hide the original, then the Original Avastar mesh will be hidden from view, then you only see the frozen version.
- when you enable as static mesh then your frozen mesh will be detached from the armature and it will end up as a simple non rigged static mesh in whatever pose in which you placed it.
- When you enable Remove Weight Groups then all weight groups of the frozen mesh will be deleted and you end up with a static non rigged mesh without any weights associated to it. (A naked model so to say)
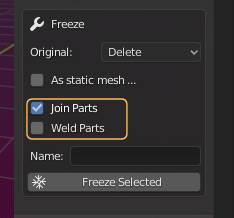
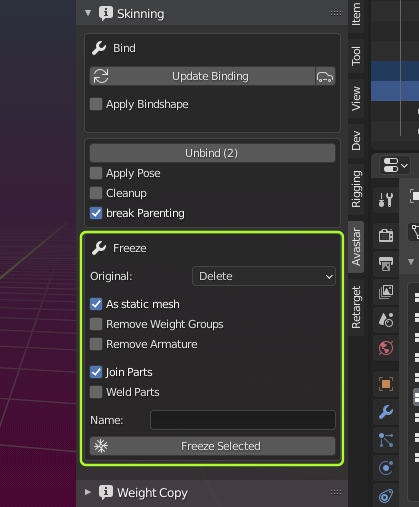
The Tool Options
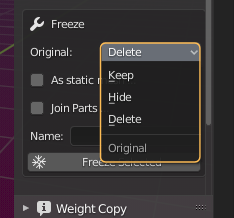
Original:
This option defines what shall happen with the original Mesh(es) (those which you have selected in Object mode)
Values:
- Keep: The Original Mesh is kept and remains visible. Thus the original and the new copy are displayed at the same time
- Hide: The Original mesh is kept but gets hidden. You can always unhide hidden objects with the keyboard shortcut ALT + H
- Delete: The Original Mesh is deleted.
As static Mesh:
If the original Mesh was rigged to an armature, then -by default- the frozen mesh Copies keep rigged as well. But sometimes you want to get a complete static statue with no animation information at all. In this case you will select this option.
Additional options:
- Remove Weight Groups: The frozen object contains no animation data (noe weight maps). This option is rarely used, but very handy when needed
- Remove Armature: After freezing the entire Armature with all its children gets removed from the Scene.
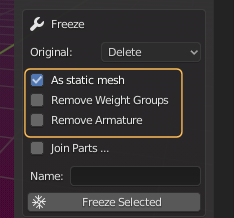
Join Parts:
If you have selected 2 or more objects, then the Join Parts option appears. The selected meshes are merged into one mesh object.
Additional option:
- Weld Parts: All duplicate vertices along the adjacent edges of the joined parts are merged. Seems are preserved.