Sometimes (actually almost always) it is not possible to use the Fitting Sliders on an entire Object with the weights given from the mBones, mostly because the original weighting for the mBones was simply not made for the fitted mesh application.
For this case we support the partial fitting of single vertices or groups of vertices. This document explains how to work with this feature. We use the Sleeveless T-Shirt shown in the image. This shirt uses the weight maps of the SL Default Avatar with a few optimizations. We start with it having no Fitted Mesh weight maps.
Preparing for fitting
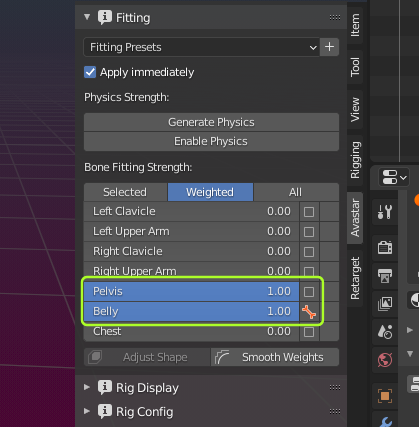
Make sure that the armature is in Pose mode and the Mesh is in weight Paint mode. The mesh is the active object. Now we setup the sliders as follows:
- Shape Editor – Belly Shape Slider: 100 (max)
- Fitted Mesh Editor – Belly Slider: 1.0 (max)
- Fitted Mesh Editor – Pelvis Slider: 1.0 (max)
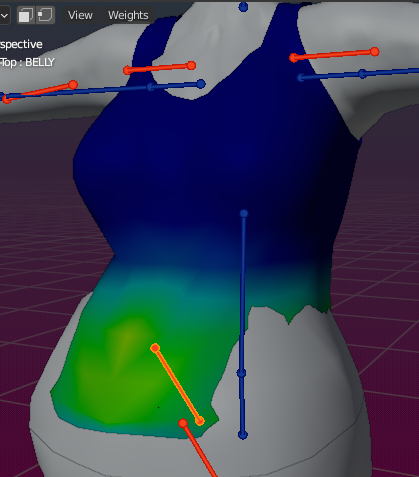
Note: The Weights partially move the T-Shirt completely out of shape, see the red zone on the belly.

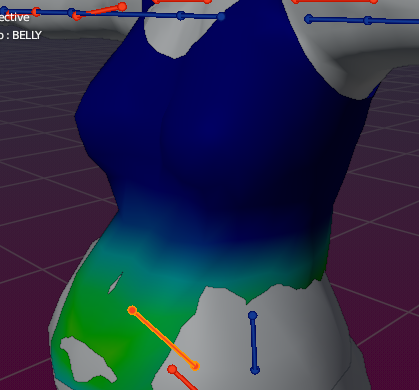
Now lets take a closer look at the Fitting sliders. We see two bone pairs:
- mTorso and BELLY
- mPelvis and PELVIS
Important: Weight is distributed between the bones of each pair. In other words: there is no weight added or removed from a Bone pair.
Also all bones which we do not need within this document are hidden.
Prepare for Fitting vertices
Make sure the Orange bone is shown in the Belly Slider (see image above). Click the check mark once or twice to toggle between the blue and orange bone.
- Enable vertex Mask Select mode
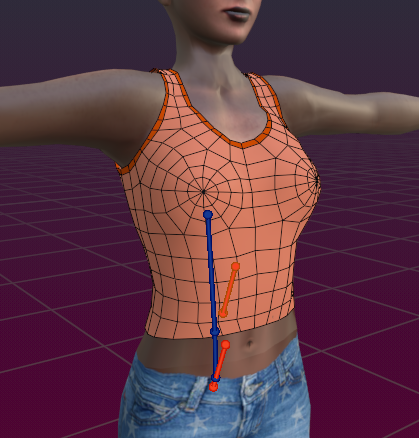
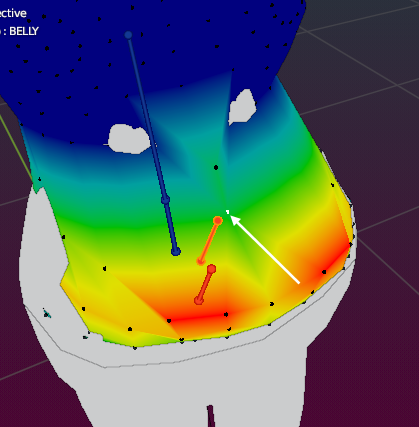
- Select the center front vertex of the T-Shirt, (see image)
Remember: Selecting a single vertex is done with CTRL – LMB (Left Mouse Button)
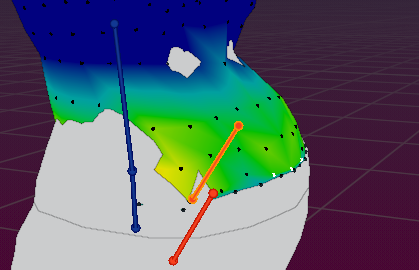
Now move the Belly slider down until the vertex touches the underlying Avastar upper body then move the slider a bit up again so that the Avastar mesh is still not visible. The Belly Slider value is about o.68 for me.
The white arrow in the image shows the path that the vertex has followed while the slider was moved.
We could continue this procedure by selecting one vertex at a time then adjusting the Fitted Mesh sliders as necessary until we have our mesh perfectly weighted. But we have two more options.
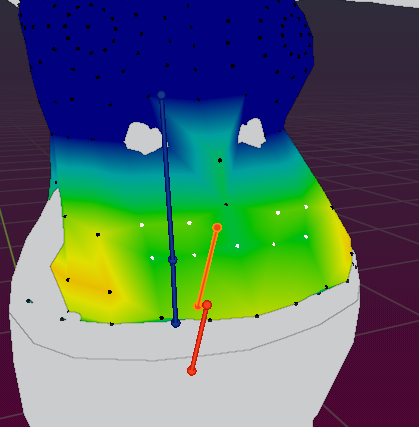
First we can select multiple vertices and apply weight to them all together. Here i have selected 9 vertices on the T-Shirt front and moved the Belly Slider down to about 0.75
Remember: Select multiple vertices with the rubber band selector (B …) ro right clicking each vertex while holding down CTRL and SHIFT
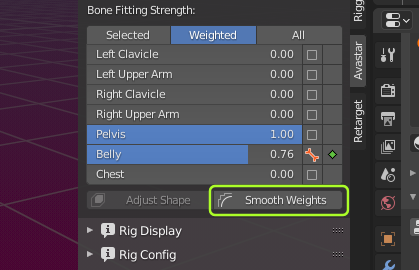
Smooth By weights
The second option is to use the function Smooth by Weight.
You find this function at the bottom of the Fitting Slider section. Use it as follows:
- Select a part of the mesh that shows a rough surface
- Click Smooth Weights one or a few times and watch how the selected vertices move around.
Hint: In this example you will need to not only modify the Belly Slider but also the Pelvis slider. And some vertices might not at all want to move into good places.
Important: This function does not touch the mesh itself. It only operates on the weights by trying to smooth the mesh surface very similar to what Blender’s vertex smooth tool does!
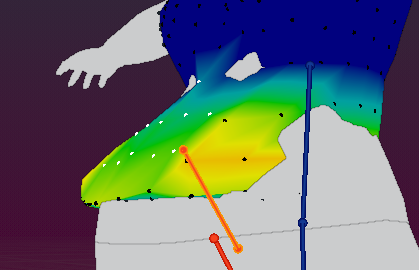
After some fiddling with the tools we end up with something like in the image aside. This is not perfect but clearly an improvement over the initial situation.
But we are not yet at the end of our options.
Bending and breaking the rules
Sometimes it is inevitable to break the rules or bend them to some extend. And our rule so far is to not add extra weight but only move the weight between the bones of the fitted mesh bone pairs to avoid any form of distortions on the mesh.
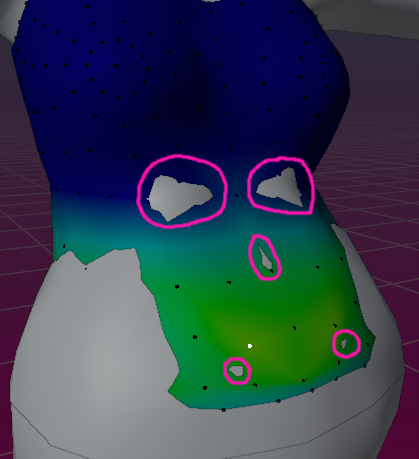
However, in the marked areas (see image) you probably are curious to experiment with additional weights. I will show you how you can do this in the following.
But beware, when you manually place weight on such an area, the weight is automatically taken away from all other bones that control this area.
Further down i will show you another technique that might be the better option, but in any case you have to carefully examine if your additional weights eventually destroy your shape. And to be honest, we can not at all tell what will happen. You must do your experiments and work out what works and what not for your case!
The waist
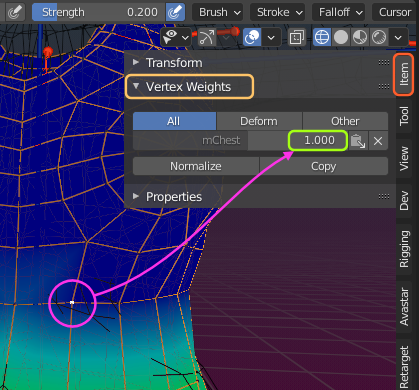
To understand why the waist does not work nicely we need to take a look at the affected vertices. Lets select one of the vertices on the waist and then inspect the Vertex Weights for this vertex (see image).
Tip: In order to find the vertex i switched temporary to wireframe mode ( ‘Z’ -> Wireframe)
We see the vertex is only weighted to the mChest bone!
Now lets see which bones the Belly Slider actually influences. we can find this in the Avatar Shape editor by locating the Belly Slider (in Torso section) and click on the orange bone on the left side.
Aha! This slider only affects BELLY and PELVIS. so no wonder that this region just stays where it is when you move the Belly Slider upwards. So, since this area does not move with the slider, it eventually gets covered by the System mesh, hence the grey spot there.

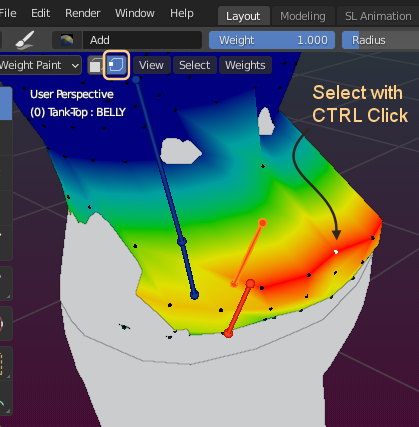
Now lets very carefully add a tiny bit of Belly weight to this vertex and its neighbors.
i used a weight Paint brush with following settings:
- Brush type: Add
- Weight: 0.1
- Radius: 50px
- Strength: 0.2
i needed 6 strokes to get the mesh into shape. for checking the effect of each stroke please use ALT-Q as explained below.
Using ALT-Q
Important: When you add weight to the weight maps then the anticipated changes in the mesh do not show up immediately. Instead Avastar keeps the meshes as they are until it needs to do a full rebind. This is an ugly detail that you ought to know! However, Avastar has defined a keyboard shortcut for you, that is:
ALT-Q
As soon as you type this shortcut on the keyboard, Avastar does the necessary shape adjustments for you. And so you can immediately see how your additional weight influences the shape.
Check the results
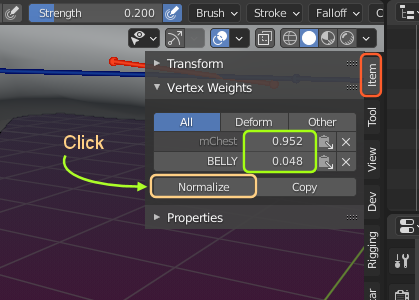
Lets again examine the weight maps of the vertex from further above. Please click the Normalize button so that we can see the true weight distribution.
in this case the addition of weight worked nicely because we actually bury only very little weight (0.048) from mChest which has plenty of weight on it. So most probably the shape of our model will not be distorted, at least not visibly.
But beware! its not always like this. In any case please be very careful when you add weight!
We can proceed with the remaining bad parts on the stomach. However when we get to the belly region (the remaining 2 spots close to the lower edge of the Tank-Top, we no longer can get away with only adding weight to the BELLY.
We have to also add some weight to the PELVIS now to get the final result.
At the end we could fix the front part of the mesh with very little extra weight on the Belly weight map.