Pose Bone Constraints settings
The Pose Mode is typically used for creating poses and animations. This panel provides customization of Bone Constraints. More on this see further down.
Rig Modify Tools in Pose mode
The Pose Mode actually can also be used as tool for editing the Rig. The necessary extra functionality is provided in the Rig Modify Tools section (See the operators As Bindpose and With Joints)
Pose Bone Constraints
Pose Bone Constraints
You normally can not tear an Animation Bone out of its bone chain. Also normally the SL Bones (the blue Deform bones) are fully controlled by the green Animation bones. Finally, the Volume Bones can not be moved away from their parent bones.
This is all because we want to preserve the integrity of the Skeleton. We achieve this by using Bone Constraints.
However, sometimes you want to get more freedom over the bones, especially when you work with non human rigs, then you may want to use individual bones for very different purposes and not necessarily in the way the original Rig has been set up. So we added a tool for controlling the Constraints.
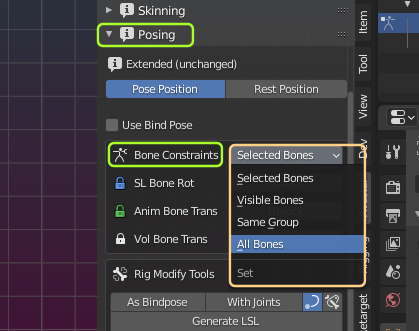
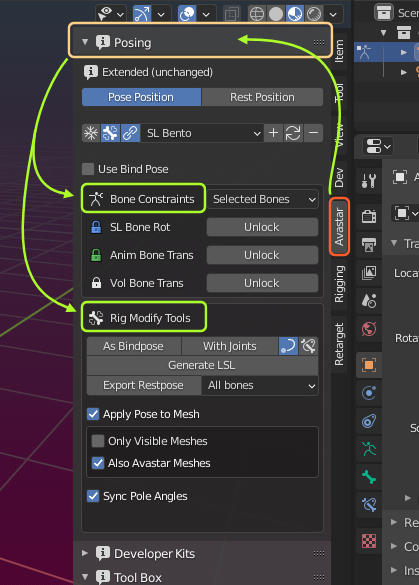
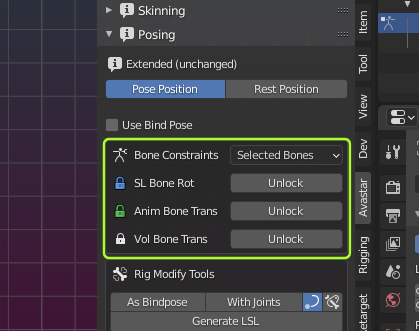
Bone Constraints (Selection)
The Scope of the operation. You can limit the scope to one single Bone, a group of selected bones, or even all Bones in the Rig. We allow to control 3 sets of constraints…
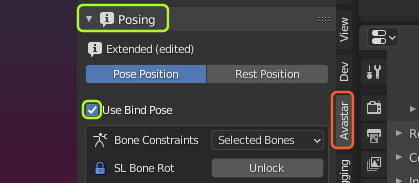
SL Bone Rot (Lock/Unlock)
The Deform Bone rotations are normally fully controlled by the Animation bones. But this operator lets you Unlock the rotation constraints.
After unlocking one or more Animation bones, you can rotate the deform bones separately from the animation bones.
But beware: You want this only(!) when you are testing the Bone Weights. Or when you are creating a Bind Pose. But you never use this for animation purposes!
Unlocking SL Bone rotation actually disables the animation bones from animating the Model.
Anim Bone Trans (Lock/Unlock)
The Animation bones are normally tied together so that you can not move them separately. Furthermore all animation bones without connected bone parents can normally not be moved around. This is good for keeping the skeleton structure intact while posing. This tool unlocks the parent connection so that animation bones can be placed without affecting the placement of their parents.
Note: The unlocking only works relative to bone parents. So if you unlock only one single animation bone then you can move it separately from its parent bone while all its children are still connected and move along with it.
Note: You may want this mode especially when you do Facial animations where separate bone movements are sometimes needed. Or when you want to achieve special animation effects on your model.
Important: When you use Bone translation in your animations then you also must tell the Animation exporter to export with Translations.
Vol Bone Trans (Lock/Unlock, very experimental)
We are not sure if the animation of Volume Bones is officially supported. However we added this option to the set. So when you Unlock Vol Bone Trans, then you can place the Volume bones freely.
Some restrictions apply:
- The Bone rotation is still inherited from the bone parents. Also the relative Movement of the parent bones is still propagated to the Volume bones. We need feedback to understand what animators expect to get here.

Rig Modify Tools in Pose mode
SL allows to modify the SL Rig by overriding the joint positions of the rig. Avastar supports the Rig editing as well, basically by switching the Armature to Edit Mode and then edit the bones by moving them around as needed.
Why use Pose mode for Rig editing?
Editing the Rig in Edit mode
Bones often depend logically on each other. For example Volume bones (Orange in Pose Mode) are normally clamped to SL Deform bones (blue/purple in Pose Mode). You want to move them together. Furthermore we have bone chains where children Joints are connected to their parent bone tails. You do not want to break this unintentionally.
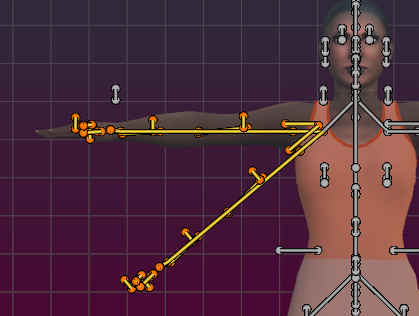
Lets take a look at an example: Creating an A posed arm in Edit mode.
This is actually a lot more complicated than it looks on first glance when you use the Rig Editor. You always have to take care that you move all children of a modified bone as well. In this case rotating the shoulder bone makes it necessary to rotate all children accordingly.
Just figure for example what happens when you forget to move the Collision volumes or the attachment points along with the arm bones…
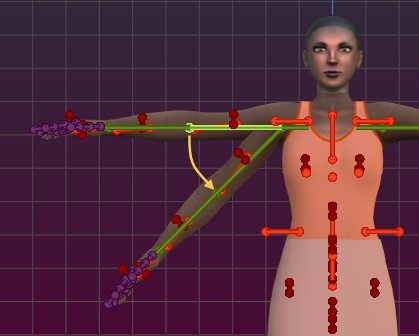
Hint: The trick is to:
- enable visibility for all bones,
- then select the entire arm,
- and make sure that the collar bone is selected last.
- Now you can select Pivot translation relative to the active bone (the last selected bone)
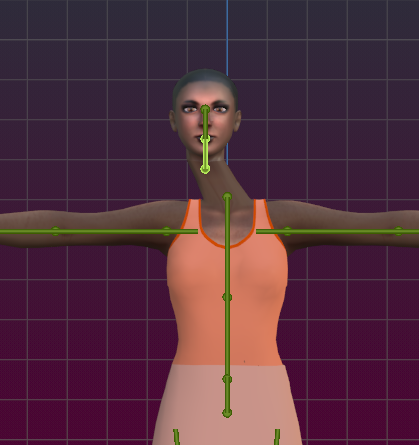
Posing the Rig in Pose mode
When we work in Pose mode, then for example rotating the Shoulder bone will automatically also move and rotate all its children into place. Thus creating an A pose in pose mode boils down to rotating the shoulder bones.
Posing just the Shoulder bone is much easier since all children follow automatically
But how can you apply your pose to the Rig?
Blender expert answer: you can use Pose -> Apply -> Apply Pose as Restpose but then you also have to do some manual tweaking (store joint edits) to get Avastar to work with the new rig.
Don’t worry, we have a one click solution for you. read on…
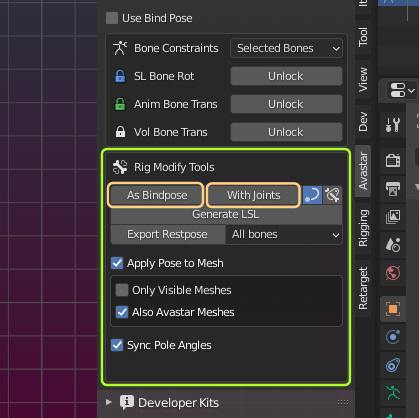
The main feature in the Rig Modify Tools for Posing are the two operators As Bindpose and With Joints which both bake the current pose into the Rig as if it had been edited. And it adds all necessary extra data so that Avastar can work nicely with the modified Rig.
Apply as Bindpose/ Apply with Joints
The two Operators Apply As Bindpose and Apply with Joints both bake the current pose into the Rig. So after applying the operator all posed bones now define the new Restpose.
Important:
- When you call the As Bindpose operator, then the use bind pose option (see further up) will be set automatically.
- When you call the With Joints operator, then the use Bind Pose option will be unset.
Beware of Pitfalls
Bind Pose freezes Avastar mesh
When you Convert a Rig to Bind pose then all assigned meshes are frozen (See freeze option). This includes the Avastar meshes. So if your Rig has Avastar Meshes then those meshes will become regular custom meshes (They no longer use shape keys). But this implies the character no longer reacts to the sliders like the SL system character does. In summary:
Note: When all you want to do is fitted Mesh for the system character, then please do not use the Convert to Bind Pose option!
Not all custom rigs are suitable for Bind Pose
Bind poses work only without problems if they have been created from the original SL Rig by only rotating the bones. If the bones have been moved (translation) then we have to handle the rig in a different way (see further down). Please check with your development kit provider if they have only used Bind Pose or if they have actually edited the skeleton.
As Bindpose operator
The Rig is treated as if its Rest pose is the Secondlife Default T-Pose with an additional pose (the Bind pose) super imposed to it. To get this to Secondlife you only have to import with Weights. This corresponds to the Use Bind Pose option described further up.
- When you click on As Bind pose
- Then your Rig remains in T-pose plus
- the current pose is superimposed to the Rig.
- You later import with Weights
Note: Technically your rig has changed its rest pose. This is so, only because Blender does not support Bind Poses at all. So, Avastar adds Bind Pose support on top of Blender.
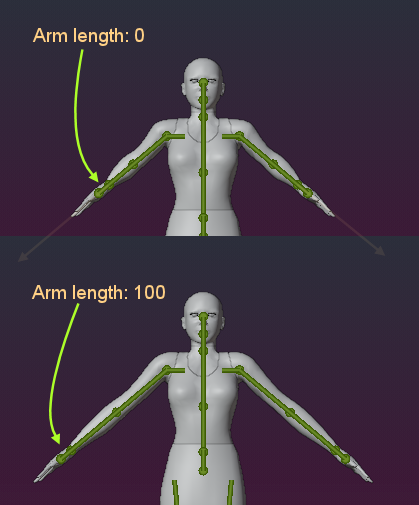
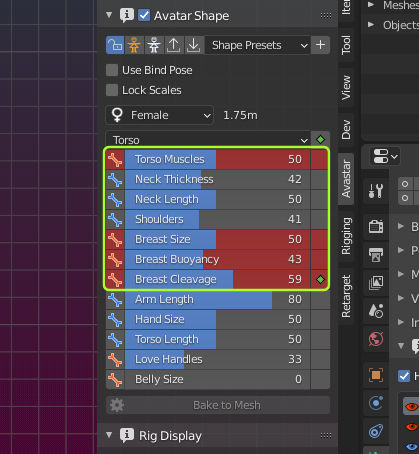
Hint: When using Bind pose, then the arm length Shape Slider changes the arm length along the arm long axis regardless to where the arms points.
Proof:
- Open the Shape Editor
- Select the Torso Section
- Move the Arm Length from 0 to 100 and watch how the arms behave when Use Bind Pose is enabled.
With Joints operator
The current pose is treated as the new Rest pose of the rig. So to get this to Secondlife you must import the Rig with Joint Positions.
- When you click on With Joints
- Then your current pose is baked into the Rig
- And your current Rig becomes the new Rest pose.
- You later import with Weights and with Joint Positions

Hint: When using with Joints, then the arm length changes only along the x-axis!
Proof:
- Open the Shape Editor
- Select the Torso Section
- Move the Arm Length from 0 to 100 and watch how the arms behave when Use Bind Pose is disabled

A word of Warning
If you try to enforce to use a restpose different from a Developer kit, you always will end up with mismatched clothes!
Generate LSL operator
You may occasionally see that your Rig gets distorted after you wear your Mesh Body in SL. This happens especially when you use Bindpose. But this is actually not a bug, neither in SL nor in Avastar. You only have to make sure the Skeleton is initialized properly. This is where the Generate LSL Operator comes into play.
The operator generates a Rest pose Adjustment LSL Script for usage in Secondlife. As noted above this script is only useful when you also use As Bindpose. The script takes care to move the Joints into their rest position. Once the script is started, all distortions should be fixed.
- Click Generate LSL (The script is placed into the Text Paste buffer)
- Go to Secondlife and wear the rigged mesh
- Open the Mesh inventory
- Add a new LSL script to your model in SL
- In the LSL Editor Paste the text buffer (the script is now in your LSL editor)
- Save and enable the Script
- Add the generated restpose to Inventory (see below)

Export Restpose operator
When you use Bind Pose then depending on the Bind pose you may need to fix your rig in Secondlife by applying a Rest pose Reset Script to it (see above). The Rest pose can be conveniently generated along with the Export of your mesh (see Avastar Collada Exporter, advanced options) or you can generate the Rest pose from here:
- Click Export Restpose (all Bones is normally what you want)
- Now the Rest pose has been generated into the current frame on the timeline
- Open the Animation exporter
- Export the single frame animation in .anim format
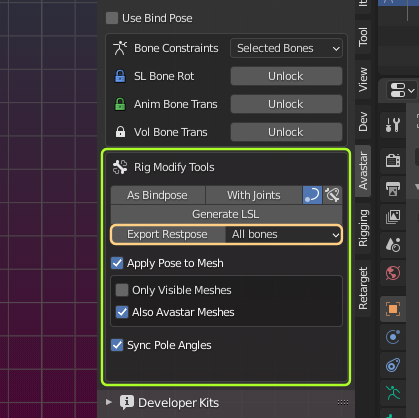
The further options
- Apply Pose to Mesh: When this option is enabled, then the new Rest pose is also applied to the bound meshes. Otherwise the meshes fall back to their previous Rest pose (typically the T-pose) and no longer match to the new Rest pose.
- Only Visible Meshes: The conversion affects only the visible meshes
- Also Avastar Meshes: The conversion also affects the Avastar Meshes (they will be converted to custom mesh items using the new Rest pose)
- Sync Pole Angles: Take care to adjust the IK Rig for the legs and arms according to the new Rest pose
Note: Normally you would keep the options with their default values. Deviations form the defaults are only rarely necessary.
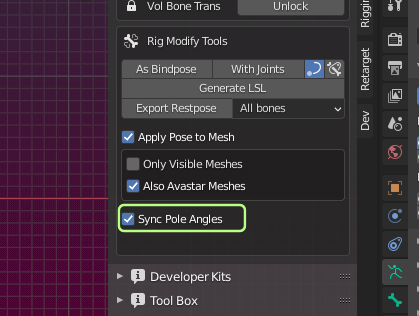
More about Sync Pole Angles
Sync Pole Angles
Pole Angles become important when you work with IK Targets. It is important to have the Pole angles adjusted correctly because otherwise you will see remarkable changes of your pose when you switch between FK and IK mode.
Normally you want to keep this Option enabled.
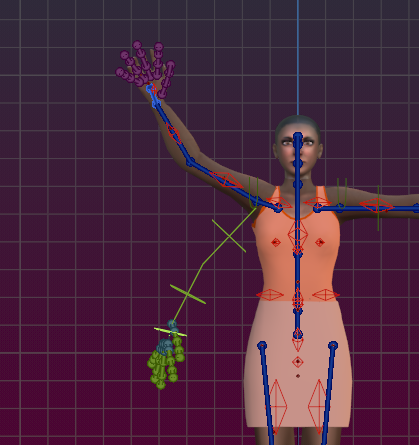
So what is the Pole Angle? ...
Now look on the other image. The green (selected) bone is the lower arm. This Bone can possibly have a longitudinal rotation angle relative to the pole plane. This angle is the Pole Angle:
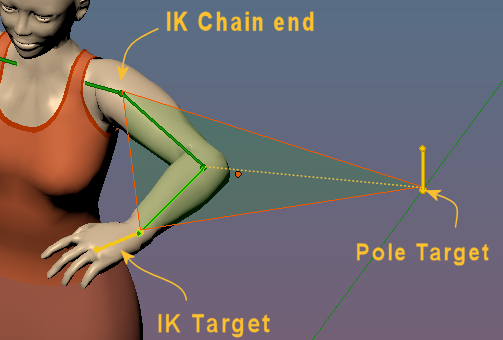
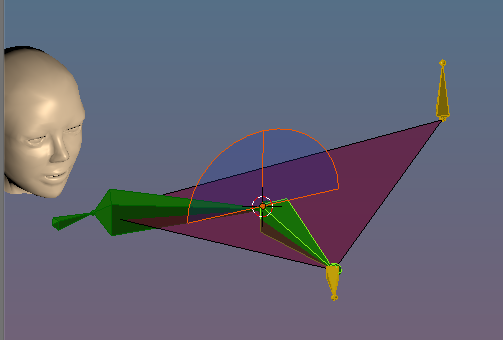
Note: The pole angle is always defined for the Rest Pose. The bending of the Arm in the images above just makes it easier to spot how the pole plane is constructed.
For a simple Rig like the Avastar Rig the Pole angle is typically 0°,90°,180° or 270° but it can have any angle actually. Blender allows to set the Pole angle manually. Avastar provides a function that calculates the optimal pole angle automatically whenever you switch from Edit mode to pose mode.
Our course Non Human character Creation tells more about this. You also find some information about the Pole Angle on the Web. You find some resources with Google, see blender pole target
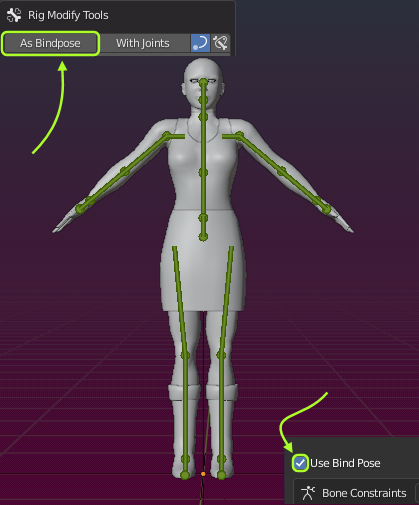
The Use Bind Pose option
When you enable the Use Bind Pose option then Avastar treats your Rig as if it has a plain vanilla (SL Default) T-posed SL rig plus an initial starting pose ( the Bind pose ). If your rig has not been edited (it is a default SL T-posed rig) then the Bind pose is the same as the rest pose. In that case enabling this option has no effect at all.
The interesting part comes when your rig is edited. Then we still are left with 2 situations:
Situation 1: Bind pose with Rotation-only
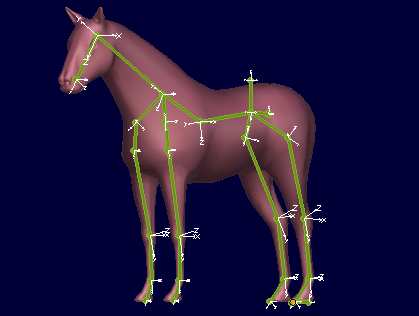
You started with the SL T-posed rig and created a new pose by only using rotations. This is a Simple rotation-only bind pose. Note that actually this rig has a lot of Joint offsets on the arms and on the legs (indicated by blue dotted lines in the image). However since the entire transformation from the T-Pose to the A-Pose can be described with one clear set of rotations, there is good news here:
This sort of Rotation-only rig can be transferred to SL without the need of Joint Offsets. This is important as we will see in a few moments.
Most common examples: A-posed rigs.
Situation 2: Bind pose with Rotation and Translation
You started with the SL T-posed rig as explained in the previous chapter (Bind pose with Rotation-only). But you then created your new rig by editing the bone locations. This editing adds translation to the joints and therefore now you have created a transloc bind pose.
In this case the differences from the T-Posed rig can be described with combinations of Rotations and translations. However now there are many different ways how this new rig can be described:
You could use translations only (as we did with older versions of Avastar) or you can use combinations of rotations and translations in order to minimze the amount of needed joint offsets (which we do since Avastar-2.6)
Again, we will explain in a moment why it is desirable to have as few Joint offsets in the rig as possible. Please keep patient.
Most common examples: Any sort of non humans (creatures)

The Joint Offsets have been indicated with blue dotted lines
A serious caveat…
Regardless of what kind of bind pose you have in your rig, Avastar will calculate the optimal Rig Data that matches perfectly to your working rig and has as few joint offsets as possible for your particular case. The calculated optimal rig is then exported to Collada and finally propagated into the SL importer.
However, while this sounds great you must know that there is a roadblock. Here we are at the heart of all confusion and why i repeatedly mentioned above that it is so desirable to have as few joint offsets as possible:
As soon as a bone needs a joint offset to get in place, its related appearance sliders change their behavior. Technically the bone no longer follows Translations (shifts in location) as imposed by the sliders. Visually the bone no longer moves. But…
Note: Sliders which only impose bone scaling still work as before. But sliders which impose Bone movement (translation) no longer apply. And this is what makes the behavior of the Appearance sliders so shady and so complicated to understand.
Sidenote: You ever wondered why sometimes the Avastar Appearance sliders turn red? The red mark indicates: Bone shifting does no longer work for one or more bones affected by this slider.
Tip: Click on the icon on the left side of the appearance slider to see which bones are affected. Bones with a red cross have joint offsets.
This issue affects mostly face expressions and hand gestures. For example when you added joint offsets to the Eye bones, then the Eye distance slider no longer works. That is why you want to have only as few Joint Offsets as possible!
An example …
Sometimes it is inevitable to edit your Rig beyond simple rotations. This happens for example when you need to adjust the hand rig (see images) and the face rig for your custom character. In this case every edit results in additional Joint offsets for the edited bone itself plus all its children!
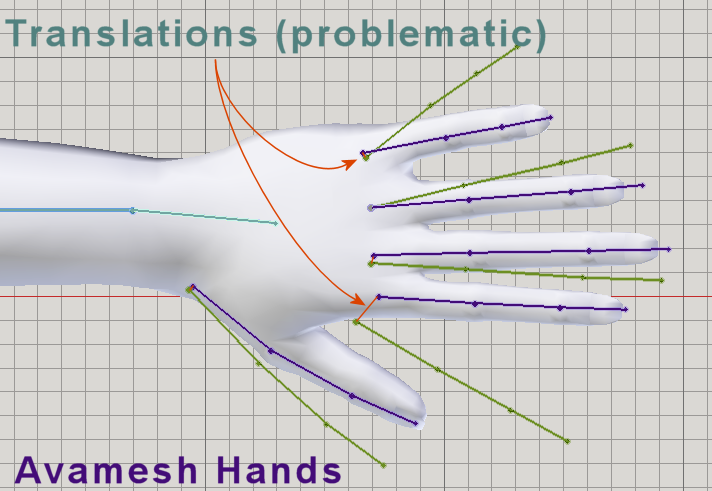
For the hand in the example image we introduce 5 joint offsets for the first finger bones. But due to the nature of how Joint Offsets are implemented in SL those 5 translations of the first finger bones make it necessary that all the child bones also get joint offsets. So we end up with 15 joint offsets for each hand!
But we got an idea…
And invented a convenient solution
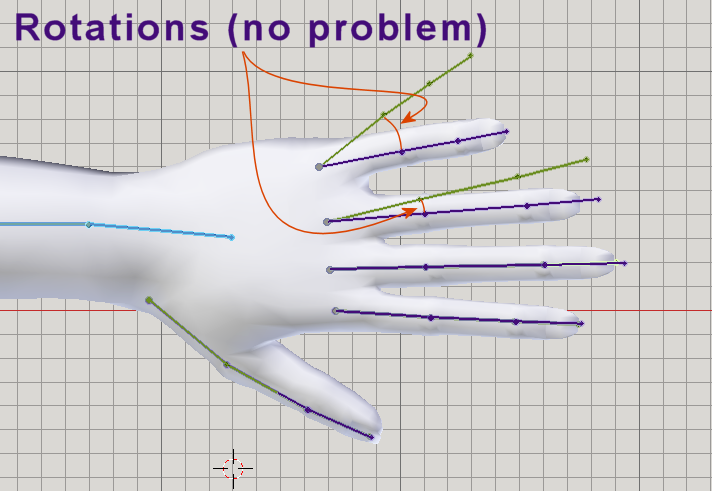
We have added an optimization to the Collada exporter which automatically minimizes the number of joint edits. For example the hand above only needs translation on the first finger bones, while all other bones can be handled with relative rotation and no need to add relative offsets. And thanks to the way how Bind poses work we can get away with only 5 joint offsets for the first finger bones.
The good news is: Our optimizer runs silently in the background, so you actually do not need to worry about how this is done. It just works. Here are some possible usage scenarios:
Scenario 1: Use Bind pose as you always did
This scenario applies also to all previous Avastar-2 versions as well:
In this case you enable the Use Bind Pose option and do not care at all about any optimizations. Just export as usual. You then import your Collada to SL only with Weights.
This option works best for slightly modified rigs (A-Pose human rigs for example are good usage candidates) especially when you have used only Pose bone rotations for editing your rig.
Only Rotations used
Note: If all works well for you and you never run into issues then this option is most likely what you want to use now and also in the future.
Scenario 2: Import with optimized Joint offsets
This scenario applies since Avastar-2-6
In this case you enable the Use Bind Pose option as well and export. And again export as usual. You then import your Collada to SL with Weights AND with Joint Offsets. This option works best when you have mostly used rotations for your edited rig but you have also added a few translations.

Hand rig edited with translations)
This option works best when you needed (for example) to move the hands to a position that could not be reached with rotations only.
Note: This option may work for a variety of cases . It even works for tinies and giants which use the Armature scaling in Object mode. However the optimization of the Joint offsets might sometimes not create the results that you anticipated. You need to experiment a bit. There is actually another pitfall waiting for you to step in.
A nasty pitfall
When you Use Bindpose then your meshes might initially show deformations and even distortions when you wear them. This is because SL does not know the initial locations of your bones, so it assumes they are all in regular T Pose. But this may be utterly wrong. For example in the next image you see the head is seriously deformed.

In order to avoid such distortions and deformations it may become necessary to force the SL bones into the correct place after you wear the rigged mesh and before you start your own animations on it. But we got a cure for this…
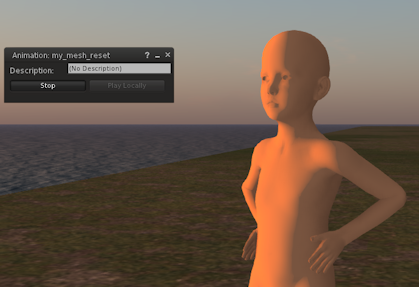
Use a restpose Animation (optional and additional)
When you enable “use Bind Pose” then it often also makes sense to apply a reset animation which enforces the Bones to be placed at their exact anticipated restpose locations. However this reset animation must run constantly as a low priority animation (priority 0) to make sure the bones always find their way back to their optimal location after any other animation has terminated.
Avastar is capable to create the Reset Animation and provide a ready made LSL script that you can add directly into your SL Rigged mesh:
Generate the Reset Animation and a Reset LSL script
When you export to Collada, open the Advanced section and enable with Reset Animation and with Reset Script:
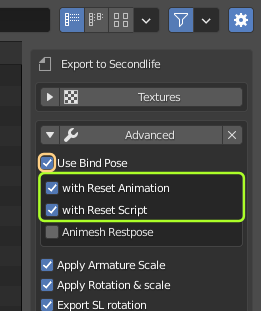
You will use a restpose Animation when the Bone optimizer could not place the bones correctly. This may happen when you used a custom Shape while creating your edited rig in Avastar. In that case it may be possible that SL places the bones to slightly wrong locations which can be corrected by using the Reset Animation.
Scenario 3: Leave Bind pose completely alone
You always have the option to not use Bind pose at all. You may prefer to do this when you are creating a very complicated rig that reuses the SL Bones in creative ways. Spiders and octopuses come to mind…
In such cases you actually do not want bind pose support at all. You might not even want slider support but just provide the rig as it is and unchangeable. In this case you will disable the Use Bind Pose option and always import with weights and with Joint offsets and do not care about Bind pose optimizations at all.