Preparations
The fitted Mesh Sliders work great but you must setup the workspace accordingly. In particular you need to:
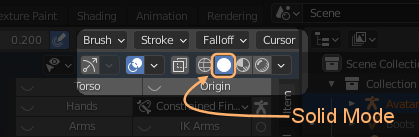
- Make sure the viewport is in Solid Shading mode
- The Mesh is selected and in Weight Paint Mode
- The Armature is selected in Pose Mode
- The Deform Bones and the Volume Bones are visible
We have added a super convenient shortcut for you so you do not need to bother with this. If your Mesh is not in weight Paint mode, then you get a notification and the option to adjust the Viewport (in fact this is the Fitted Mesh Workflow Preset).

We propose that you take a quick look at the Preparations in detail, so that you know how exactly you can prepare your workspace on your own:
Preparations in detail
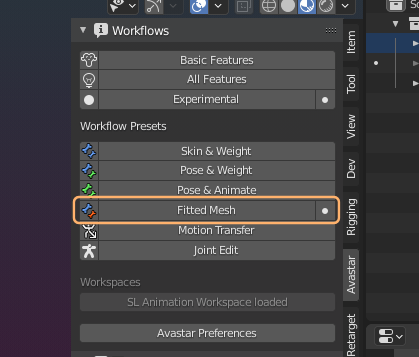
We recommend that you select your Mesh, then select the Fitted Mesh Workflow (see image). this will set your mesh to Weight Paint mode and the Armature to Pose mode and it will enable the Collision volumes and the deform bones .
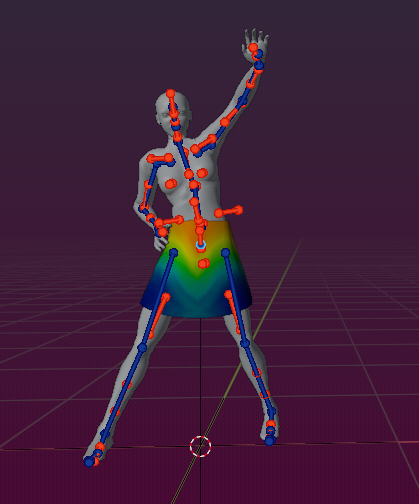
When you follow the recommended settings, then the 3D Viewport will show you immediately the results on your work on the fitting Sliders.
You can use your armature posed or in the rest pose. Also we recommend to use Viewport Shading Display in Solid mode:
The Strength Sliders
You normally start your fitting work without having weights on the fitted mesh bones. Especially we recommend that you first weight your meshes to the SL Basic- and Extended- bones and do not touch the collision volume bones for the begin. In that case it is straight forward to use the Fitting Panel.
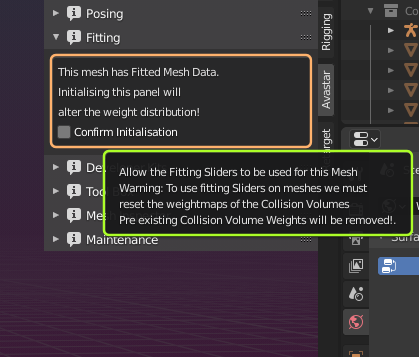
But if your meshes already have Fitting bone weights defined (for example after a copy weights from other meshes operation), then you get a popup text with a warning and a confirm button. Be aware that your weights will be altered when you proceed! Take this serious! If you are sure to lose the current weights on the collision volume bones, then confirm the initialization.
Otherwise this panel is not made for your tasks.
Important: You never want to edit the weights of meshes from a Developer kit model, unless you are the creator.
So, when the fitting sliders are enabled…
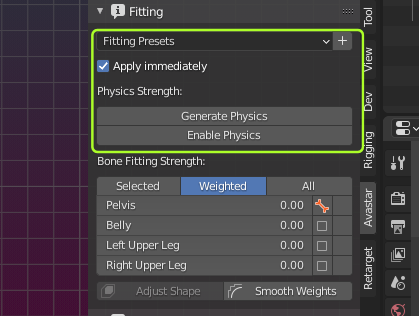
The top of the Fitting Panel is the control section. Here you find a Preset selection and some physic related operators. We will get back to this section later.
For now you only need to remember the option Apply immediately which takes care that all your changes in the slider settings are immediately propagated to the mesh and displayed in the 3D Viewport. See below for more details.
For now please keep the settings as they are until we refer to them.
The Slider section
The strength Sliders move your weight values of each fitting pair (see above) between the deform bone and the corresponding collision volume.
- Slider – Left: (Slider value 0.0) All weight is on the deform bone
- Slider – Right: (Slider value 1.0) All weight is on the collision volume
Note: For huge meshes (with many thousands of polygons) you may see a significant delay when you move the sliders. This is because the fitting system needs a lot of computer power. In that case it may be helpful to disable the Apply immediately option (see above) and use ALT-Q instead whenever you want to get your changes applied to the mesh shape.
Remember: If you want to always see immediately how the slider changes affect the shape, you need to make sure the option Apply immediately is enabled.
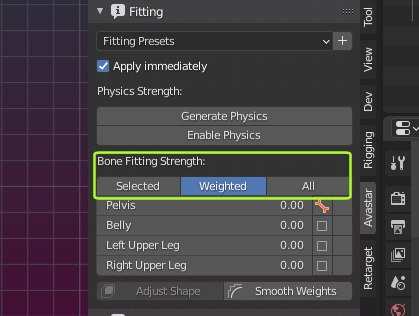
At the top of the Slider section you find 3 filter buttons for restricting the Display to:
- The Selected Fitting Bones
- The Weighted Fitting Bones
- All Fitting Bones
Normally you want to keep with the default setting (Weighted Fitting Bones) to keep the panel clean and organized.
The next section contains the Fitted Mesh sliders. these sliders are used to distribute weight between the mBones (value:0.0) and the Volume Bones (value:1.0).
Remember: These sliders work in combination with the Avatar Shape Sliders. If your Shape is in Restpose (or Bindpose) then you do not see any immediate changes of the mesh shape!
Right to each slider you find 2 – by default empty – columns…
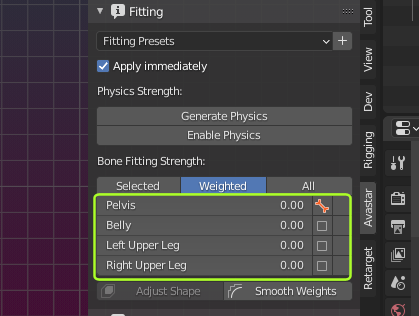
The first field is a bone selector. When you click on an empty field, then
- The field changes to show the orange bone icon.
- In the 3D Viewport the Deform bone is selected.
- The corresponding weight map is shown on the mesh.
When you click a second time, the bone selector switches from the Volume bone to the corresponding SL Bone (shown in blue)
the second field is used to mark edited weight maps and reset them back. We will get to this in the next document (Edit mode)
the entries in the list are sliders. You can change each slider value from 0.0 to 1.0 by click drag the mouse, or by directly entering values with the keyboard.
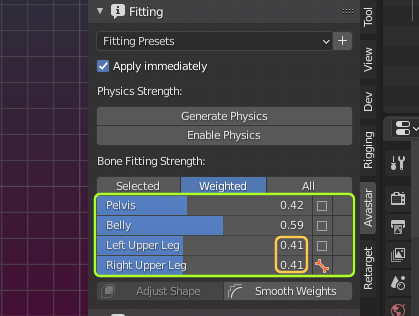
Note: make sure that symmetric bones get the same slider values. Avastar does not take care of that (see Left/Right Upper Leg sliders in the image).
Note: You can store the slider settings as your personal Fitting Presets (see below)
But… Nothing changes on the Mesh ???
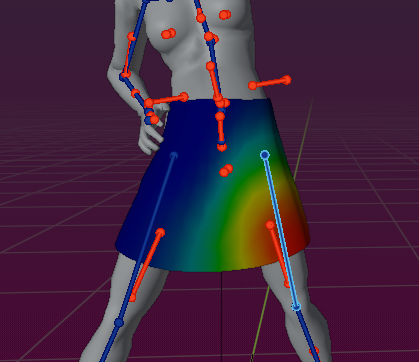
We get this question often. the user claims they are changing the sliders furiously but nothing at all happens on the meshes. for example in the image we have maxed Pelvis and Belly. But the model does not show any difference…
The reason for this is very obvious. And still the question shows up and even experienced users occasionally step into this pitfall.

Here is what is going on:
By default all Shape sliders for the fitted Mesh bones are in a neutral position. Because of this the weights do not change the shape.
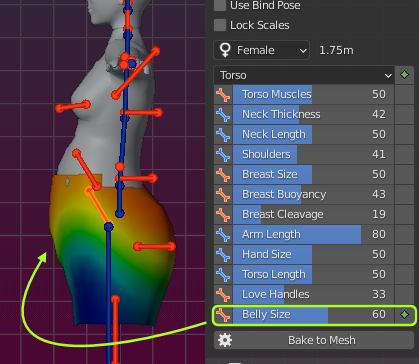
If you want to test your weight changes, then you must also add values to the Shape Sliders!
for example when turning up the Shape Slider for Belly Size (in the Shape Panel), then the fitted mesh begins to react on the slider changes as well (when it has weight on the volume bone).
The Presets
You find the Presets at the top of the Fitting Panel. These presets contain sets of predefined values for the Fitting sliders. Here you can set up your own Presets (click the ‘+’ button to add the current setting as a new preset).
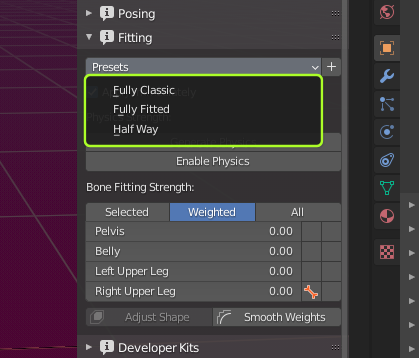
Avastar comes with 3 very basic presets:
- Fully Classic: No weights on the Fitted Mesh Bones (all sliders at 0)
- Fully Fitted: No weights on the Classic Bones (all sliders at 1)
- Half way: Weights evenly distributed (all sliders at 0.5)
these Presets are not much more than demo presets. They only define reasonable starting points for your own fittings.
Note: The Presets also contain settings for the Physics sliders. We will get to these settings in the Physics Document