Avastar’s Rig is fully compatible to the Second Life Rig and it behaves mostly identical to the Avatar in Second Life. We have organized the Rig into 5 Subgroups:
- Control (green)
- IK (yellow)
- Volume (bright red)
- Attachment (dark red)
- SL (blue)
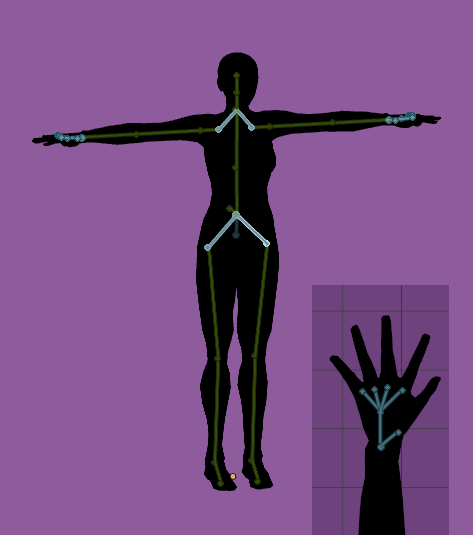
Not all bones are visible by default. The display would otherwise become close to useless (see image to the right). By default only the animation control bones are displayed…

Animation Control Bones (green)
These are control bones for the usual SL bones (see below). These bones are used for posing and animating.
The Control Bones are very similar to the SL Bones but come with a small tweak: the Pelvis bone has been flipped around and made a child of the COG bone so that it’s easier to animate hip movement. Otherwise the sizes and parenting hierarchy is the same as in SL.

By default we have enabled “Custom Shapes”. that is the bones are not displayed as bones, but as control handles (green rings around the Avastar Mesh Character).
To see the bones in a more traditional form tick “X-Ray” and untick “Shapes” in the armature tab of the property editor.

We have split the Control bones into further subgroups which can be individually shown and hidden so you can enable only what you need:
- Torso – the spine bones and COG (see below)
- Arms – the arm bones
- Legs – the leg bones
- Origin – the origin marker for the avatar (see below)
- Extra – some less used controlling bones (Foot, Toe, Skull, and Eye bones).
The eye bones are used indirectly for animation via the eye control bone.
So when you move a control bone, then Blender automatically propagates this move to the SL Bones. Note then actually the control bones never contain any weights!
Structure Bones (green and steel blue)
Some bones in the SL Rig are phsically separated from their parent bones, like for example the hips and the shoulder bones. We have added structural bones which can be used for animation purposes.
with Avastar-2.2 we also have added structural bones on the hands for easier animation. for example you no longer need to explicitly enable translation for the finger bones if you just want to move the knuckles closer together. You can do this now by rotating the finger structure bones.
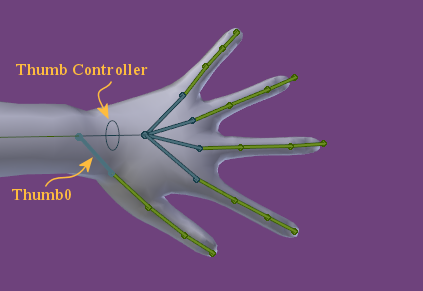
Thumb Controller
We have added one extra bone which is at the same position as the writs bone. This Thumb Controller can be used to rotate the thumb around the long axis of the wrist in order to make posing the hands and thumbs a lot easier.
We also have constrained the Thumb0 bone so that it only can change the angle between the thumb0 and the wrist. So the Thumb Controller in combination with Thumb0 allows an easy posing of various hand movements.
IK Control Bones (yellow)
These bones belong to the IK (Inverse Kinematics) system. By default these bones are invisible and the influence of these bones is set to zero. To enable IK control select a bone on a limb and use the sliders in the “Rig Properties” section of the Properties Panel.

When switched on the whole limb will try and align with the position of the IK control. Note that there are a bunch of bones that are there to provide a target for the IK system and to show you how a limb is orientated. The latter bones can be made visible with the “IK Rig” visibility switch below.
SL Bones (blue)
These are the “true” bones of the SL Character. These bones are used to do the weighting for your own mesh characters or mesh attachments. When it comes to export of your mesh, then (by default) this is the only set of bones which are taken into account. But see for more details in the export options.

For animations these are the only bones that count (together with the Origin which provides the reference point for the entire entire avatar).
As described further up the green control bones drive the blue ones. That is when a green bone moves, the corresponding blue bone moves as well. Why did we do this? Why don’t we just drop the green bones and only use the blue ones?
The answer is: The set of blue bones and their constraints is strictly defined by Linden Lab and can never be changed. But Blender allows us to do a lot more with animation than what we are allowed to use on the Blue bones. Especially we are allowed to add as many green bones as we like and do whatever we want with these bones (for example using Inverse Kinematik – IK ). We only have to ensure that the blue bone definitions never change.
Avastar knows about the specialties of the blue bones and always ensures that the exported animation data is compatible to Second Life.
Extra Bones
The Extra Bones have SL Bones as partners which are usable as deforming bones, but actually not used as such. These are in detail: Skull, ToeLeft, ToeRight, EyeLeft, EyeRight
Especially the eye bones do not affect the Head mesh. They are strictly used to move the eye meshes of the SL Avatar.

Root Bones (green)
We provide 2 special bones for making animation easier:
The Origin for moving the entire rig regardless of animation and the COG Bone for animating entire character movements:

The Origin
This bone is at the feet and is shaped like a four pointed arrow. All the animations are relative to this bone so moving it around won’t change the animation, it just gives you another handle to position the avatar and it represents the floor for the avatar.
If you were creating a multiple-avatar animation, think of putting the Origin bones where you would place the pose-balls.
The COG Bone (Center Of Gravity Bone):
The COG is how you rotate or move the character as a whole. The Pelvis and Torso are children of this bone and everything else is a child of those.
Normally this bone is a small green circle near the small of the back. In contrast to the movement of the Origin, any moves or rotations of the COG bone will be recorded in your animation.
Attachment Points (Red spheres)
The attachment points correspond to the attachment points of the Avatar. These points are primary used for animation. But we also support weighting of the attachment points.

Using attachment points for weighting
Second Llife does not officially support weighting of attachment points although it works in principle. However, there is a caveat here: Some attachment bones have a space in their name (e.g. “L UpperArm”). Those bones can not be exported to Collada due to name restrictions (spaces are not allowed in bone names). Avastar tries to workaround this issue by replacing spaces in names by underscores (‘_’). However this is also nothing officially supported. currently only the Firestorm viewer is capable to read those modified bone names and can upload the Collada files correctly.
Note: You can animate attachment bones without restrictions if you export your SL animations in the SL internal .anim format (Avastar supports that).
Collision Volumes (red)
The Collision Volumes correspond to the collision volumes in the Avatar. Originally these bones provide a simple mesh frame that allows efficient (fast) calculations of physical interaction (collisions) of your avatar with the environment. However these bones can also be used for animation and weighting.

The most important feature of the Collision Volumes is that they are coupled to the SL Shape sliders. And if correctly weighted, they allow your meshes to be customizable via the SL Slider system.