This chapter is a very brief but hopefully complete introduction to the fundamentals of skinning and how this applies to Blender. If you are an experienced Blender user, then you may skip the first part of this document and directly advance to the chapter
Ok, you decided to read on. So, if you are very new to all of this, then you probably need to read this part of the document more than once. It is not an easy document and we have put a lot of effort into describing the topic as simple as possible.
This is a theory chapter…
We are aware that this text only scratches the surface. But we believe that you will find your way through this topic over time. Just read this document in little chunks, once, twice, multiple times. Get back here when you got stuck in your project and when you don’t see why things happen as they do. Maybe this document is then good for finding the problem. The more you understand in this document the easier things will become for you in the later chapters!
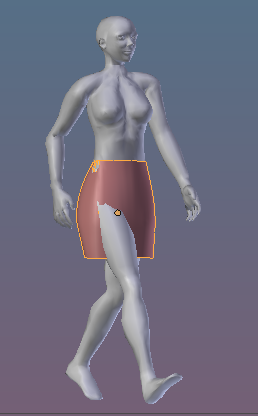
In the picture you see an SL Avatar and a basic skirt which is adjusted to it’s anticipated location around the hips. I have also posed the Avatar into a walking pose. However, you see the upper leg pokes through the skirt fabric.
This is because the skirt does not know anything yet about the avatar, neither does it know where the avatar is, nor does it know how the avatar moves. Hence it stays where it is.
So the very first thing we have to do is to somehow attach the skirt to the avatar. In SL you would probably attach it to the Pelvis or the Torso. In Blender we will attach it to the Avatar’s rig (the Armature)…
The model skirt (not rigged yet).
Note: You could import this skirt as it is to SL (or OpenSim or similar) and attach it to the Hips or the pelvis attachment point. But when the legs move you will see how they poke through the mesh like in the piture above.
Now lets first dive into skeletal animation and figure out what we mean by posing the Avatar into a walking pose as mentioned above. And lets clarify what actually an Armature is…
Bones and More
The SL Avatar Mesh
Let us first take a more detailed look on the SL Avatar. Actually the SL Avatar consists of a mesh made out of about 7500 triangles (or mesh faces in more general terms). When it comes to posing and animation all of these faces have to be moved around somehow. However, it would not be very practical if we had to define the locations of all Mesh faces one by one for every possible pose. And luckily there is a better way to do this.
Bones
The SL Avatar has a set of (159) bones which can be moved separately. And we will see in a moment that each bone controls the deformation (bending and stretching) of a specific area of the mesh. These bones are also named Deform Bones. But one step at a time…

Bone Relations
When you move one bone then all its attached neighbors (more precisely all its child bones) move along with it so that the “skeletal” integrity of the bone system keeps preserved when you animate the bones.
Our primary goal, however, is to move, stretch and bend the character’s mesh such that it appears to act just like a person (or animal/creature) moving in real life. So where comes the Armature into play?
The connection is that in fact the movement of the vertices of the Avatar mesh are controlled by the bones of an Armature. So, there is a missing link here. How do the Mesh and the Armature talk to each other, or …
How do the vertices know how to move ?
There must be a relationship between the bones and the vertices of a mesh. More precisely:
- There must be a relationship between each vertex of the mesh and each animating bone.
- And obviously each vertex of a mesh has to be moved by at least one bone.
- Possibly a vertex could even be moved by more than one bone.

Bone Weight Maps
A Bone Weight Map defines how much influence a specific bone has on each vertex of a specific mesh. The influence is typically defined in a range from 0.0 (no influence) to 1.0 (maximum possible influence). So if a vertex shows up in a Bone Weight Map, then it will be controlled by that bone. The weight value in the Bone weight map defines if the vertex only slightly follows the bone (weight ~0.0) or moves as if it where glued to the bone (weight ~1.0)
Note: Bone weight Maps are defined per Mesh (as a set of vertex groups, see next chapter). Because of this we also talk about weighting meshes to bones and not the other way around.
Visualizing Weight Maps
Weight maps are often visualized directly on their associated mesh by using a color code (where each weight value between 0 and 1 is mapped to a color in a color band. Blender uses by default a color band that maps a weight of 0.0 to the color blue, and a weight of 1.0 to the color red. In between weight values are mapped to the rainbow colors:
Here is an example for the visualization of the Weight Map of the SL Avatar’s mHead bone:
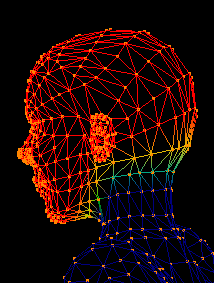
The green and yellow vertices indicate the weights are split between mHead and mNeck in this region
Skeletons
From a technical point of view each Bone that has a weight map in a given mesh, also can take part in the animation (deformation) of the mesh. We call the set of Deform Bones also a Skeleton. However, in Blender a Bone actually has to be enabled as Deform Bone otherwise it’s corresponding weight map is ignored:

A bone needs to be enabled as deform bone in the Bone data properties.
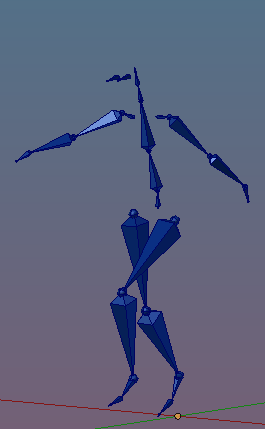
In Avastar all Basic skeleton Bones are displayed in Blue and all additional Bento bones are displayed in purple :

Bones displayed as sticks, not all available bones shown here
Rigs
For example it is possible to animate a mesh (in Blender) only by using Empties and Constraints, so no single bone is involved, yet it is an animation system. However we will not get deeper into this here, as it is not of importance for SL Rigs.
In a Nutshell:
- Bone: Animates other Bones and/or Meshes.
- Control Bone: Animates other Bones.
- Deform Bone: Animates areas of meshes(1)
- Skeleton: Set of Deform Bones plus constraints.
- Armature: Skeleton plus Control Bones.
- Rig: Animation Control System for a Model (Armatures are Rigs based on Bones).
(1): Deform Bones can also be control bones, for example in a bone hierarchy the parent bones control the child bones.
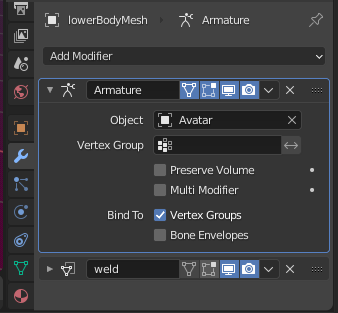
Armature modifiers
There is one last ingredient missing here. That is we have to tell a mesh that it actually has to be animated by an armature. And this is done with the aid of an Armature Modifier:
- An armature Modifier is always created in the Context of a mesh.
- Within the Modifier you specify which Armature Object shall control the mesh. You do this in the Armature modifier’s Object field.
- Finally you specify if the modifier shall use the mesh’s Vertex Groups or the Armature’s Bone Envelopes.
Blender’s Parent Armature deform
Blender has a tool for half automatic skinning a mesh to a Rig (Parent Armature Deform). This tool basically does 3 tasks (and this is in principle all you need):
- It parents the Mesh to the Armature.
- It creates an Armature Modifier.
- It creates a set of weight maps for the Armature’s deform bones.
Blender’s tool is used as follows:
- Ensure you are in Object mode.
- Select the Mesh Object that you want to animate.
- Shift Select the Armature Object.
- Object -> Parent -> Armature deform.
Note: Avastar uses the automatic tools internally but it also adds a few more handy options for your convenience (see later chapters).
Armatures and rigged Attachments
So far we have been talking about Armatures in relation to Avatars. And it has become clear how the Avatar Meshes get animated in principle (by animating the Avatar Skeleton). But what about attachments ? How do they fit into the overall picture ? well, it could best be described as:
Attachments are specialized characters
What? That sounds weird… but actually it is a correct picture. See this:
- Any rigged attachment needs a rig.
- The Rig must be compatible to the SL Avatar’s Armature,
- The rig can only contain the Bones which are also defined for the SL Skeleton.
- And any mesh attachment can be rigged to a complete skeleton as well, however it is sufficient to provide just the needed bone chains (all chains start at the pelvis and end in a leaf bone on a limb (or the skull)
- So a Mesh attachment is technically a (partially) rigged character.
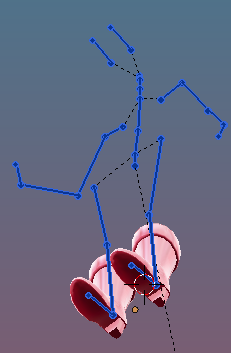
Example: Boots rigged to the SL Avatar Rig
The good news is: All that we have learned above also applies fully and without any change to mesh attachments. So we can treat our attachments exactly like we treat the SL Avatar.
However: Mesh Attachments never get their own bones when they are later attached to the SL Avatar. They just “bind” to the already existing SL Avatar’s skeleton.
So at any time, regardless how many Meshes an Avatar wears, there is only one single skeleton involved to which all meshes are Bound.
Rigged Mesh & Attachment Points
So, every rigged attachment has to be rigged to the same Skeleton as the SL Avatar. So in fact a mesh attachment is handled in exactly the same way as a mesh character. And technically there is no difference between the SL Avatar, a complete Mesh character and a Mesh attachment. All of them get controlled by the same rig in the exact same way.
While the SL Avatar just “exists”, the Mesh attachments and Mesh based Avatars have to be worn “on top of the SL Avatar” by attaching them to an attachment point. Yes, even a mesh character has to be “worn” on an attachment point of the SL Avatar!
The Avastar Rig
The Avastar Rig contains the Original SL Rig. But it has more than that. In detail we find:
The bones from the Original SL Rig:
- SL Basic Bones (Deform Bones, blue).
- SL Extended Bones (Deform Bones, Purple)
- Attachment Bones (red).(1)
- Collision Volumes (orange).(2)
additional bones added in Avastar:
- Animation Control Bones (green).
- IK Bones (yellow).
- Structure Bones (steel blue).
Hint: All Bones together are named “Armature” in Blender terms.
Note: From all these bones, only the SL Base Bones, the Attachment Bones and the Collision Volumes should be used for skeletal animation. Attachment bones can also be used as deform bones, but it is unclear if this is just tolerated or officially accepted by LindenLab.
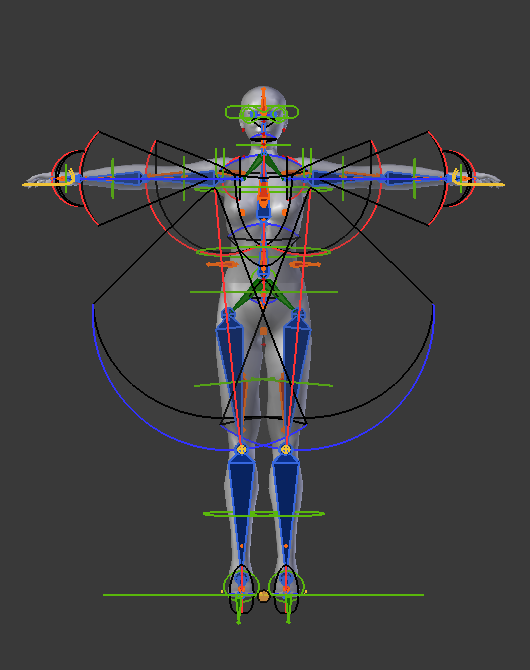
All Bones of the Avastar system character at a glance.
(1): The use of the Attachment Bones for skeletal animation is discouraged by Linden Lab. Furthermore some of the attachment Bones have spaces in their name which results in issues during uploading. Firestorm Viewer has a patch for this and can also upload weighted bones with spaces in their name.
(2): The Collision Volumes have originally been used only for defining the click surface of the Avatar (when a click is detected as “avatar clicked”. But they can now officially be used as Deform Bones (This is Fitted Mesh, we get to this in more detail later).
SL Avatar Weight maps
Since a Bone Weight Map is always related to a specific bone, that means for the SL Avatar: We have to provide 159 weight maps (one Map per bone) in each mesh that we want to rig.
So, lets see…
- A weight map is always related to one bone.
- And it contains one weight value for each vertex.
- the SL system character has 7500 vertices
- 7500 Vertices * 159 weightmaps = 1.2 million weights.. huh?
well, this is insane. And fortunately it is not exactly what happens. Actually there is a rule:
The Rule of Zero weights
If a vertex is NOT mentioned in a weight map, then it is assumed to have a weight of 0.0 for the related bone. This rule helps to keep the bone weight maps reasonably small because now the map only needs to contain those vertices which are actually controlled by the bone. Phew…
The next picture shows areas with different numbers of “weights per vertex” for the SL Avatar. Indeed most areas of the SL Avatar are assigned to only one bone (areas displayed in light grey), while near the joints we always find 2 bone weights per vertex (areas displayed in light green).
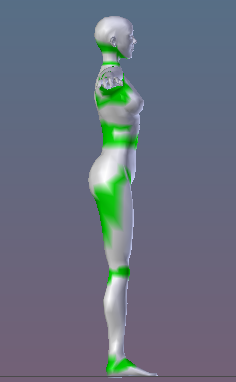
Weights per vertex.
Grey:1 weight
Green:2 weights
Note: Remember that each vertex has to show up in at least one weight map, otherwise you get an error “unweighted verts in mesh” when you try to import your mesh to SL or compatible worlds.
What else you should know...
There are 2 important constraint which apply to SL (and similar environments):
Weights per Vertex at most 4
Each vertex may be controlled by no more than 4 bones. If the vertex shows up in more than 4 weight maps, then the resulting animation behavior is not defined!
Weights per Vertex at least 1
Each vertex must be controlled by at least one bone. Otherwise the SL importer will reject the import.
The SL Bone Weight Maps
The SL System Avatar uses following weight Maps:
Basic Maps (21):
- mPelvis
- mTorso
- mChest
- mNeck
- mHead
- mEyeleft, mEyeRight
- mCollarLeft, mShoulderLeft,
- mElbowLeft, mWristLeft
- mCollarRight, mShoulderRight,
- mElbowRight, mWristRight
- mHipLeft, mKneeLeft, mAnkleLeft
- mHipRight, mKneeRight, mAnkleRight
Extra Maps (5):
- mToeLeft
- mFootLeft
- mToeRight
- mFootRight
- mSkull
Note: In Blender all Weight Maps are stored in Vertex Groups. You find the list of defined Vertex Groups in the Object Data Properties editor.
Fitted Mesh Maps (26):
- PELVIS
- BUTT
- UPPER_BACK, LOWER_BACK
- LEFT_PECK, RIGHT_PECK
- LEFT_HANDLE, RIGHT_HANDLE
- BELLY
- CHEST
- NECK
- HEAD
- L_CLAVICLE, L_UPPER_ARM
- L_LOWER_ARM, L_HAND
- R_CLAVICLE, R_UPPER_ARM,
- R_LOWER_ARM, R_HAND
- L_UPPER_LEG, L_LOWER_LEG, L_FOOT
- R_UPPER_LEG, R_LOWER_LEG, R_FOOT
But there are many more Bones defined (the Bento Bones). You find a complete list of all bones in the SL Skeleton Document.
Note: You only need to define those Weight maps that you really need in Blender. This helps to keep the vertex group lists small and manageable. There is no reason to keep empty weight maps.
The difference of Prims and Rigged mesh
There is one important difference between attaching Prims and attaching rigged mesh. That is:
A Rigged mesh actually attaches to the Avatar skeleton as a whole, regardless to which attachment point it has been attached.
And for SL and compatible worlds it is as easy as that: A rigged mesh always uses the pre defined Avatar Rig.
Putting all together
So what we have to do next is to combine what Avastar provides (the SL Armature) with your mesh attachment (in our case the demo skirt). In particular we have 2 tasks:
- Associate our Mesh to the Avastar Rig so that both know each other.
- Create/Modify/Optimize Bone weight maps which define the relation between the skeleton bones and particular areas of your mesh.
This process is named : Skinning And this tutorial is actually about skinning.
I am at the end of the fundamentals of skinning. In the remainder of this tutorial we will get into practice.