About this Document...
Content:
Create a Tinie or Giant
Import the Mesh to your online world.
The Video:
- Create a Character.
- Scale the Armature
- Use the Collada Exporter
- Use the SL Importer for Upload
What does Avastar provide?
Avastar basically supports the creation of animateable Models (Avatars&attachments) and the creation of animations. Therefore the tool adds various functions and user interface elements to Blender.
The full functionality of Avastar can be a bit overwhelming on first sight. You should be prepared to spend some time and patience to get it all working nicely for your projects.
What does this Document provide?
Creating Tinies and Giants with Avastar is really easy. Actually it all boils down to scaling the Avatar in Object mode and knowing about how to handle the scaling during export…
We expect that you have basic knowledge about Blender.
This is a method to convert any character into a Giant or Tinie. Actually this is achieved by scaling the armature in object mode and then know the little secrets to succeed.
Secret 1: Scale it in the right way
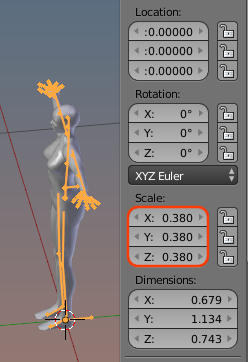
The by far easiest method to get your Character right is by scaling the Armature in Object mode.
- Select the armature in Object mode
- Scale it up or down as you like
You can see the object scale in the N Panel on the right side of the 3D View.
Secret 2: Export correctly
Now select the parts of your character which you want to transfer to Second Life. One easy method to select the parts is by using the Outliner.
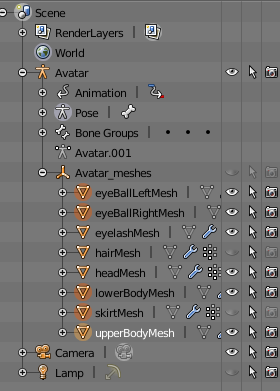
After you have selected all meshes finally export your selection to Collada. You find the Collada Exporter at the Top Menu:
File -> Export -> Collada (Avastar)
Now take a look at the advanced section of the Collada tab. There make sure following options are set:
-
Use bind pose (disabled)
-
Apply Armature Scale (enabled)
-
Export with Joints (enable)
-
only weighted bones (disabled)
The last setting makes sure that all deform bones including the eye bones are added to the export, even if no mesh is weighted to those bones. While this is not strictly necessary, it ensures that all bones are at the expected locations

Finally export as usual. But this is not the end of the story. We also need to do one more thing in the Second Life mesh importer.
Secret 3: Import the Meshes in the right way
After we have opened the mesh we can check its look in the preview window.
We also can enable the preview of the skin weights and joints here. But keep in mind that enabling joints and weights in the previewer is only good for inspection, but this alone will not upload the data!
therefore we also have to open the upload options tab. Here we have to enable:
- With Skin weights
- With Joint positions
You also can play with the Z value. This controls the hover height of your character.
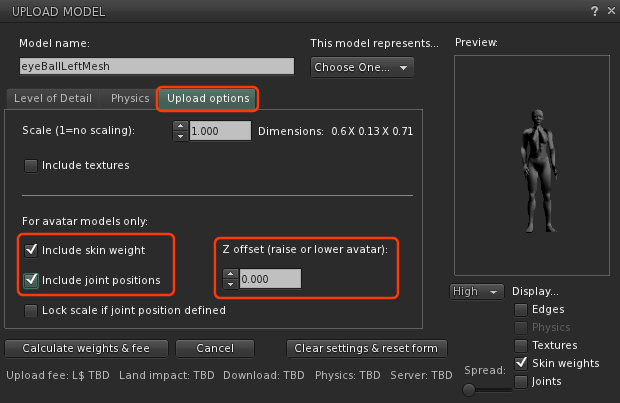
Finally we highly recommend to check that your model has a convenient name. The default model name is taken from the first of the imported meshes and this might not be the best matching name for the imported collection (as seen in the image above and in the video)
Some more tips
- The system character’s eyes will almost never match in size with your mesh character. Therefore you better create your own mesh eyes and import them along with the character.
- Before you wear your Tinie or Giant mesh you probably first want to wear some invisibility outfit that will hide your default avatar-meshes (including the Eyes)
- You will probably need to adjust the character height by using the hover slider (Right Mouse click on your Avatar, then select the Hover Height option to change the location of your character.
- If you need more precision to adjust the hover height, then you also can modify the Z value in the importer panel (See image above).