- Please carefully construct a simple redoable case.
- Well prepared reports are answered much faster!
- This guide helps your creating your ticket…
Note: We reject incomplete reports and confusing reports.

What we need from you
This is what we need in general:
- Make sure you report only one issue per ticket.
- Write a brief and precise text explanation of what your issue is.
- Describe how we can reproduce the issue.
- Prepare a .blend file that demonstrates the problem
We also need to know:
- The exact Add-on version (ok: avastar-2.4-12 not ok:
“the newest”) - The Blender version that you use (ok: Blender 2.78b)
If you have all of this already done before, then here is the
Otherwise read on…
write a brief and precise text explanation
Please keep the text short and to the point. Don’t make large text explanations.
Add a brief description
- What fails ?
- What do you expect ?
- What happens instead ?
- How can we reproduce it ?
Describe Your environment:
- Product number (like Avastar-2.4-12)
- Name of the installed zip file
- Blender version number
- Operating system
Good Example:
- I bind my mesh to a default Avastar Rig by using “Bind to Armature”.
- I try to pose the character, but the mesh keeps as if it is not bound at all.
- When i open the Blender console, then i see a huge amount of repeating errors.
Here is an excerpt of the repeating errors:
Traceback (most recent call last):
 File "__init__.py", line 1345, in Avastar
ZeroDivisionError: division by zero
Reproduce the problem as follows:
- Open the attached blend file
- Click the “Bind to Armature button”
- Try to pose the armature
- See the errors in the blender console
Bad example:
I purchased Avastar the other day, i can not bind my mesh, please help. as i mentioned i use the newest Avastar, it aught to work. so i do not understand why i get issues with that. my project runs out of time and i need a solution as soon as possible. i also can not provide a demo because i do not trust you!
Prepare a .blend file that demonstrates the problem
Blend files tend to grow quickly in size. Huge files take time to upload and download. And when a file contains many items unrelated to your issue we do not know what to inspect. So, first of all: Create a backup copy of your blend file. then proceed to…
Clean up your blend file
Remove all items from your blend file that are not directly related to the issue.
Items we normally do not need:
- Cameras
- Lights
- Materials
- Textures
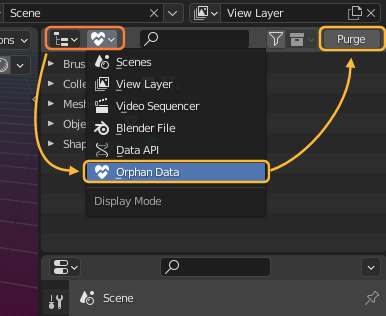
Purge Orphan Data
Orphan data is data that is nowhere used in your blender project. You can purge orphans in the Outliner, see image.
Note: You may have to purge multiple times, because every purge may create new orphans. Just hit the Purge All button until the list of orphans no longer changes
Hint: Items with the Fake User flag will never be purged
Remove Textures and Materials from your model
We normally do not need your materials definitions and your textures. It is best when you just remove those elements from your model and then purge (see above)
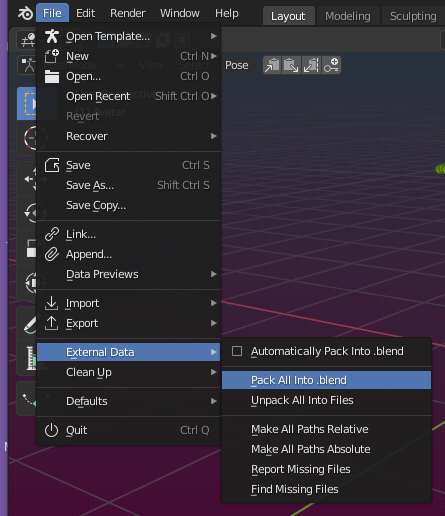
Note: If your issue is actually related to Textures and materials you will do the opposite and make sure that you Pack All into .Blend (see image)
Reduce your high poly meshes in size
In most cases it is sufficient to only keep a small portion of your “broken mesh” in the blend file, just enough to show us where things go wrong. Lets say for example you have an odd issue with distortions on a part of your mesh. Then you can delete the rest of the mesh and demonstrate your issue just with the much smaller fragment that is apparently behaving wrong:
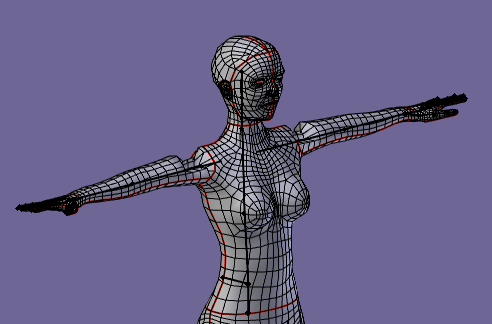
Instead of sending the entire model
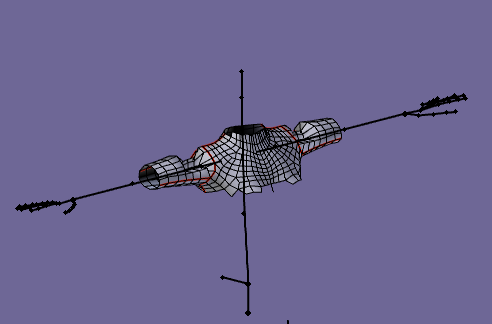
keep only those parts that are needed to show the problem.
Prepare to just before the issue happens
The last sentence in your description should be similar to:
When you click ‘here’ you see how it breaks
So please take care to prepare your blend file such that “the next click shows the problem”
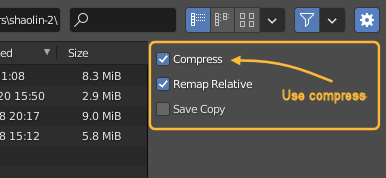
Save with Compression
Please never zip a blendfile. Blender can do this for you when you save your blend file. You should always take care to save with compression. That may help you to save a lot of file storage as well.
You find the compress option in the Tool shelf Operator panel when you save your file.
Note: The maximum size of accepted blend files is 10 MByte
Make your Ticket
Now you should be well prepared to
thanks
cheers,
Gaia