Glossary: Rig/Rigging
The most common form of Rigs is based on Bones. This special form of a Rig is also named Armature.
Rigging is the process of creating the Rig.
However since in Blender we clearly have to distinguish the processes and workflows, we should also use precise terminology. Thus we distinguish between Rigging (make the rig) and Skinning (weight the mesh).
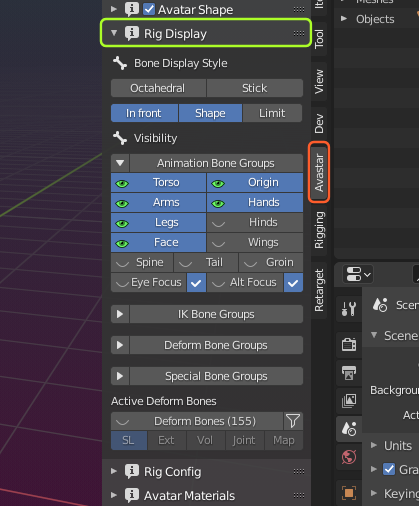
The Rig Display panel gives you full control over which parts of the Rig can be seen at a given time. By default only the Control bones are visible. But sometimes it is desirable to hide or unhide parts of the Rig.
Furthermore the control bones (green) use custom shapes by default. That is, they are formed as rings which are placed around the Avastar body. The benefit of the custom shapes is that they can be selected easier. But sometimes it is desired to switch from Custom shapes back to Blender’s default shapes (Sticks or Octahedrons).
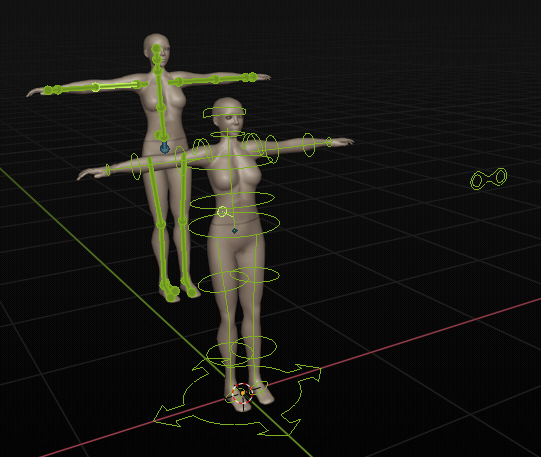
Character in the Background: Bones as Sticks
Character in the Foreground: Bones with custom Shapes
Panel Overview
The Rig Display panel basically contains a collection of properties which also are available at other regions in Blender. But having them all in one place is a time saver. The Rig Display panel has 6 major sections:
- Bone Display style.
- Bone Visibility.
- Animation Bone Groups (expanded by default)
- IK Bone Groups (collapsed by default)
- Deform Bone Groups (collapsed by default)
- Active Deform Bones (collapsed by default)
- Special Bone Groups (collapsed by default)
Bone Display Style
The first row of buttons changes the bone shape. You can select between the Octahedral Style and the Stick Style.
Note: In the Armature Data Panel (Properties Window) you have 3 more options for setting the Rig display style
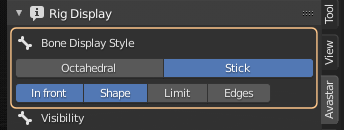
In the Second Row of the section we find 4 properties:
- In front: To display bones even when they are occluded (hidden) by the mesh.
- Shape: To enable the usage of Custom shapes.
- Limit: To display the bone movement ranges.
- Edges: Show edges in object mode (only displayed if active Object is a Mesh)
Bone Visibility
In the Bone Visibility panel you can hide/unhide various bone sets. The panel is subdivided into 4 major groups as follows…
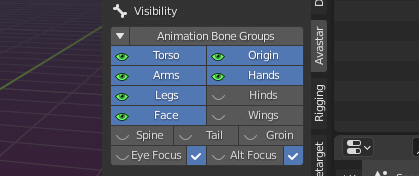
Animation Bone Groups
- Origin: The Root bone of the Armature (use only for placing the armature in the scene)
- Torso, Arms, legs, Hands: Main Body Bones
- Hinds: Additional Bento bones for Quadrupeds
- Face, Wings, Spine(*), Tail , Groin: More Bento bone sections
- Eye Focus, Alt Eye Focus: Special bones used as Focus point for the eyes. The Alt Eye Focus is for the Bento Face (Alt Eye Bones)
More about the Spine
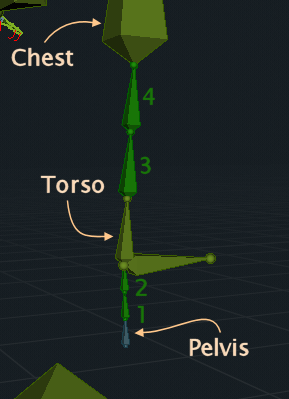
The Spine is made of 4 Bones which are by default folded in such a way that they do not disturb the behavior of the System Character
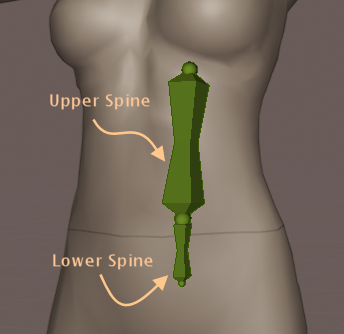
In the image aside the upper Spine bones (Spine3 and Spine4) and the lower Spine bones (Spine1 and Spine2) have been unfolded and are marked in dark green. You see how they are embedded between the Pelvis, Torso and Chest.
Note: You can fold/unfold the spine from within the Rig Config panel
IK Bone Groups
These buttons control which of the IK Bones (yellow) are visible
- IK Fingers (Simple, Constrained, Hand Grab)
- IK Arms
- IK Legs
- IK Limbs
- IK Face
The circles on the right side indicate if the IK bones are disabled (circle) or enabled (filled circle)
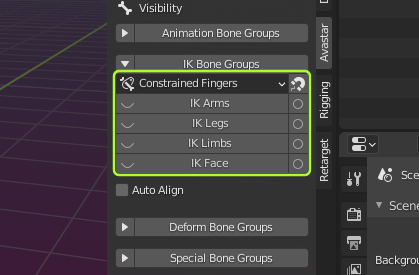
Note: The Magnet icon right to the IK Fingers applies the current visual pose to the FK Bones.
Option – Auto Align :
- When you switch on IK, then the IK Bones are aligned to the current FK Bone setting.
- When you disable IK, then the FK Bones are aligned to the current IK Bone setting.
Deform Bone Groups
Display all bones which have the Deform Option enabled. The content of this set can change dynamically (see fitted Mesh)
- SL Base: to display the SL Bones (Blue)
- Volume: to display the Volume Bones
- The others: Bento Bone Groups

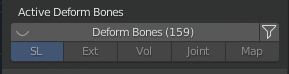
Active Deform Bones
The Active Deform Bones are Bones which have the “Deform Flag” set. Only Active deform Bones can modify the mesh (via skeletal animation) when they have an associated Weightmap.
The Active Deform Bones can be filtered by 5 categories:
- SL: The 26 Animation Bones for SL
- Ext: Bento Bones
- Vol: The Collision Volume Bones
- Joint: Bones that have modified Joints (Joint Edits)
- Map: All deform bones which also have Weightmaps (only shown when a mesh is selected)
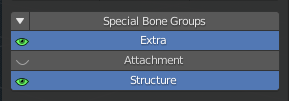
Special Bone Groups
- Extra: There are a few Extra bones which usually are not used for Animation in SL. These bones are either not weighted to the default Avatar (Skull, Foot Bones and Toe Bones) or are automatically animated (Eye Bones). However you can use these Bones in your animations for custom meshes.
- Attachment: to display the Attachment Bones (red)
- Structure: to display the Structure bones