We already know that we can modify the Second Life default Skeleton by using the Appearance Sliders. But this is not all we can do. In fact it is possible to rearrange the Skeleton in any way we want. There are only 3 basic rules:
- We can only use the existing set of Joints (bones).
We can not add new joints to the Skeleton. - We must keep the hierarchical Joint structure as it is.
We can not rearrange the joint hierarchy of the Skeleton. - We are free to move the existing Joints wherever we want.
In first place this might sound like a strong limitation. But you quickly see that you can create a wide variety of creatures only by rearranging the existing bones. However there are a few things you need to know before you jump into the deep waters…
Joint Offsets
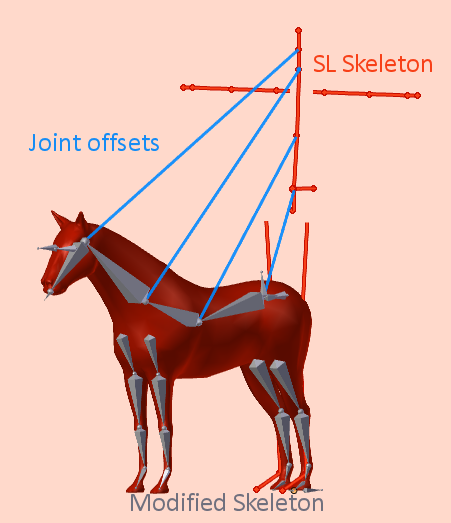
As mentioned before we only can rearrange the location of Joints but not their relationship. Because of this we always can define a modified skeleton just by recording how far each Joint has been moved away from its original location. This distance is the Joint Offset
So one way to define the modifications of the Skeleton is by recording the Joint offsets for all Joints (the small dots in the image on the right side).
The image shows the default SL Skeleton in its T-Restpose (the orange skeleton). And a modified Horse Skeleton (the grey Skeleton). The blue lines mark the offsets from original joints to the modified joints.
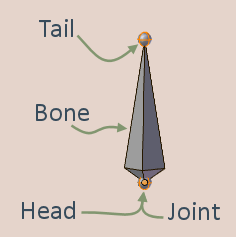
Blender uses Bones with a Head and a Tail. the Head is very similar to what other programs name Joint. The Tail is not supported by other programs. The dots at the end of a bone chain are always bone tails, so those final dots are not Joints!
Defining Joint Offsets
The good news is: You only need to move the joints of your Skeleton into place. For Blender users: You can do this by selecting your Skeleton (the Armature) in EDIT mode and then move the bones one by one.
So, how does Second Life know if a Skeleton uses joint offsets? The Second Life importer decides this for each joint by checking if its location is close to the default joint location of the SL Skeleton in Rest pose. As soon as a joint is offset by more than 0.1 millimeter it is counted as a joint with offset.
Note: The joint offsets are only checked when you enable “with joint positions” in the SL Importer’s Option tab.
Create your modified Skeleton by moving the joints one by one into place.
Checking your joints in the Viewer
The SL Viewer allows you to display the Skeleton Bones. You enable the bone display in the Develop menu under:
Develop -> Avatar -> Show Bones
- Joints are displayed as small dots (pink in the image for better visibility)
- Weighted Joints without Joint offset are displayed in Cyan
- Weighted Joints With Joint offset are displayed in Red
The SL Viewer shows the Joints at their expected locations. But the bone orientation (the colored lines) are always taken from the Restpose Skeleton.
The model shown in the image above has only its right arm edited into an A Rest Pose. You can see the joint locations are displayed where we expect them to be. But the Bone orientation (the lines) are not rotated as you might expect.
If you take a closer look into this then you find the Bones orientation is always taken from the Restpose orientation. Because of this the bones of the right arm do not line up as expected but point to the right (left from your point of view).
here you see how the “bones” are just translated (moved) from their original locations to the offsets.
A surprising behavior
The Appearance slider behavior depends on whether a joint has offsets defined or not:
- For regular joints (without offsets) the appearance sliders can influence the joint location (Translation) and the Scale
- As soon as a joint has an offset, the Translation part is disabled
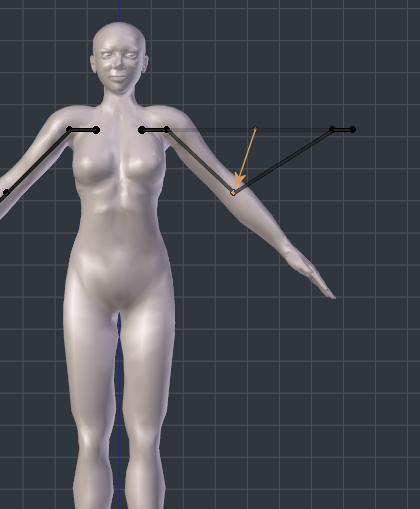
But you also must know that the orientation of the Joint scaling does not change. This is important as you can see in the image aside. In this example the right arm has been edited to point straight downwards. While the left arm remains unchanged.
This results in drastic differences how sliders influence the arm length.
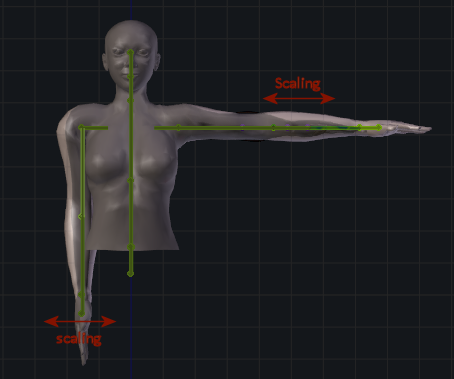
The scaling orientation does not change for joints with objects. This can result in very unexpected behavior. Here you see how the arm length slider changes the length of the right arm and the thickness of the left arm.
You can verify the arm length slider changes the length of the left arm (as before) but the thickness of the right arm (very unexpected, but works as designed).
And a nasty Pitfall
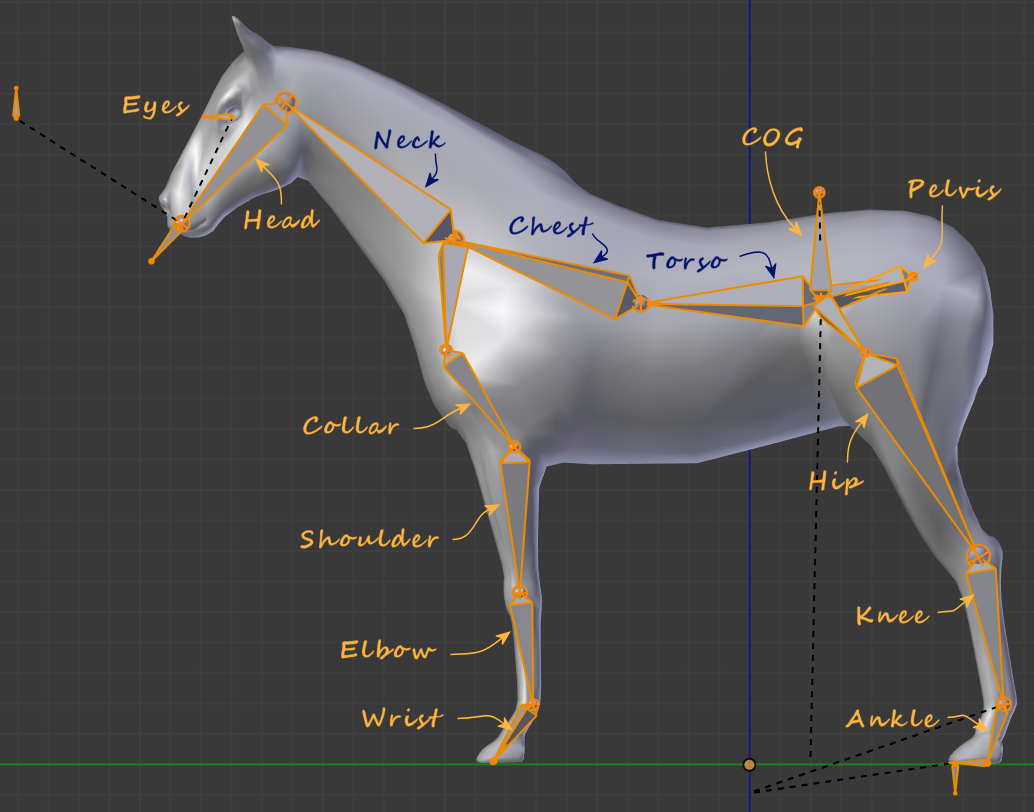
Now lets turn back to the horse from our initial example (see above). Lets say the mChest Bone of this horse has not been used for weighting the mesh (just as an example). The mChest bone lies in the middle of the Bone chain that starts at the mPelvis and ends at the mHead
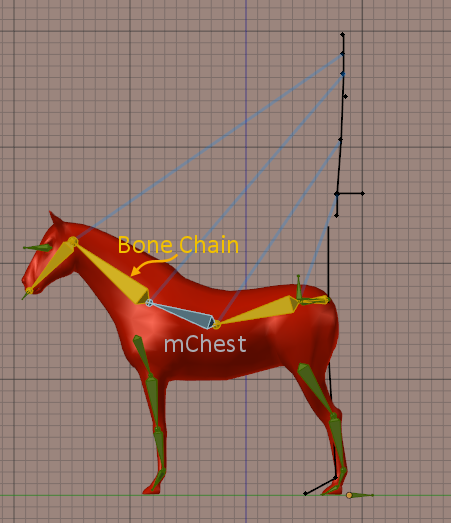
Since Bento it is possible to only import partial skeletons. Especially you can decide to only export the weighted bones of your character (because unweighted bones are not used for deforming your mesh). So, when you import this horse with the Bento Viewer, then the mChest bone is not imported. But…
During importing your character all “missing” bones are taken from the original skeleton. But the SL Importer has no way to find out where the mChest bone has been placed in the original model. So it simply keeps the mChest bone at its default location . And this results in a skeleton where no joint position is defined for the mChest.
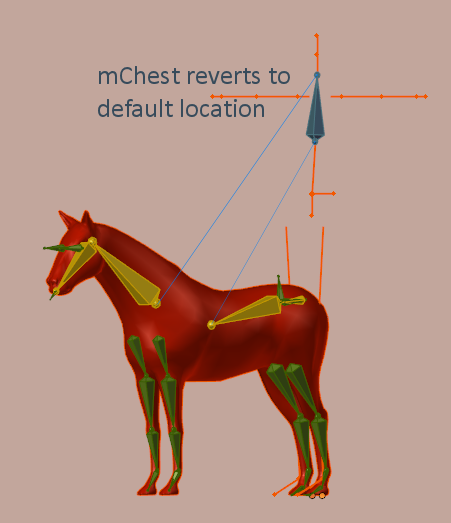
So even if the mChest bone plays no role in the character weighting (in our example) it still affects all its children as far as appearance sliders are concerned, because it reacts different to the appearance sliders when it has no joint offset defined.
Now you wonder why this is important even if you do not at all use the appearance sliders? In fact the appearance sliders take effect even when you wear a default shape. But this is another story.
What about PIVOT and POS
You may have seen that Avastar supports 2 Joint Types, namely PIVOT and POS. But what is that and how do we work with this? In fact this is one other source of misunderstanding, misbehavior and its quiet badly understood by everybody, even by LindenLab them self (i believe).
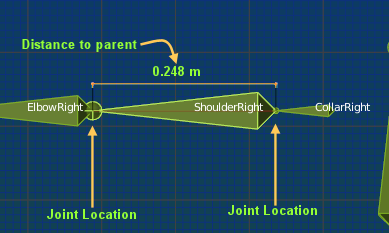
In short POS and PIVOT are 2 definitions of the Secondlife Rig which are almost identical but differ a tiny bit from each other. The reason for why those 2 rig definitions exist is unclear and buried somewhere in ancient history of Secondlife. Below you find an excerpt of the Rig definitions. The values are 3 dimensional vectors. Each vector defines the distance to the parent joint:
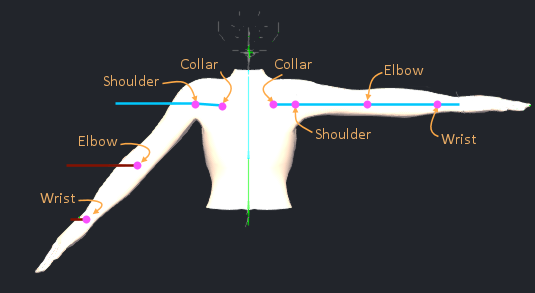
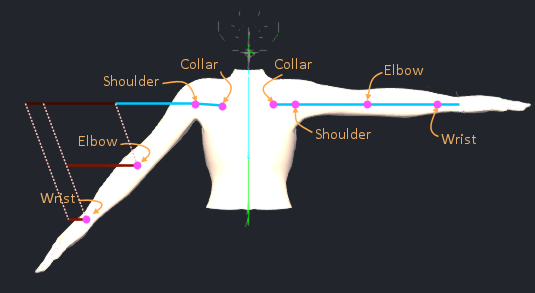
Bone
mCollarRight
mShoulderRight
mElbowRight
mWristRig
 Pivot-Rig location offsets
-0.020927 -0.085000  0.165396
 0.000000 -0.079418 -0.000000
 0.000000 -0.248000 -0.000000
-0.000000 -0.205000 -0.00000
 Pos-Rig location offsets
-0.021 -0.085 0.165
 0.000 -0.079 -0.000
 0.000 -0.248 -0.000
 0.000 -0.205 -0.00
For example the mElbowRight joint is exactly 0.248 m (24.8 cm ) away from the mShoulderRight joint in both Rigs (see image)
But the joints mCollarRight and mShoulderRight are placed at slightly different locations in both rigs (see the numbers in the table)
I have marked the differing numbers in orange boldface.
So what?
First of all the 2 Rigs are actually used for different purposes:
POS Rigs
Are only used by the Secondlife System character. The POS Rig is declared as the one Rig that has no Joint Offsets.
So when you import a mesh that was rigged to a clean POS Skeleton then even if you Import with Joint Positions the SL Import willl correctly see that there are no Joint offsets at all defined in the rig.
PIVOT Rigs
Are only used by the Custom Mesh attachments and Custom Mesh characters.
So when you import a mesh that was rigged to a clean PIVOT Skeleton then the SL Importer detects falsely that some bones have Joint offsets.
The following 2 rigs both have been created with default Rig values and imported with Joint Positions. Bones with Joint Offsets are marked in Red. You see the POS Rig imports cleanly but the PIVOT Rig exposes Joint offsets although its a perfect clean PIVOT Rig:
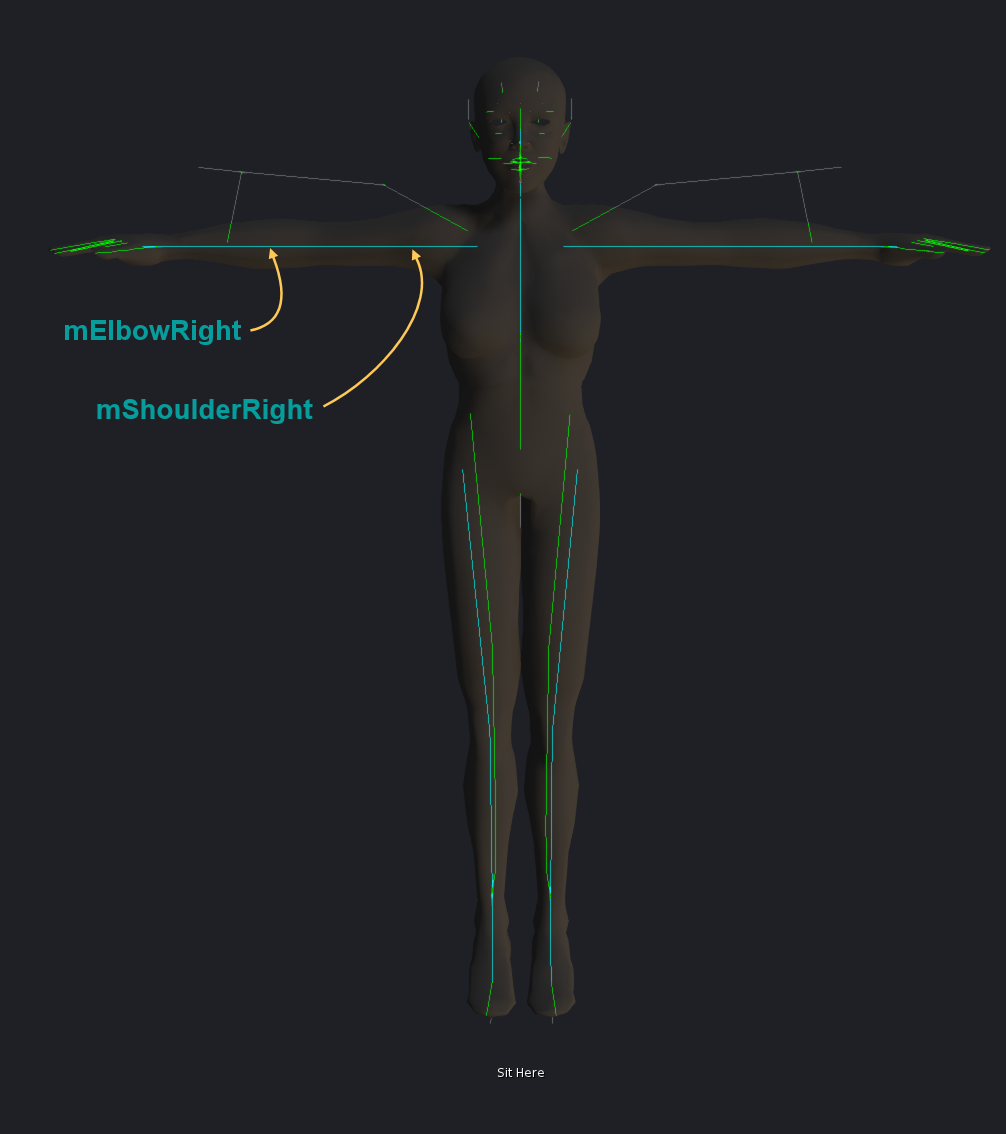
A POS Rig imported with Joint Positions
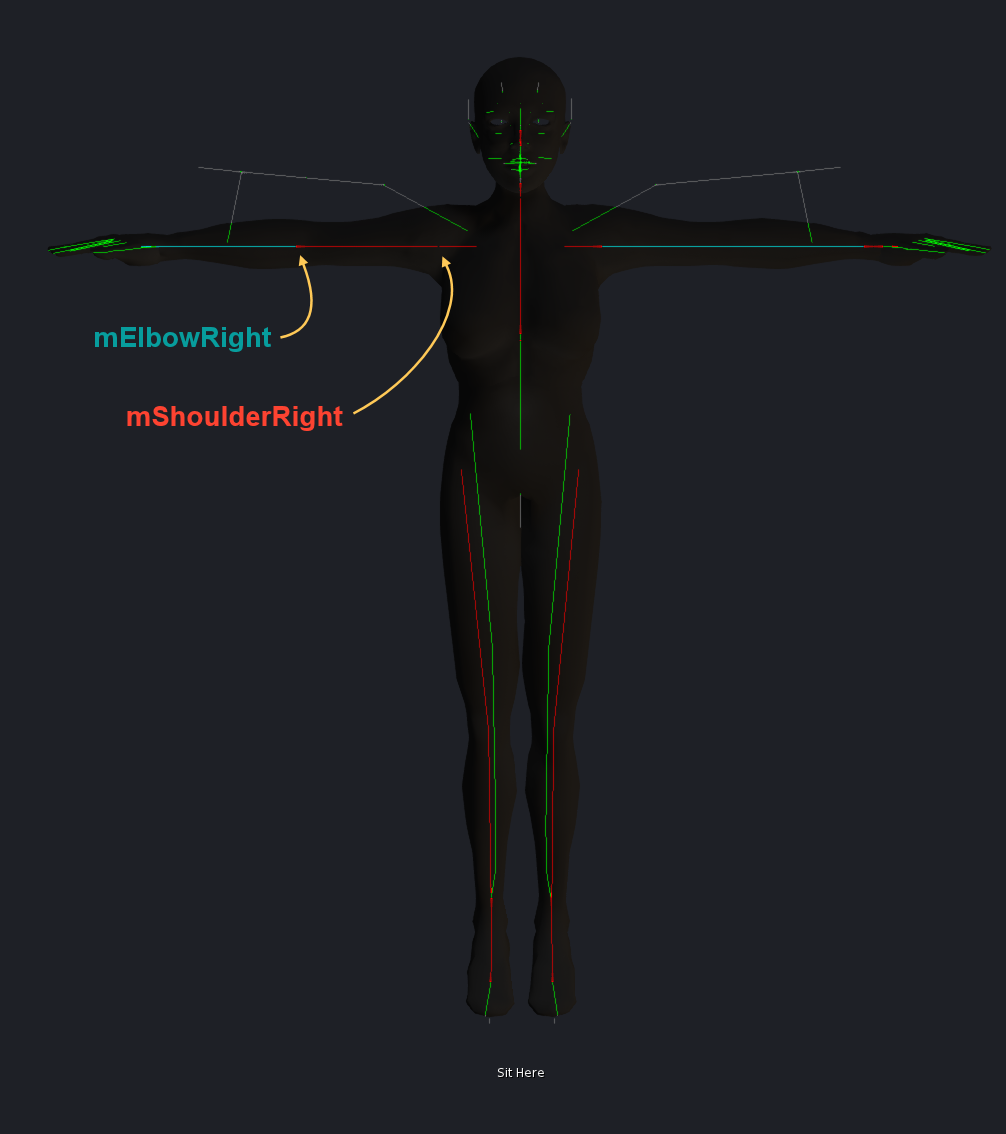
A PIVOT Rig imported with Joint Positions
And here is the Double Salto Mortale
Remember what i said about when is which rigtype used? Here is it again:
- POS Rigs are only used for the System Character
- PIVOT Rigs are only used for the custom Mesh Characters
So as a consequence here is the first Salto:
When you use a clean POS Rig for your mesh character then an import with Joint offsets works just fine and correctly detects there are no joint offsets in the rig. But the Mesh gets bound to a PIVOT Rig and so you will see mismatches when you compare to the System Character.
When you use a clean PIVOT Rig for your mesh character then an import with Joint offsets uncorrectly detects joint offsets for some bones. But the Mesh gets bound to a PIVOT Rig and so it will match better when you compare it to the System Character. But there are still mismatches… why?
And here is the second Salto:
When a Bone has a Joint Offset then it gets treated slightly different by the Appearance system. Technically it loses the ability to follow translations.
That means for the Collar bones and Shoulder bones: When you move the Torso Shoulders Slider then it just does not work any more. And this has major consequences and you end up with a shape that no longer matches to the System character mesh, even when the mesh itself does match perfectly on vertex level.
Summary
Second Life uses 2 slightly different Rig definitions for the System character and for your Custom meshes. Also Bones with Joint Offsets behave different from Bones without Joint Offsets. So …
- Forget to make Mesh characters by using the POS Rig. Otherwise you lose precision in the meshes.
- Forget to import clean PIVOT Rigs with joint offsets. Otherwise you loose precision in the meshes.
- The only reliable way to get good results: Use clean PIVOT Rigs and avoid using Joint offsets when you try to match items to the system character