
The Collada exporter exports your Mesh character or mesh attachment to a file with the file ending .dae and possibly it also exports a set of images (image textures). You find the Mesh Exporter in the Blender Export menu.
The Exporter opens with a file selection window where you can set the file to where you want to export.

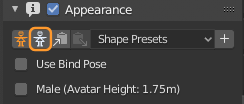
The Export option Panel

Hint: You usually can keep the default settings and just click on the “Collada(Avastar)(.dae)” button in the lower right corner of the Window (see zoom icon in this chapter title).
A File Selector will pop up. Here you can navigate to your export directory and then export your file as a Collada file (using the file extension “.dae”) There is also a set of export options available on the right side of the window (see image)

Tip: If you intend to use your exported mesh for Animesh then please note that Animesh currently does not support the Shape Sliders in world. Your mesh will always been displayed as when you enable the Neutral Shape preset in the Avastar Shape Editor panel.
The Export option Sub-panels
Textures export (advanced)
Note: For rigged meshes the images are not recognized by the SL Importer. This is a viewer bug which has never been fixed.
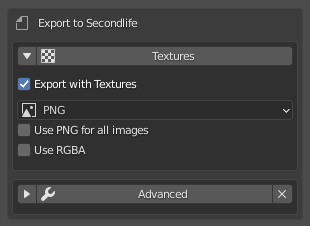
- Image Format: (default is png) is typically predefined in the Render settings. However we found it convenient to offer an immediate setting in the Exporter. By default the exporter applies the image type only to generated images.
- Use ‘Image format’ for all images: If you set this option, then Blender will use the selected image format for all exported images. If you disable the option, then only the generated images are affected.
- Use RGBA: Blender can export the Alpha channel for images. Normally you set this in the render settings where you can specify to use either RGB or RGBA for image exports. If the selected export format supports Alpha then enabling RGBA here will export images with Alpha channel even if the render settings are set to RGB and vice versa.
Hint: You may want to NOT use RGBA because of the Alpha glitch. However this is not a general advice. There are many situations where using Alpha images is even recommended (for example when you want to create an Alpha mask).
Hint: If the format of the exported image(es) does not support an Alpha channel then the “Use RGBA” option is simply ignored.
Advanced options
The Advanced Options are related to special scenarios. You should normally keep all options set as they are. This makes sure that your exports are well suited for SL. However in some situations you will have to get back here and set the options according to the descriptions below.
Warning: You must really know what you do when you set an advanced option. Handle with care!

Use Bind Pose: The Use Bind Pose option is largely documented in the Bind Pose Workflow
You normally set this option in the Avastar Shape Editor. We added it here only for convenience.
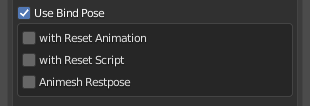
Following options are only available when the Use Bind Pose option is enabled:
- with Reset Animation: Avastar generates a 0-priority single frame animation of the current Restpose. This animation can later be used in SL together with an animation reset script (see below)
- with Reset Script: Avastar generates an LSL Script ready for usage in SL. In SL you copy this script together with the Reset Animation (see above) into your model’s inventory. You need this especially when you are not exporting in white stickman mode (see Avastar Shape Editor)
- Animesh Restpose: when your model shall be used as an Animesh, then you need to enable this option here. Otherwise your imported meshes will not look the same as in Blender.
Animesh Restpose: You use this option when you want to export cor Animesh. Note this option only resets the Shape Editor to White Stickman for Export. You may actually want to work in White Stickman Shape all the time, so this option is here just for convenience.
Export SL Rotation: When you export an Avastar Rig then it must be rotated according to the SL Standards (so that the character looks into the positive X direction).
Hint: You want to enable this option when you export to Second Life or similar worlds.
Enabled: Rotate the Rig by 90 degrees to make it compatible to the SL specifications
Triangulate: Export the meshes as triangles. Normally you want to do the triangulation on your own if at all. You also can just export without triangulation and let the SL Importer do the job. Or just use this option here.
This is an optional setting. We set it to True because it seems to be the safest option of all possible ones.
Export Shape: The current Shape from the Shape editor is exported as an avatar shape file (with extention .xml) Some viewers (firestorm) can import this file as new Avatar Shape by some
This option is most important especially for Developerkit makers. If you distribute this shape along with the developerkit file, then Avastar can setup the Developerkit Manager with more precision.
Sanity Checks: Perform tests on the Mesh (tricount, texture face counts, etc…)
Hint: You want to enable this option in most cases.
Bone Filters
Define which subset of the Bones in the rig are exported along with the meshes.

Export with Joints: When you have edited the Armature to adjust the Rig to your special character (Alien, creature, pet…) then you normally want to keep your edited Armature when you export your Meshes.
Hint: You want this option disabled only when your rig is so complex that Avastar can not calculate the Neutral Rig for your situation. In that case please set the sliders to SL Neutral (Avastar Shape Editor, white stickman icon) and never touch the sliders again (actually the sliders will be locked when you select the neutral shape)
Disabled: Export the Rig visually as it is. Note: You must make sure that the Avastar Shape Editor is reset to the SL Neutral Shape (White Stickman Icon). Otherwise Avastar rejects the exports.
Enabled: Calculate the neutral skeleton from the current rig settings (temporary set Sliders to Neutral SL Settings) but apply the current Slider settings as bind pose. Pleased refer to the Bind Pose document for further explanations.
Export all Bones: Add all bones of the rig to the exported Model.
Only Weighted Bones: Avastar can export all deform bones of the Rig. However in most cases it is enough to only export the deform Bones which are actually used (weighted to meshes)
Hint: You want to enable this option in most cases.
Disabled: Export all deform Bones unconditionally
Enabled: Export only those bones which are actually used (have weights for meshes)
Only Deform Bones: Avastar has many control bones (mainly for IK-Animation, targetless Animation and attachment points) Avastar can export all Bones of the rig, or only the Deform bones
Hint: You want to enable this option in most cases.
Enabled: Export only deform Bones
Allow Weighted Attachments: SL does not allow weighting of attachment points. Hence we suppress the export of weights for attachment points by default.
This option should indeed never be used for SL! Handle with Care. It is very likely that the SL importer rejects meshes with attachment point weighting at some time in the future.
Enforce Parent Hierarchy: Ensures that all parent bones of exported bones are also exported, even if they have no weights defined.
Details: When you enable the above bone filters then it can happen that not all bones of a Bone chain are exported. This becomes a problem when one or more of the not exported bones have Joint edits defined. Those definitions would then get lost during export.
Hint: You want to enable this option in most cases.
Enabled: Take care that all parent bones of exported Bones are also exported.
Collada Options
The Collada options are mainly for exporting the models with the most possible extra information. This data can ater be used by other 3D programs or target engines for rebuilding as much of the original Avastar rig as possible. Those options are rarely used.

Export Bone Roll: Export Bone Roll using the Blender Collada Scheme.
Hint: This is only useful when you want to later import back the Dae file to Blender.
Enabled: Export the Bone roll according to Blender’s Collada Scheme
Export Bone layers: Export Bone Layer Data using the Blender Collada Scheme.
Hint: This is only useful when you want to later import back the Dae file to Blender.
Enabled: Export the Bone Layer data according to Blender’s Collada Scheme
Export with Blender Profile: Use Blender Collada scheme for exporting Blender specific Information
Hint: This is only useful when you want to later import back the Dae file to Blender.
Enabled: Export Extended Options according to Blender’s Collada Scheme
Unsupported Options
Avastar also provides some advanced export options. However those options are not shown by default as they are only rarely used.
Note: If you really want to use these options, then you first need to enable them in the Avastar Addon Properties Panel.

You enable these options in the Avastar Add-on Panel (where you initially enabled the Add-on after you installed it):

Limit Weight Count: In SL the number of weights per vertex is strictly limited to 4. We believe this number is enough for all weighting tasks. In cases where you think this limit is too low, we always found the real problem was due to bad mesh topology and bad rigging.
Setting this number affects the maximum number of weights which are exported by Avastar. We strongly recommend to keep this number set to 4.
Troubleshoot Collada Export Warnings/Errors
Warnings
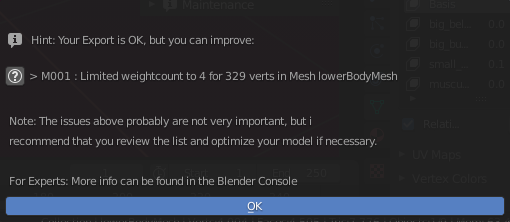
When exporting meshes with the Avastar Collada exporter, our tool detects possible issues which may or may not become an issue when you later upload to the target system. In that case you get a popup window after export with a list of possible issues.
Errors
Sometimes Avastar detects serious issues which can not be exported in a good way. In this case You will get another similar popup that lists all issues.
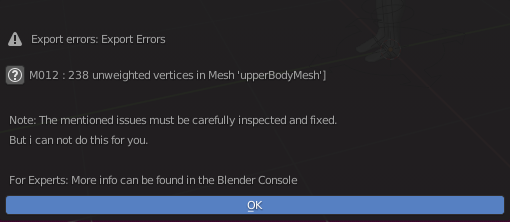
If there is more detailed information available, then you find an additional (?) Icon on the left side of the message. Click on this icon to open a web page with more information.
Known Issues with Importing to SL
MAV_BLOCK Parsing error
If you create small objects with disconnected sub-meshes, then you often get errors labelled as MAV_BLOCK Error when you try to upload your mesh to Second Life.
The image aside gives a nice example of a single object that is made of many smaller disconnected submeshes. While there is nothing wrong with this mesh, the SL Importer often has trouble to import the mesh.
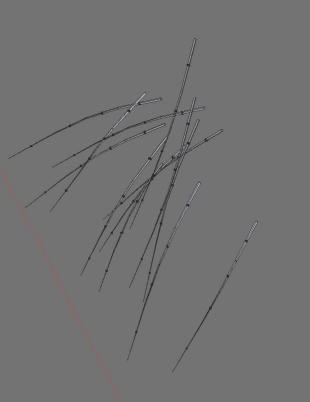
The reason for this issue is hidden somewhere in the Second Life Upload process. We believe the reason for the issue is that the SL Importer deletes Submeshes when they become too small. Then suddenly a part of the Mesh gets removed and this can end in a situation where a complete texture face is no longer available in one of the LOD’s. Then the SL Importer runs into this issue.
A known Workaround
In all cases where small submeshes where involved, we found that adding your own (simple) physics mesh to your Object solves the problems:
- Create a simple mesh like a cube or a tetrahedron for example. The size of the mesh does not matter.
- Export this simple mesh as Collada file
- Import your Mesh as usual.
- But before uploading visit the physics tab of the SL importer
- There add Physics mesh from file
- select your simple object
Now the upload should work.
DAE Parsing Errors
Second Life users frequently report a Dae parsing error. We found a couple of situations where this error appears (see below). However, in general your first step is to look into the Second Life Viewer Logfile…
Find the Viewer Logfile
Typical causes for this issue
Special characters in Object names
Most dangerous characters are: & < ! > # $ ‘ “
Resolution:
Remove special characters in Object names and then export again
Special characters in File names
Most dangerous characters are: & < ! > # $ ( * ) [ ] { } ‘ “
Resolution:
Remove special characters in file names (renaming the .dae file should be enough)
Extremely dense Meshes
Please check if your mesh contains areas with very small triangles (edge length smaller than about 1 millimeter)
Resolution:
Try to avoid high resolution meshes. You are doing better when you put high density into textures and normal maps (Normal maps are now supported by Second Life)
Orphaned edges and vertices
If your mesh contains edges which do not belong to any face or disconnected vertices.
Resolution:
Remove these edges and vertices.
Hint: in Edit mode Select -> Non Manifold to find candidates. You may want to disable the “boundary” option in the operator panel.
Duplicate Vertices
If your mesh contains duplicate vertices this can cause issues. However sometimes duplicate verts are on purpose (for example when you use the split edge modifier in Blender 2.73 or older) so you need to test if this issue is caused by split edge or by accidental duplicates.
Resolution:
Remove the duplicate vertices.
Hint: in Edit mode ‘W’ -> Remove Doubles to delete the duplicates.
Detailed Messages from the Avastar Collada Exporter
M001
M002
M003
M004
M005
M006
M007
M008
M009
M010