Glossary: Skinning
Skinning is the process of creating an association between a Mesh (the Skin) and a Rig. More specifically in the Skinning process we define associations for each bone of the Rig’s Skeleton to each vertex of a mesh. In practice, for a polygonal mesh character, each bone is associated only with a subset of the character’s vertices.
Portions of the character’s skin can be influenced by 2 or more bones, where each vertex of the affected area gets an influence factor to each associated Bone. This factor is also called Vertex Weight. Thus the influence of each bone on a specific Vertex is defined by its Vertex Weight.
The process of Skinning includes:
- Binding the Character to the rig in a specific Pose (basically establishing an association between the Rig and the Mesh)
- Weighting the Mesh to the Armature bones (create the Vertex Weights)
Note: When binding a Mesh, then typically some form of automatic Skinning is applied as well to populate the mesh weight maps with initial data. Those initial weight maps are then optimized and tuned manually.
The Binding Section
Here is where your Mesh(es) are connected with your Rig. This step is best described as Binding the mesh to the Armature
When none of the selected Meshes is already bound we have following Binding function:
- Bind to Armature (when the mesh is not yet bound)
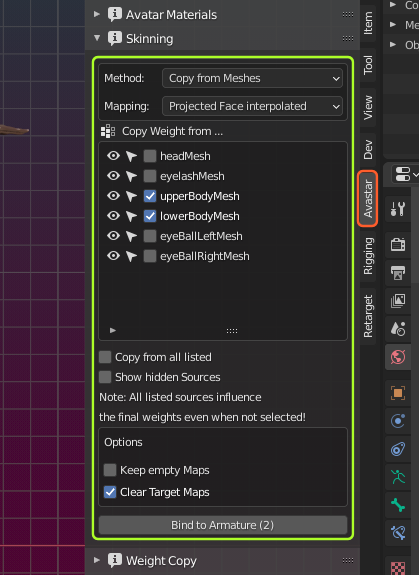
Note: If you have more than 2 meshes selected, then the number of selected meshes is displayed in parentheses (see image, the Bind to Armature Button is at the bottom)
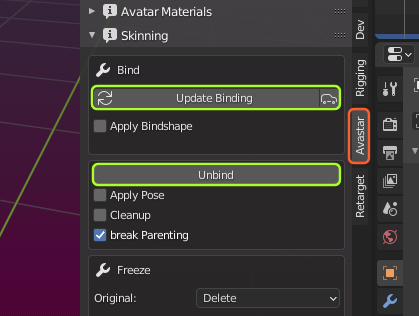
When the selected meshes are already Bound, we get these functions instead:
- Update Binding
- Unbind
Note: When the Auto icon in the Update binding button is enabled, then the update happens automatically. You find more about this panel in the document about Unbinding.
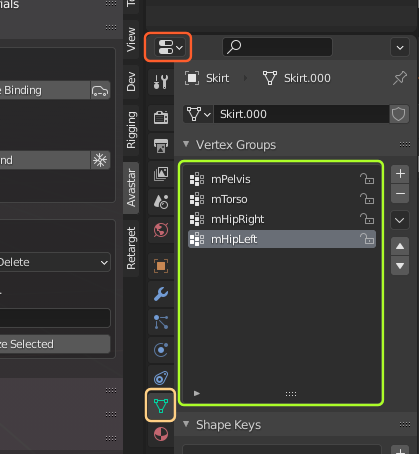
Tip: Where are the Weight maps located?
The Weight maps (which get created during binding) are stored in the meshes. You have access to the maps in the Properties Editor, in the Mesh Data section, Vertex Groups Widget. Weight maps have the same name as their corresponding bone.
Tip: You can create weight maps manually by creating a new vertex group and name it like the bone for which the map is supposed to be used. If the mesh is Bound to an armature it is automatically used as weight map.
The Binding Method
When a mesh is not yet bound, then you have different options for creating the weight maps for the initial binding. Technically this is all about from where Avastar gets the Mesh weight maps. Below you find more details about the supported methods
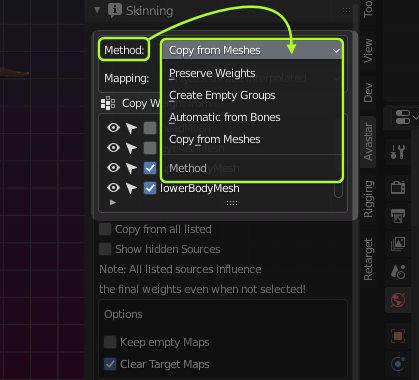
Method: Preserve Weights
No weight maps will be created. However, if the mesh already has weight maps they will be preserved. You want to use this option when your mesh has already been weighted, and or when you want to manually weight your meshes.
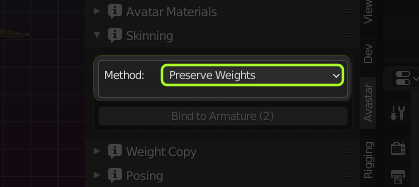
Note: This option only makes sense when you have weight maps on your mesh. Such as when you needed to Unbind a mesh (see below) and later want to rebind the mesh to your Armature, then you might want to preserve the weightmaps from the Mesh instead of creating new ones.
There are no more options available for this Skinning method.
Method: Create empty Groups
Weight maps will be created, but not populated (no weights will be calculated). If the mesh already has weight groups assigned, then these groups will be preserved. You want to use this option when you later plan to assign weights manually.
Note: This option creates empty weight maps for all rigged deform bones. In most cases this is not what you want, because…
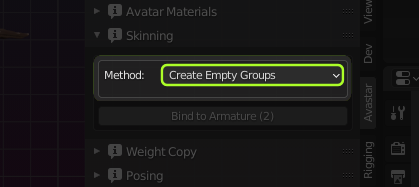
Important: …You can add weight maps at any time later. In fact many of the available weight tools automatically create weight maps when they are needed. So, please also take a look at the skinning method Preserve Weights as it is described in the previous section (see above). In most cases this is the better choice because it does not create unnecessary maps.
There are no more options available for this Skinning method
Method: Automatic from Bones
the weight maps are generated from the Skeleton by using the Bone heat algorithm. This method generates weight maps depending on the location of the skeletal bones and the locations of the meshes. The method is based on Blender’s automatic weight from Bones.
It normally creates reasonable results, but you often need to tweak the data manually. However, sometimes the heat algorithm fails to find solution for one or more bones…
This method has options…

Options
Only Visible Bones
Only take weight from the visible bones.
IncludeGroin:
By default mGroin is not used as deform bone. Setting this option enables the mGroin bone as a deform bone.
Keep Empty Maps:
Keep weight maps even when there is no weight in them. Take care: Normally you want to keep this option disabled.
Clear Target Weight maps:
Remove any preexisting entries from the weight maps to make sure the bone weights are added to clean maps. Normally you want this option to keep enabled
Troubleshooting
Sometimes the automatic weight from Bones algorithm creates unexpected results. Here are some tips for troubleshooting:
Failed to find solution…
The automatic weight from bones algorithm normally creates reasonable initial results. However, sometimes the heat algorithm does not claculate weights for a subset of the mesh vertices. And sometimes it even rejects to create weights for the entire mesh.
There was a topic about this on Blender stackexchange: See fails to find solution for one or more bones…
Here are some tips how you might get rid of the issue:
- Fix duplicate vertices
- Fix mesh polygon intersections.
- If the mesh object has 2 or more unconnected submeshes, then try to split the submeshes into separate objects, then weight again and finally join the submeshes back into one single object
- Check if the Mesh uses modifiers (e.g. subdivision). Disable the modifiers before binding, then add them back after binding.
- Check if the bone deform flag is set for all bones where you expect to get weights.
- Be sure you are not selecting the green animation bones or the yellow IK bones . Remind: the green bones are only used for Animation. They should never have weight maps.
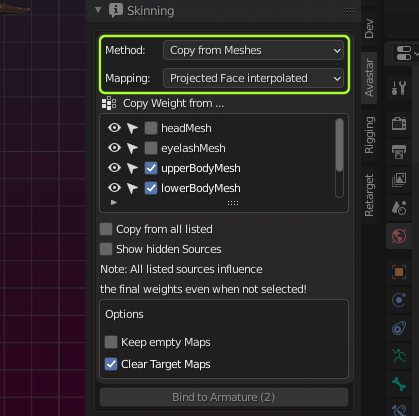
Method: Copy from Meshes
The Weight maps are taken from other Meshes currently attached to the same rig. The list of weight sources is available in the Copy Weight from … subsection (see image) where you can select the weight sources individually.
The list of displayed meshes can be modified:
- Copy from All Listed:
Take weights from all meshes listed in the widget, regardless if they are selected. - Show hidden sources:
Also list the meshes which are currently hidden.
About the icons in the list
- The Eye Icons:
When you disable the eye icons, then the disabled meshes are not used as weight sources - Selectable Icons (for convenience):
Allows to set selectability of the Mesh. this is a shortcut for the same operation in the Outliner, so it is nothing special - Checkmarks:
Copy weight from all chekmarked meshes. If the Copy from all Listed Option is enabled, then this option is not taken into account
Note: You can not expect that this function automatically creates optimal results! You later need to fine adjust your weights manually. Please look at the Create an Attachment tutorial on this website.
Options
Keep Empty Maps:
Keep weight maps even when there is no weight in them. Take care: Normally you want to keep this option disabled.
Clear weights:
Remove any preexisting entries from the weight maps before adding the bone weights. You want this option be enabled in most cases.
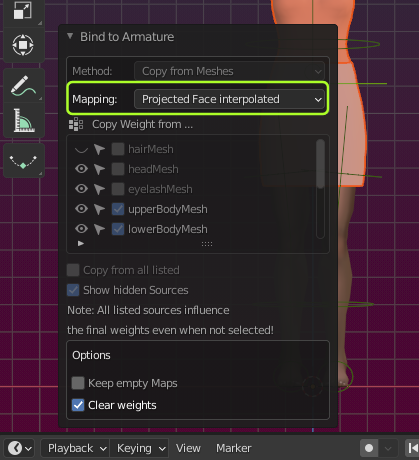
The Redo Panel
As soon as the Binding has finished, a redo panel appears. In this panel you can change some of the displayed actions interactively. the most important parameter here is the mapping parameter: You can change the mapping here.