Once in a while you want to import a rig from a Collada file. While this is not a big thing in general there are still a few pitfalls that could get you into trouble. Avastar has got the Rig Transfer Tool for this purpose. Although this tool is not perfect, it may still be a good starting point to get your imports attached to Avastar.
This mode is entered when you have selected a foreign (not Avastar) Armature. In that case Avastar shows the Rig Transfer Tool at the Bottom of the Rig Inspector Panel.
Note: Often users begin with importing an already existing model that is stored in a Collada file (.dae). However, while Blender can import Collada files, you still must take care to use the correct Collada import options. Please follow the notes below if this case applies to you.

How to Import a foreign rigged character from Collada. more...
- Open the Collada Importer by using:
File -> Import -> Collada
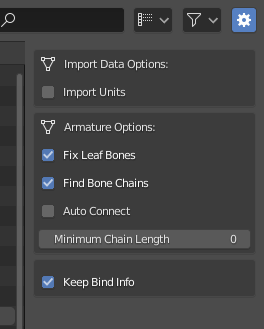
- Locate the Operator Redo Panel near to the top right corner of the File selection Window (See image). Please make sure that the following options are enabled (check marked):
Fix Leaf Bones
Find Bone
Keep Bind Info (importing Fitted Mesh Bones, see below)
Note: the Auto Connect option can be disabled in most cases. Please test what works best for your case!
- Import the Model
Important: The keep bind info feature is especially needed for development kits that are made for restposes other than the SL T-Pose. If you intend to import those development kits to Blender/Avastar, then please make sure that the Keep Bind Info option is enabled.
Note: If you ignore this Tip, then be prepared that your meshes will not look right in SL. Avastar can not export your meshes correctly in that case. Also you can not fix this later. So better get it right here and now.
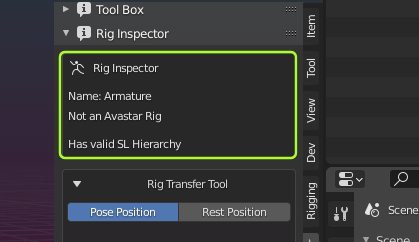
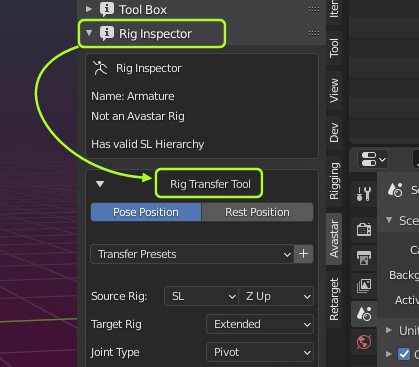
Once you have imported your foreign Rig from Collada you select the imported rig in Object mode. Now the Rig Inspector examines the Rig and gives you some information about its finds (see image).
The important part here is the notice Has valid SL Hierarchy
If you see this information in the panel, then you can proceed as explained below.
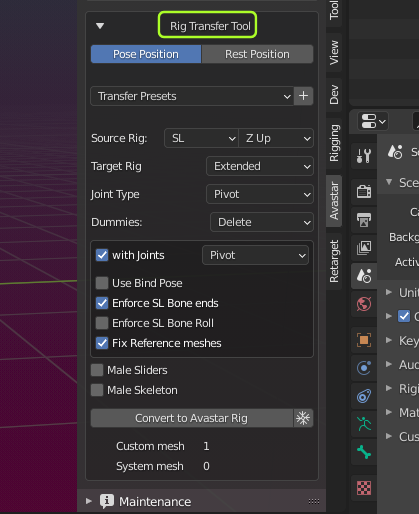
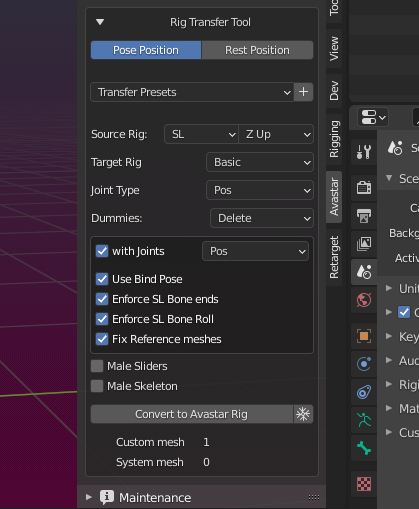
When converting a foreign Rig to Avastar the Rig Transfer Tool shows a different set of conversion options. Please make sure you have selected the rig in Object mode!
In detail you now can specify:
- Source Rig type (Typically SL)
- Target Rig style (Basic or Extended)
- Joint type
- …
It is important to get the configuration right. This may be a tedious task when you have only limited information about the imported rig and its meshes. You must prepare for doing a bit of experimentation here to figure out what is best in your case.
Tip: If your rig is transforms correctly into an Avastar, but the meshes become deformed or have wrong orientation, location or scale after the conversion, then a good work around is to revert to the original imported rig, then unbind the meshes (please use the Blender Unparent function for this) and then redo the transformation of the rig into an Avastar. Finally adjust the meshes to the Avastar rig, apply transforms (location, rotation, scale) and use the Avastar bind tool as usual to finish the transfer.
The Header Section
Pose/Rest Position: This selector allows you to quickly toggle between the current Pose and the Restpose of your Rig. The selector also shows up in Blender’s own Properties Editor in the Rig Data section. We added this here only for convenience.
Transfer Presets: We found that the configuration is a bit confusing especially if the Rig Creators do not give clear instructions. To make life a little bit easier we have added a selection of predefined configurations which have been tested by us. You also can store your own Transfer Presets.

Source Rig: We offer 4 different rig types
- SL: The Rig has been imported from the workbench, avatar.blend or any compatible SL Rig in its neutral Shape.
- Generic: The rig is oriented like the Avastar Rig, but it is otherwise fully compatible to the SL Rig
- Avastar: Please ignore this option unless you are explicitly told to use it.
- Manuellab: The rig has been created by Manuellab (or MakeHuman). This option is not largely tested and may not work properly.
Up Axis: In most cases this is Z Up, we have found a few models (mostly from Maya) which use Y Up
Target Rig: You can select either Basic Rig or Extended Rig (with hands, face, wings, …)
Joint Type: Pos or Pivot(used in most cases) Which Joint type is used must be published by the Rig creator. When in doubt, then use Pivot. If the Joint type is wrong, you will see small deviations when you later compare in SL the original Mesh from the imported collada file and the same Mesh exported by Avastar.
Dummies: You can decide to Keep, Hide, or Delete the Avastar Meshes in the converted Rig. For non human creatures you normally want to delete the Avastar meshes. For human characters you most probably want to delete or hide the Avastar meshes.
The Options
The Import Options allow you to define in more detail how exactly your imported Rig shall be Updated. Finding the right options is a bit tricky at times, depending on the nature of your Rig. The options are explained below
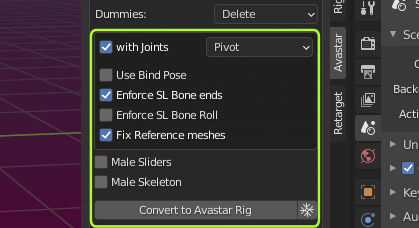
With Joints: Tell Avastar to record the details of the imported skeleton. SL supports 2 slightly different Rig definitions, namely the Pivot Rig and the Pos Rig. Those rigs only differ in their precision of defining the Joint locations. However small the difference is, it is visual.
It is very important to know which of the 2 Rig versions has been used to create the foreign rig. If you choose the wrong rig version here, you later will end up with small deviations from the original. So, best is to ask the creator of the rig. Or at least make some experiments before you decide which is the correct rig version to use here. Then conserve your finds by creating a new Preset for later reuse.
Use Bind Pose: When the imported Rig is mostly human and does not differ much from the SL Default rig, namely only by bone rotations, like for example the Belleza Developer kit kit or the TMP Developer kit, then your best bet is to enable the Use Bind Pose option. Because then all Appearance Sliders behave very similar (but not identical!) to the default system character.
Note: You can enable/disable this option at any time later (in the Pose Panel)
Enforce SL Bone Ends:When you have imported a Developer kit from a Collada file, then the bone ends of the imported bones are not defined. In this case Blender creates some fictive bone ends based on some reasonable assumptions. While the bone orientation of the end bones does not matter a lot, you still may want to match those end bones to the corresponding SL Bones.
This option sets the lengths of the end bones (especially the Fitted mesh bones) according to the SL settings.
Note: Actually it should not matter if you enable this option. If you are in doubt, keep this option enabled.
Enforce SL Bone Roll: The Bone roll is the rotation of bones along their long axis. If the Bone Roll is wrong then you can end up with very odd issues. This option tries to reset the Bone Rolls of your armature Bones to the Roll as used with the Default SL Avatar. This option is only rarely necessary, but very handy when it is needed. (remember: You need to experiment a lot!)
Fix Reference Meshes: You need to keep this enabled when you import a foreign rig. Unless you plan to never use Avastar’s Shape Editor and its appearance sliders.
Male Skeleton: Bind your meshes to the Avastar Male rig (instead of the female rig)
Note: If you get this wrong you may see very odd distortions on your mesh, especially the arms become longer or shorter then expected and the meshes do not match the Skeleton. In most cases the imported rig has the female skeleton (also for male models)
Male Sliders: Set the gender for the Appearance Sliders.
Note: This option can be changed at any time in the Appearance Sliders Panel
The Operator section
The Snowflake icon: When this option is enabled, then the original rig is applied to the meshes (the current pose is baked) before updating. You only want this option when your original Rig is not in Restpose.
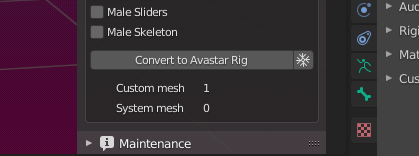
Below the Update Rig button you find an information section which tells you some details about your Rig and the bound meshes:
- Custom Mesh: The number of user made (custom) meshes bound to the Rig
- System Mesh: The number of Avastar meshes (head, body, eyes, …) bound to the rig
Note: The System Mesh count is normally always 0. If you see anything else there, then please report this situation to us.
What happens during the update
When all settings are done, then you click the Update Rig button (see image above). Avastar will now step through following activities:
- The original Armature is applied to the Meshes (when snowflake icon enabled)
- The meshes are unbound
- A new Avastar armature is created (Basic or Extended Rig version, Pivot or Pos Rig type)
- The Avastar bones are aligned to match the original rig (If check for joint edits is enabled)
- The meshes are bound to the new Avastar armature
- Depending on the other options the new Avastar meshes are kept, hidden or deleted
Example: Converting the Belleza Development Mesh
There is nothing special about the Belleza Devkit. It just happens to be an ideal candidate for showing how to do a Migration in practice.
Step 1: Import the Devkit
- Open the Collada Importer by using:
File -> Import -> Collada
- Locate the Operator Redo Panel near to the top right corner of the File selection Window (See image). Please make sure that the following options are enabled (check marked):
Fix Leaf Bones
Find Bone
Keep Bind Info (importing Fitted Mesh Bones, see below)
Note: the Auto Connect option can be disabled in most cases. Please test what works best for your case!
- Import the Model
Important: The keep bind info feature is especially needed for development kits that are made for restposes other than the SL T-Pose. If you intend to import those development kits to Blender/Avastar, then please make sure that the Keep Bind Info option is enabled.
Note: If you ignore this Tip, then be prepared that your meshes will not look right in SL. Avastar can not export your meshes correctly in that case. Also you can not fix this later. So better get it right here and now.
Step 2: fix the Material settings (specific to Belleza)
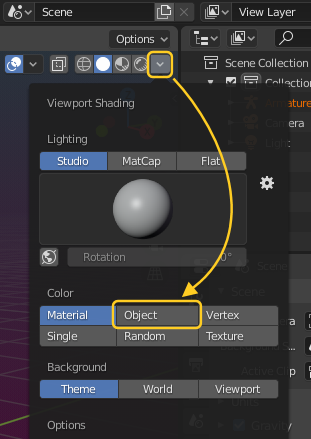
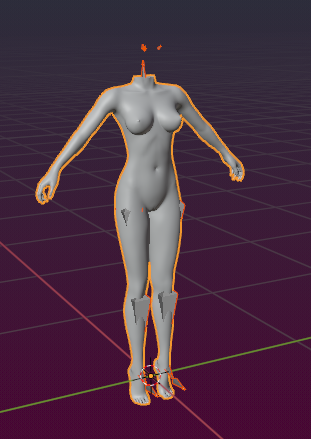
Belleza has set up their models with a transparent material. So it is very likely that you see only the Outline of the Belleza Body.
The reason for this is that the Blender 2.8 Viewport has been improved a lot and it now can display advanced material options.
The good news: You can configure that…

- Open the Shading Options panel (upper right corner of the 3D Viewport)
- in the Color subsection select Object
- Now the Belleza Body appears again as usual
Now the mesh appears as usual
Step 2: Set the Migration options
- Select your Armature in Object mode (or Pose mode)
- Open the N-Panel and locate the vertical Avastar Tab
- Within the N-panel scroll down to the Rig Inspector
- Within the Rig Inspector locate the Transfer tool
- The Source Rig is SL with the Up Axis: Z
- The Target Rig can be Basic or Bento depending on what you want to do next. When in Doubt then select Basic.
- The Joint Type is Pos as far as we know.
- You probably do not want to have the Avastar meshes, so Dummies:Delete
- Belleza comes with an A Posed rig, you want to use Bind Pose and With Joints
- Since we are importing a female model, we keep Male Sliders and Male Skeleton unchecked
Important: For the male Belleza Mesh please enable Male Sliders but disable Male Skeleton
Now you are ready to click the Button Convert to Avastar Rig.
Belleza Mesh right after Import (Collada)
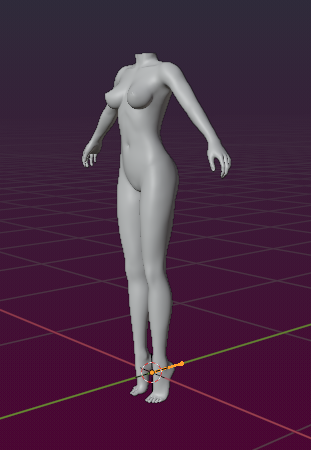
Belleza Mesh after conversion to Avastar. The 90 degree rotation is on purpose.
We propose to use the Developer kit Manager instead of using the conversion as described here.
Note to Developer kit Creators:
Step 3: Prepare the Export
The Belleza Rig is an ideal Candidate for been used with Bind Pose. Just to remind you: You can enable or disable the Bind Pose option at any time.
- Open the Settings Panel
- Ensure you have set Advanced Settings
- Open the Pose Panel
- Enable the option Use Bind Pose

Step 4: Check the Sliders (optional, out of curiosity)
- Open the Appearance Panel
- Select the Torso Section
- Check how the arm length changes with the slider values
Now make an experiment:
- Disable the Use Bind Pose option
Right above the Appearance sliders - Now check how the Sliders work totally different on the Arms
Gotcha? Perfect!

Arms in Bind Pose mode
In Bind Pose mode the arm length changes as one would expect:

Appearance Slider – 0

Appearance Slider – 100
Arms in Joint Offset mode
In Joint Offset mode the arms are shifted sideways instead of lengthened along the limb:

Appearance Slider – 0

Appearance Slider – 100
Important: If you do not understand why the Appearance Sliders work different when you have enabled use Bind pose, then please take a moment and find out about the Slider behavior. It has been largely discussed in the SL Forums and in the SL Wiki…
Step 5: Check the export
Now do a regular Avastar Mesh export and see how your mesh behaves (you can use Aditi for testing). We tested it as follows:
- Important for Belleza: Before you export your mesh take care to disable the Male gender setting (export as female)
- Upload the Belleza Devkit file to SL
- Upload the Avastar export to SL
- Wear both meshes and
- inspect them in Wireframe mode
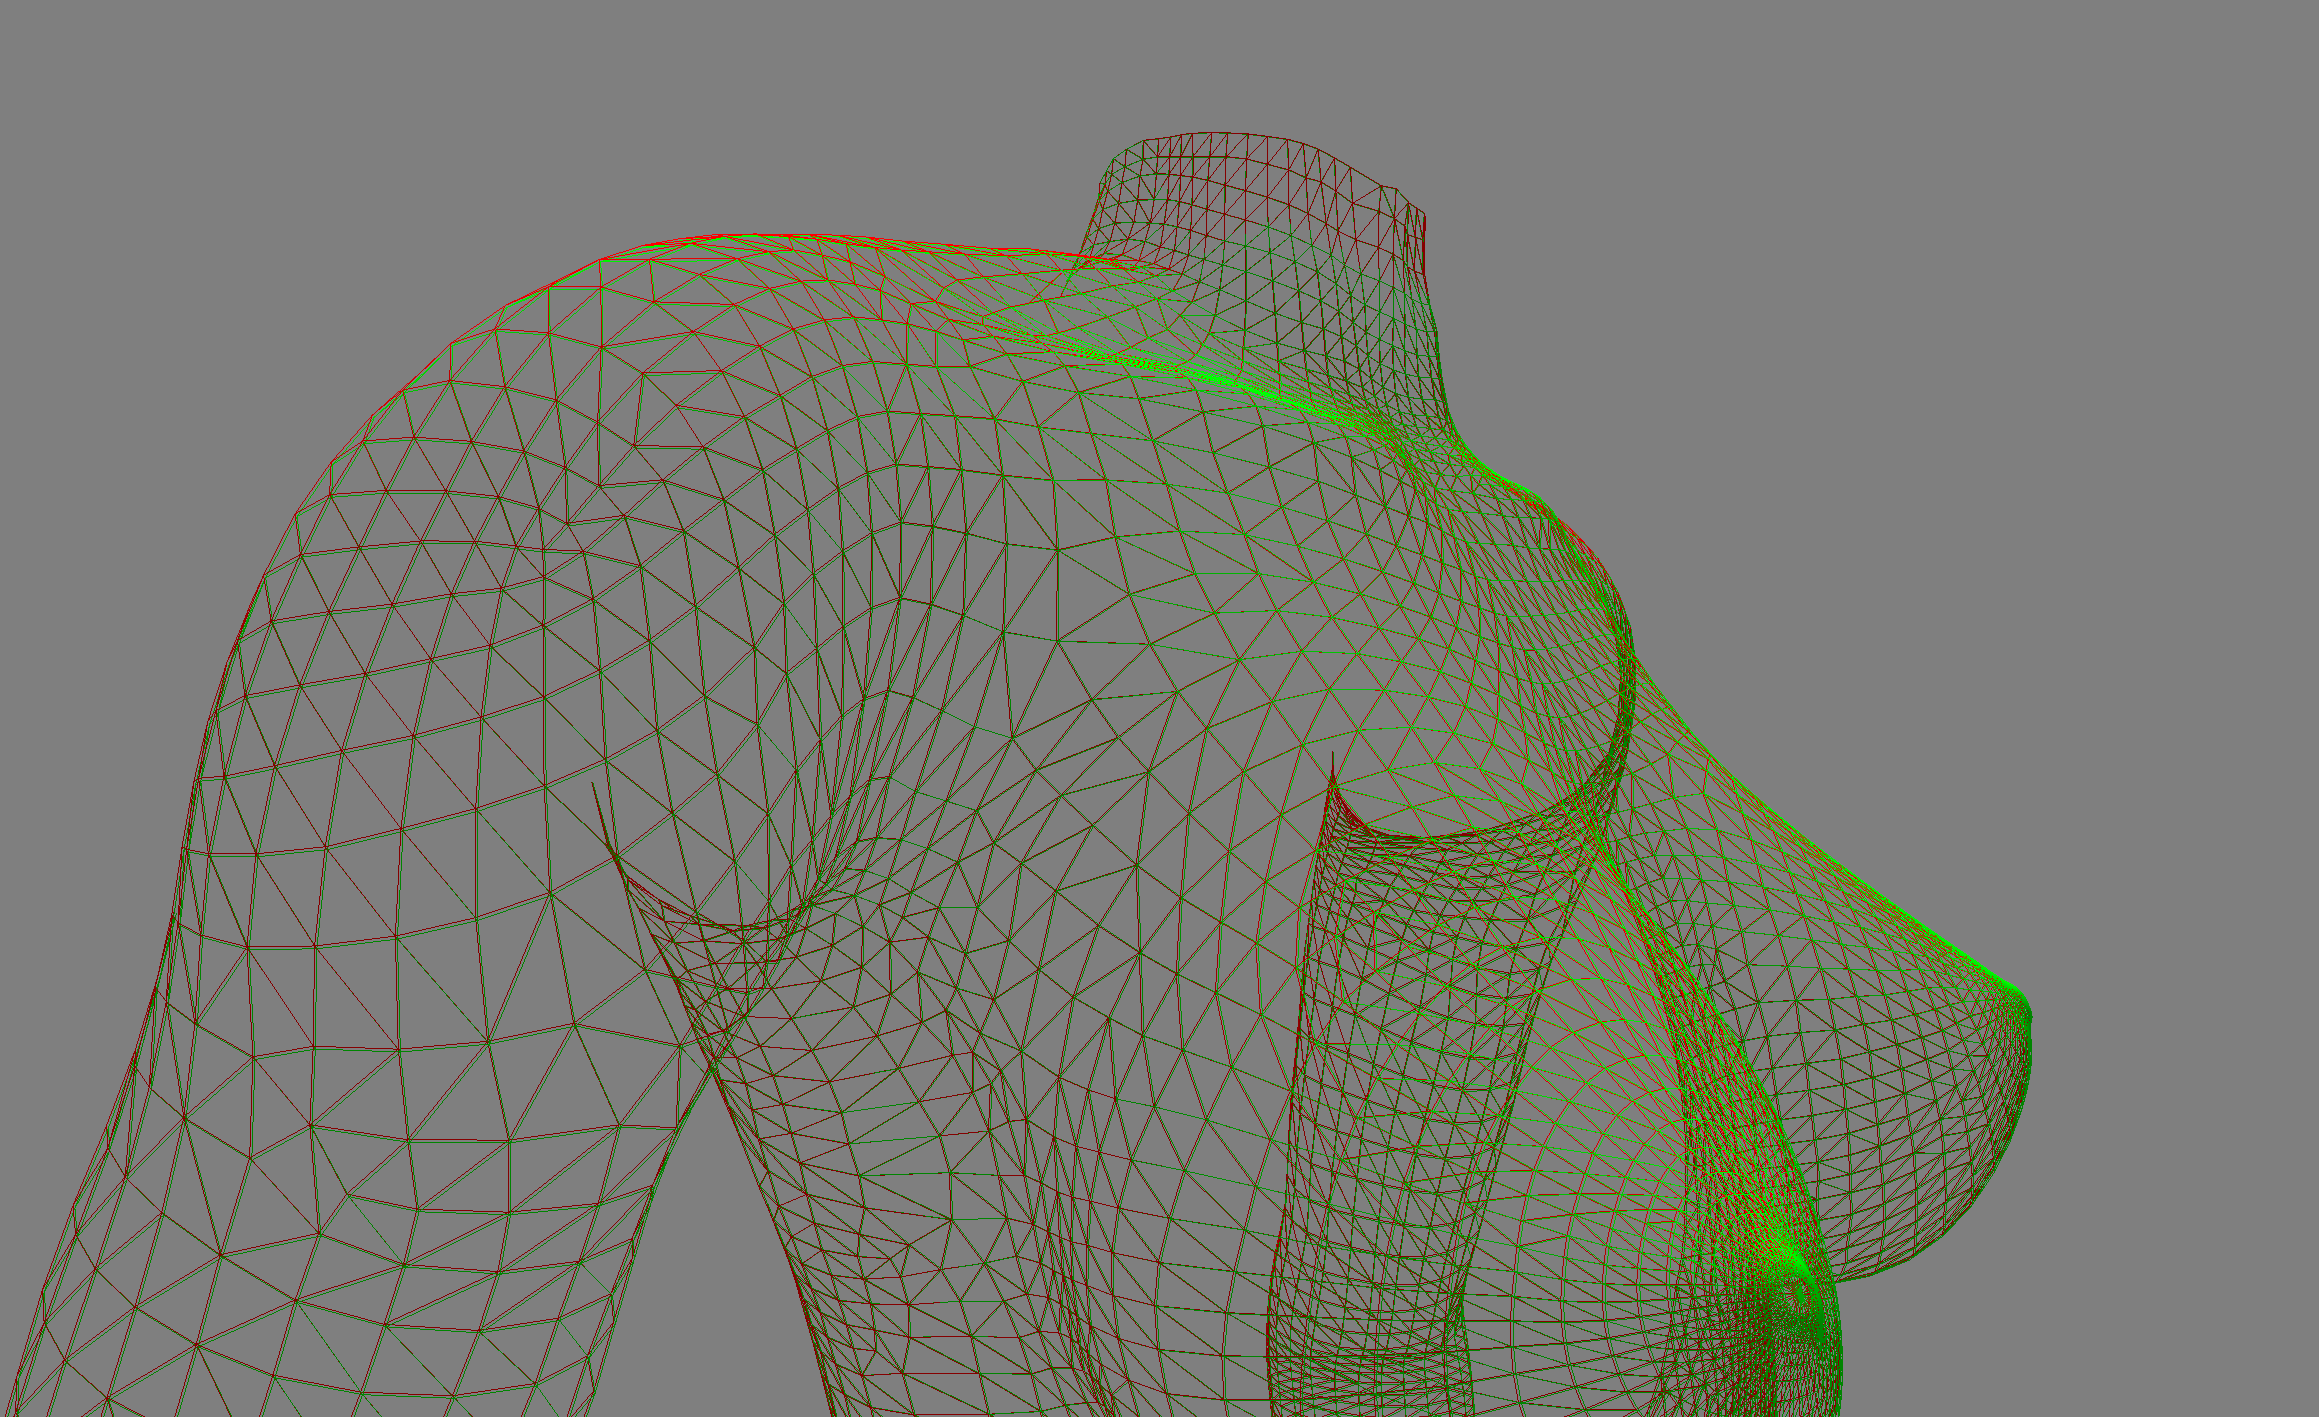
Avastar and Belleza show an almost perfect match when inspected in wireframe mode