Purpose
Sometimes you may want to modify the Avastar meshes
- to create slight modifications of the original SL character.
- to use the original as starting point for your own Model.
- to create static (posed but not rigged) versions of the Avastar meshes.
The workflows below help you to Quickly create a Mesh based clone of the SL Avatar.
Good to know in advance
Important: In some cases you may want to modify (edit) the Avastar character meshes. For example when you want to …
- Create a tiny or a giant.
- Add extra shape beyond what you can do with sliders.
- Modify the Avastar Meshes into something totally different.
- Join the character parts to have one single mesh body
Well, you actually can do this. But you must convert the Avastar Meshes into regular custom meshes ( see the Freeze option in the Avastar Tool Box).
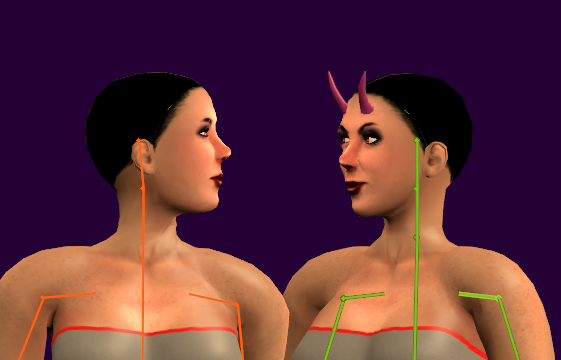
If you do not prepare (freeze) the Avastar meshes, then you have a good chance to break Avastar and create wild results as shown below:
Unexpected results after small edits in the Avastar meshes
The technical reason for this behavior
Avastar needs to translate the slider settings into the final shape as you can see in the Blender 3D View. However the shape calculation is based on a hidden reference shape. This reference shape is created once when the sliders are setup for the character. And Avastar relies on the reference shape having the same mesh topology (same number of verts, edges and faces) as the visible mesh.
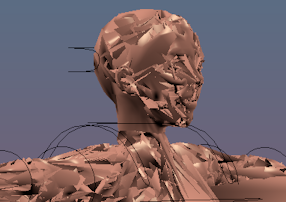
But as soon as you edit the visible mesh you introduce a difference to the reference shape. Then it becomes likely that Avastar gets everything wrong. And things like in the image above can happen.
You can get over this by freezing the Avastar character. Basically you then remove all shape keys from the character. What this means will be explained later.
Workflow
This is the most basic process of creating a simple character mesh based on the SL Avatar mesh
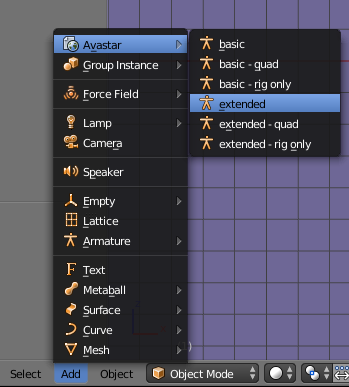
Step 1: Create a new Avastar
Adding a new Avastar
You can add a new Avastar Character only when Blender is in Object mode. You navigate to the Add -> Avastar menu and select from one of the rig types:

After a short time (typically 2-4 secs) a new Avastar character is created in the 3D View and at the center of the 3D View .
Step 2a (optional): Use Appearance Sliders
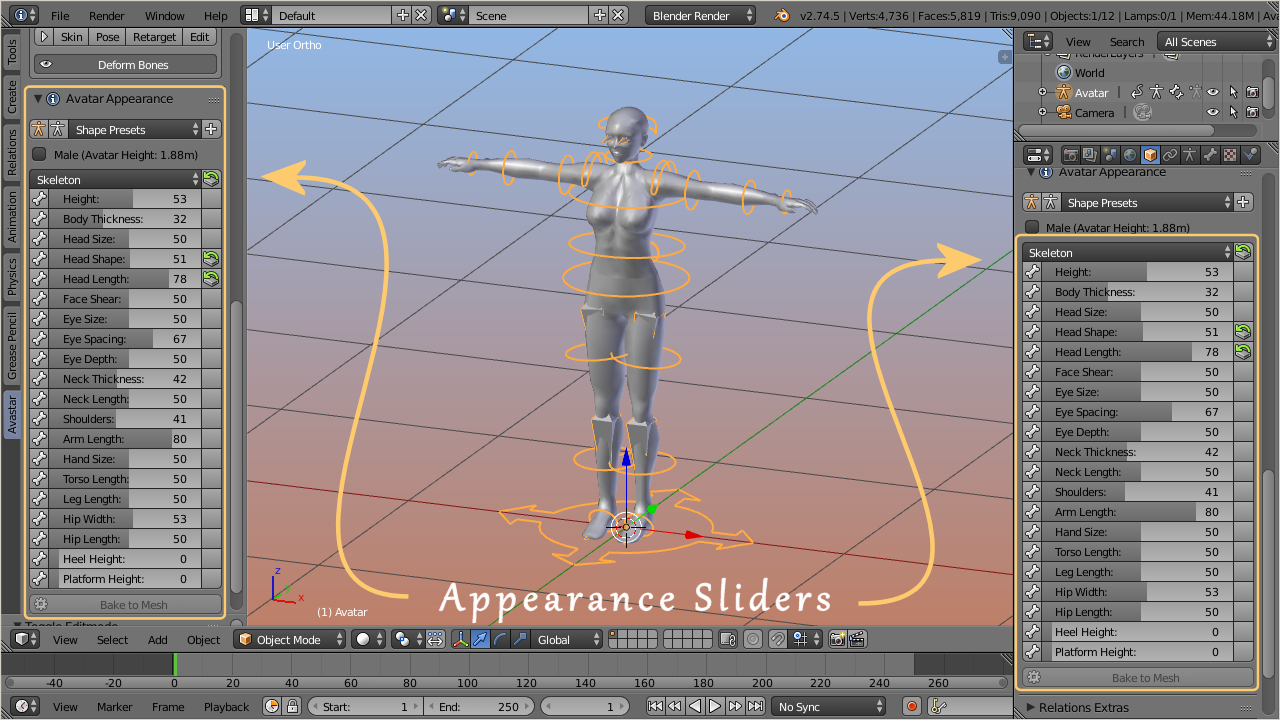
In a Nutshell: We support the same Appearance Slider system that you can find in SL, OpenSim or other compatible worlds. You find the Appearance Sliders in the Toolshelf – Avastar Tab:
- Go to object mode.
- Select the Rig (RMB on the yellow circles around the mesh).
- Open the Tool Shelf – Avastar Tab
- Locate the Appearance Panel (see image).
The UI Elements of the Appearance Sliders
It may look small and easy to use, but it is also a very powerful tool in your daily life with Avastar. So there is a lot of activity behind the scenes. The tool actually loads a complex extra set of data and this consumes a few seconds of load time.
Load Appearance Sliders…
When you have just started Blender you may find the appearance sliders are not yet available. Instead you find a button to load them…

Click to activate the Appearance sliders
You only need to load the sliders once and they stay available as long as Blender is running, even when you switch to other blend files.
The Appearance Panel is divided into 3 sections…
Shape Presets Section
The top row of the Panel already contains a powerful set of actions.:
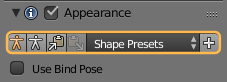
- Orange Stickman: Set SL Default Shape (Identical to create new Appearance in SL)
- White Stickman: Set the SL Neutral Shape (SL Restshape, see additional note (*) below)
- Backup to Shape Buffer: Quick backup the current Shape without need to permanently store it in a Shape Preset
- Paste from Shape Buffer: Restore the shape from the Shape Buffer back into the Sliders
- Shape Presets: Here you can add your own Slider configurations. When you click the white “+” sign the current shape slider values get stored as a new Preset (see also below)
(*) Where the White Stickman preset makes sense
- Using as Animesh: When you intend to use your mesh as Animesh in SL then please make sure you select the white Stickman icon before you do your export. This makes sure that what you export will be the same as how your Animesh will look later when it moves in world.
- Import from other tools: The White Stickman preset may be useful when you bind to a mesh that was made for the SL Skeleton in its neutral shape (like workbench or avatar.blend, or imports from other tools like Maya or 3DS Max)
- Working without Shape Sliders: The SL Restshape is also needed when you disable the appearance sliders (see the section Appearance Sliders and Custom Rigs below)
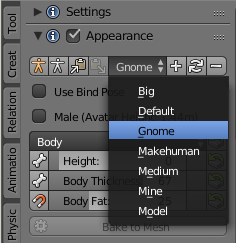
The Shape Presets Selector
The Preset Selector can be used to store your custom Shapes. For example when you attempt to work with a fixed set of Standard Shapes, you can create Presets for each of your supported Shapes.
All you need to do is:
- Define your shape (by moving the Shape Sliders, see below)
- Create a new Preset
Shape Properties Section
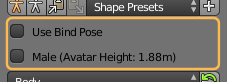
- Use Bind Pose: Treat the Restpose of the Rig as a Bind Pose. This is mostly used for slightly modified Rigs (e.g. A Posed Rigs).
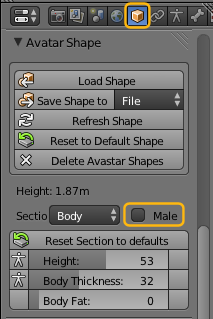
- Male: When enabled, the Shape switches to Male gender. The current absolute Avatar Height is displayed in parentheses.
The Sliders Section
The section subpanel of the Avatar shapes panel contains the Shape Sliders. the sliders are organized almost identical to the Appearance Editor in SL. The values assigned in SL match exactly with the slider values in Blender.
- Some sliders have a small Bone icon on their left side. This indicates the slider affects the bones (bone sliders).
- Some sliders have a small magnet icon on their left side. This indicates the sliders affects a fitted Mesh bone (Collision Volume bone)
- Sliders with no icon on the left side affect only the System Character mesh (Morph sliders). They have no influence on your Custom Meshes.
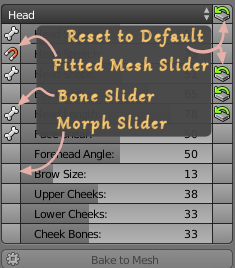
Fitted Mesh Sliders indicated with a magnet
- Sliders with a peach colored Bone Handle on their left side indicates the sliders affect the new Bento bones. But note: Some of the Bento bones are also affected by the other sliders. This is not indicated in the Avastar Appearance Settings. Please take a look at the Bone-Slider map.
The icons on the right side of the sliders indicate that the slider value has been changed. Click on these icons to reset the corresponding Slider Value to its default (Then also the icon disappears)
Note: The Reset icon on the Top Right of the section panel resets the entire Bone Section to its Default Values.
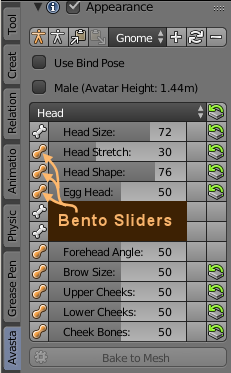
Bento Sliders indicated by a peach colored Bone Handle
Slider to Bone Mapping
Avastar maintains a built in mapping between sliders and affected bones. The mapping is hidden as a pull down list.
The list is expanded/collapsed by clicking the leftmost icon of a slider. The bone list contains
- Green checkmark: the Bone is not edited
- The Bone Name
- ‘Trans’: The slider moves the bone
- ‘Scale’: The slider scales the bone
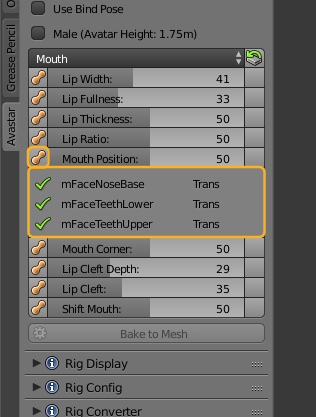
Note: The slider mapping is directly taken from the Avatar definition files. It is supposed to be an exact mapping.
Appearance Sliders and Custom Rigs
In general, the appearance sliders also work when the rig has been edited (when the Armature was modified in edit mode). However the sliders behave slightly different for bones which have been edited. Especially when sliders not only scale bones but also translate them (like for example the eye distance slider or the Shoulder distance slider) then as soon as the bones are edited, they only can be rotated and scaled. Any translation component is then suppressed!
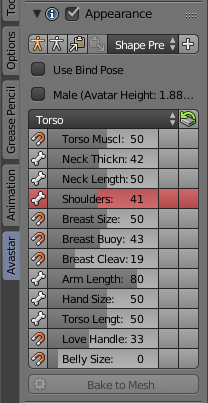
The Appearance Sliders in Avastar behave in the same way as they do in Second Life, but we have added a visual hint, that indicates when a slider affects one or more bones with custom joints…
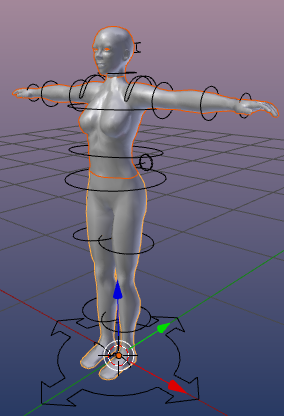
Assume you have edited the Shoulder Bones and separated them a bit (see image). This means the Shoulder bones (actually mShoulderLeft/Right to be precise) are now treated differently. And now all sliders which directly move the Shoulders will be colored in red.

What is the meaning of red sliders?
One pretty obscure feature of the SL appearance slider system is that it distinguishes between bones with edited joints and bones without edited joints. As soon as a joint is edited, all sliders which directly affect the bone no longer apply bone translations to the bone. However Bone scaling remains intact even for edited Bones. Becasue of this feature we have marked all sliders with a red background when they affect bones with joint edits.
In this example you see the red Shoulders slider indicating that it no longer translates the mShoulderLeft/Right bones as before.
Appearance Sliders and Shape Keys
Avastar supports the usage of Shape keys with your custom rigs. However shape keys and Appearance sliders are somewhat intertwined. When your custom mesh has shape keys defined, then you occasionally need to update the Appearance sliders data.
This is done with the operator Sync with Shapekeys in the Appearance Sliders panel.
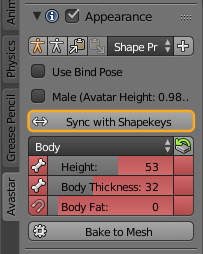
When to use the Sync with Shapekeys
- You changed the Appearance sliders while (after) you are editing a shape key
- You renamed your shape keys
- You modified the order of your shape keys
Tip: Set the sliders to white stickman (the icon in the top of the Appearance slider panel) before editing shape keys
Caveat: (Important to know!)
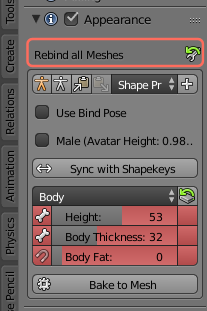
Whenever you edit a custom mesh, Avastar marks the mesh as modified and adds a Rebind all Meshes button on top of the Appearance sliders panel. When you use Shape keys there is an unfortunate twist.
his is also true for the Skinning panel where the repair reference mesh button shows up in red. We are aware of this inconsistency and try to make this more elegant.
Working only with the SL Restshape
By default the Appearance sliders are enabled. This allows you to test the behavior of your meshes in regard to the Avatar Appearance sliders, before the meshes are even exported. However, sometimes a rig becomes so complicated and the creator decides that the usage of the Appearance sliders is actually not wanted. In this case Avastar allows you to disable the sliders by unchecking the check mark in the header of the Appearance panel.
Important: When you want to disable the appearance sliders, then it is best to set the white stickman mode first. This makes sure that your rig matches the neutral skeleton. While this is not strictly necessary we still recommend that you enable the white Stickman shape prior to disabling the sliders. Then you can be sure that if you ever want to enable the sliders again, you will not suffer from unwanted stretching of the skeleton.
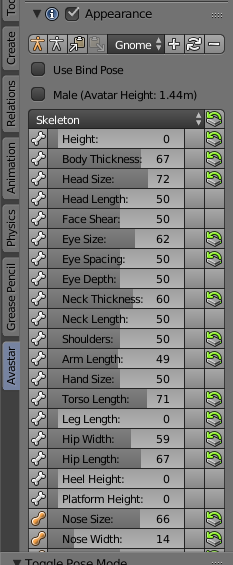
The Special Sections
- We have added 4 extra sections (Changed, Fitted, Extended and Skeleton) which do not appear in the Second Life Shape editor:
- The Changed section is empty by default and will be populated by the list of changed Shape sliders of your Avastar.
- The Fitted Section contains all Sliders which affect Fitted Mesh Bones (Collision Volume Bones).
- (new): The Extended section is the collection of sliders which affect the new Bento Bones.
- The Skeleton section (see image) contains all sliders which affect the bone length of the Avastar character.
- On top of the list (in the Section Header) you see a Reset button. This button will reset all shape sliders of the current Section to its factory defaults.
- Each slider can be dragged, or you can click on it and then type in a number.
- If a slider has been changed then you see a reset icon right to the slider. Clicking on that icon resets the slider to its default value.
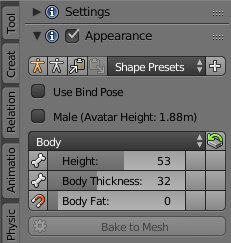
Bake to Mesh:
This function makes all slider changes permanent for the active (and selected) Custom Mesh. Take care: This function deletes all Shape keys (should you have defined Some) and the Mesh gets permanently and irreversible changed!
Hint: This option is not available (greyed out) for the Avastar Meshes.
Special Feature: The Mesh deformer
The Mesh deformer is an old development that came about a couple of years ago, but the project has never gone public in Second Life. However we keep basic support for the Mesh deformer available, because other compatible online worlds might possibly support the Mesh deformer.
Step 2b (optional): Change Gender
You can change the Gender of the Avastar character as follows:
- Select the Avastar Armature
- Open the Data Properties Tab in the Properties window:
- locate the Gender Selector and enable “Male”
Your final result will look like this: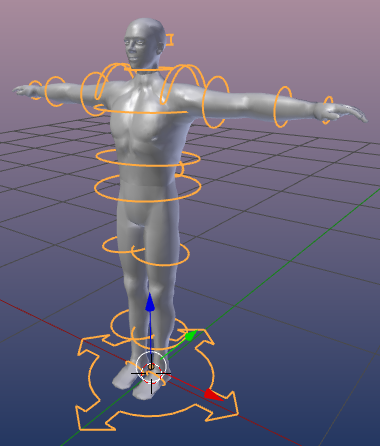
Note: You can switch the Gender on and off as you like.
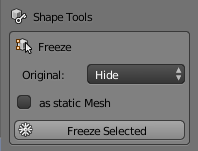
Step 3: Freeze your Shape

The Avastar Meshes can not be modified. As soon as you try to do this, you will get very bad distortions. This is due to how Shape keys are handled in Blender.
The freeze either creates static meshes from your rigged meshes, or modifiable versions of your selected meshes. The tool basically removes all shape keys and all Avastar control data.
The Freeze Tool is used in following situations:
Usage
- Ensure Blender is in Object Mode.
- Select all parts which you want to freeze.
- Set the freeze options.
- Freeze Selected.
Details
Select all parts of the Avastar meshes which you want to use for your own character:
Here i have selected the Head, the upper body and the lower body
Then set the Freeze Options, and finally Freeze Selected:
Note: The frozen Meshes no longer react in the exact same way to the Avastar sliders as the original Avastar character does. However, the meshes behave exactly in the same way as they will behave when imported into SL, OpenSim or other compatible virtual environments.
What you should know
- When you select to Keep the Original, then the original mesh and your frozen mesh will overlap and you might not be able to see that there are actually 2 meshes now.
- When you select to Delete the Original, then the Original Avastar mesh is fully replaced by your frozen version.
- When you select to Hide the original, then the Original Avastar mesh will be hidden from view, then you only see the frozen version.
- when you enable Standalone Posed then your frozen mesh will be detached from the armature and it will end up as a simple non rigged static mesh in whatever pose in which you placed it.
- When you enable Remove Weight Groups then all weight groups of the frozen mesh will be deleted and you end up with a static non rigged mesh without any weights associated to it. (A naked model so to say)
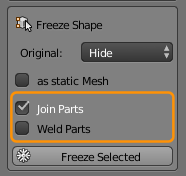
The Tool Options
Original:
This option defines what shall happen with the original Mesh(es) (those which you have selected in Object mode)
Values:
- Delete: The Original Mesh is deleted.
- Hide: The Original mesh is kept but gets hidden. You can always unhide hidden objects with the keyboard shortcut ALT + H
- Keep: The Original Mesh is kept and remains visible. Thus the original and the new copy are displayed at the same time
As static Mesh:
If the original Mesh was rigged to an armature, then -by default- the frozen mesh Copies keep rigged as well. But sometimes you want to get a complete static statue with no animation information at all. In this case you will select this option.
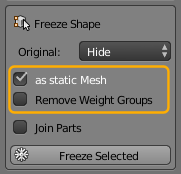
Note: If you select this option you get an additional option Remove Weight Groups which does what the name implies. Hence you can achieve that the frozen object contains no animation data at all (this option is rarely used, but very handy when needed)
Join Parts:
If you have selected 2 or more objects, then the Join Parts appears. This option just joins the frozen parts into one resulting mesh object.
Note: If the Join parts option is selected, then you get one more option Weld Parts. If that option is checked, then all duplicate vertices along the adjacent edges of the joined parts will be merged.
Step 4: Join Parts (Optional)
Join Avatar Parts
Joining parts of a mesh will make all parts belong to one single object.
- Select all objects that you want to join. Here i have selected the Head, the upper body and the lower body of a frozen version of the Avastar character:
Note: You can select multiple objects by holding the SHIFT key down while you right click on the parts which you want to select.
- Press CTRL +J to join the parts into one object
What you should know
You might have duplicate vertices especially along the seams of the meshes. You can remove these duplicates as follows:
- Go to Edit Mode
- Select all Vertices (press “A” once or twice)
- Press “W”
- Select the “Remove Doubles” function
- Go back to Object Mode
Your final result will look like this:

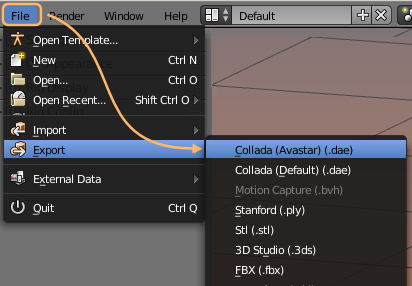
Step 5: Export the Mesh
The Collada exporter exports your Mesh character or mesh attachment to a form that is recognizable by the target System (SL, OpenSim or any compatible online world). You find the Mesh Exporter in the Blender Export menu.
The Exporter opens with a file selection window where you can select the file to where you want to export, or you can type in a new filename.
Note: If you prefer to see the Collada exporter in the Tool Shelf, then you can customize the Avastar Add-on Preferences.
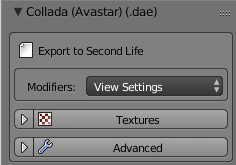
The Export option Panel

Hint: You usually can keep the default settings and just click on the “Collada(Avastar)(.dae)” button in the upper right corner of the Window (see zoom icon in this chapter title).
A File Selector will pop up. Here you can navigate to your export directory and then export your file as a Collada file (using the file extension “.dae”)
Tip: If you intend to use your exported mesh for Animesh then please note that Animesh currently does not support the Appearance sliders. Your mesh will always shows as when you enable the white Stickman preset in the Avastar Appearance slider panel.

The Export option Sub-panels
The Exporter provides a couple of export options for special cases. Please use these options with care.
Modifiers
By default Avastar applies all mesh changing Modifiers except the Armature Modifiers to the exported meshes. However, some modifiers offer 2 sets of options, one option set is for rendering, the other option set is for the Viewport. We offer 3 options here:
- Apply according to the View Settings (the 3D Preview settings)
- Apply according to the Render Settings (the settings for Blender’s own Renderer)
- Don’t apply modifiers and only export the base mesh
The exporter by default applies the View settings. These settings are very closely related to the Blender Render System. In most cases you can actually just use the defaults. We will get back to this when we talk about how to use (or not use) Modifiers.
Side note: The Armature Modifier
Armature Modifiers define the relation between your meshes and your Skeleton (Armature). Avastar never applies the Armature Modifiers when exporting because the mesh would be transformed to static non rigged Meshes. This is almost never what you want.
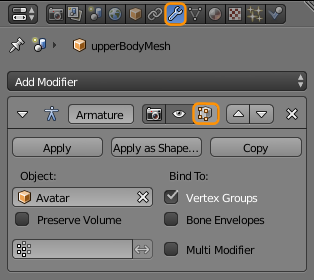
For the curious: You find the Armature modifier in the Modifier Stack (see image). Remind: Armature modifiers are always defined in the mesh modifier stack. Armatures them self have no Armature modifier.
We will get to armature Modifiers in the “Create an Attachment” tutorial.
Hint: You want to display the modifier in edit mode and adjust edit cage to modifier result
Textures export (advanced)
Note: But for rigged meshes the images are not recognized.
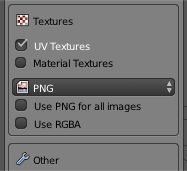
- UV Textures & Material Textures: Blender supports Material based textures and UV textures (which are directly assigned to polygons). Normally you want to export only the UV textures. In rare cases it is more desirable to export the material based textures instead. But beware, Blender does not export the render results, but only the source images!
- Image Type: The image format is typically predefined in the Blender Render settings. However we found it convenient to offer an immediate setting in the Exporter. By default the exporter applies the image type only to generated images.
- Use ‘Image format’ for all images: If you set this option, then Blender will use the selected image format for all exported images. If you disable the option, then only the generated images are affected.
- Use RGBA: Blender can export the Alpha channel for images. Normally you set this in the render settings where you can specify to use either RGB or RGBA for image exports. If the selected export format supports Alpha then enabling RGBA here will export images with Alpha channel even if the render settings are set to RGB and vice versa.
Hint: You may want to NOT use RGBA because of the Alpha glitch. However this is not a general advice. There are many situations where using Alpha images is even recommended (when you want to create an Alpha mask).
Hint: If the format of the exported image(es) does not support an Alpha channel then the “Use RGBA” option is simply ignored.
Advanced options
The Advanced Options are related to special scenarios. You should normally keep all options set as they are. This makes sure that your exports are well suited for SL. However in some situations you will have to get back here and set the options according to the descriptions below.
Warning: You must really know what you do when you set an advanced option. Handle with care!
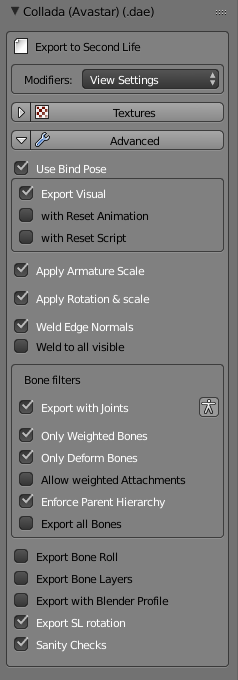
Use Bind Pose: The Use Bind Pose option is largely documented in the Bind Pose Workflow
You normaly set this option in the Appearance Sliders. We added it here only for convenience.
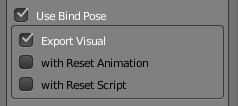
Following options are only available when the Use Bind Pose option is enabled:
- Export Visual(new in Avastar-2.6): Avastar tries to minimize the number of translation components in joint offsets to achieve the best possible (the easiest) rig configuration. Normally you want to keep this option enabled. If you find that this option does not work for you,m then please send us a note, so we can improve the feature.
- with Reset Animation (new in Avastar-2.6): Avastar generates a 0-priority single frame animation of the current Restpose. This animation can later be used in SL together with an animation reset script (see below)
- with Reset Script(new in Avastar 2.6): Avastar generates an LSL Script ready for usage in SL. In SL you copy this script together with the Reset Animation (see above) into your model’s inventory. You need this especially when you are not exporting in white stickman mode (see Appearance sliders)
Bone Filters
Export with Joints: When you have edited the Armature to adjust the Rig to your special character (Alien, creature, pet…) then you normally want to keep your edited Armature when you export your Meshes.
Hint: You want this option disabled only when your rig is so complex that Avastar can not calculate the Neutral Rig for your situation. In that case please set the sliders to SL Neutral and never touch the sliders again.
Disabled: Export the Rig visually as it is. Note: You must make sure that the Appearance Sliders are reset to the SL Neutral Shape (White Stickman Icon). Otherwise Avastar rejects the exports.
Enabled: Calculate the neutral skeleton from the current rig settings (temporary set Sliders to Neutral SL Settings) but apply the current Slider settings as bind pose. Pleased refer to the Bind Pose document for further explanations.
Only Weighted Bones: Avastar can export all deform bones of the Rig. However in most cases it is enough to only export the deform Bones which are actually used (weighted to meshes)
Hint: You want to enable this option in most cases.
Enabled: Export only those bones which are actually used (have weights for meshes)
Only Deform Bones: Avastar has many control bones (mainly for IK-animation, targetless Animation and attachment points) Avastar can export all Bones of the rig, or only the Deform bones
Hint: You want to enable this option in most cases.
Enabled: Export only deform Bones
Include Parent Hierarchy: Ensures that all parent bones of exported bones are also exported, even if they have no weights defined.
Details: When you enable the above bone filters then it can happen that not all bones of a Bone chain are exported. This becomes a problem when one or more of the not exported bones have Joint edits defined. Those definitions would then get lost during export.
Hint: You want to enable this option in most cases.
Enabled: Take care that all parent bones of exported Bones are also exported.
Export Bone Roll: Export Bone Roll using the Blender Collada Scheme.
Hint: This is only useful when you want to later import back the Dae file to Blender.
Enabled: Export the Bone roll according to Blender’s Collada Scheme
Export Bone layers: Export Bone Layer Data using the Blender Collada Scheme.
Hint: This is only useful when you want to later import back the Dae file to Blender.
Enabled: Export the Bone Layer data according to Blender’s Collada Scheme
Export with Blender Profile: Use Blender Collada scheme for exporting Blender specific Information
Hint: This is only useful when you want to later import back the Dae file to Blender.
Enabled: Export Extended Options according to Blender’s Collada Scheme
Export with SL Rotation: When you export an Avastar Rig then it must be rotated according to the SL Standards (so that the character looks into the positive X direction).
Hint: You want to enable this option when you export to Second Life or similar worlds.
Enabled: Rotate the Rig by 90 degrees to make it compatible to the SL specifications
Accept Attachment Weights: SL does not allow weighting of attachment points. Hence we suppress the export of weights for attachment points by default.
Sanity Checks: Perform tests on the Mesh (tricount, texture face counts, etc…)
Hint: You want to enable this option in most cases.
Unsupported Options
Avastar also provides some advanced export options. However those options are not shown by default as they are only rarely used.
You enable these options in the Avastar Add-on Panel (where you initially enabled the Add-on after you installed it):
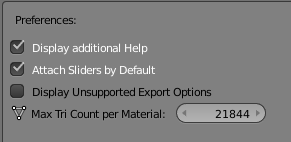
Tick the advanced export options to get the buttons in the UI

Advanced Export Panel with unsupported options enabled
Limit Weight Count: In SL the number of weights per vertex is strictly limited to 4. We believe this number is enough for all weighting tasks. In cases where you think this limit is too low, we always found the real problem was due to bad mesh topology and bad rigging.
Setting this number affects the maximum number of weights which are exported by Avastar. We strongly recommend to keep this number set to 4.