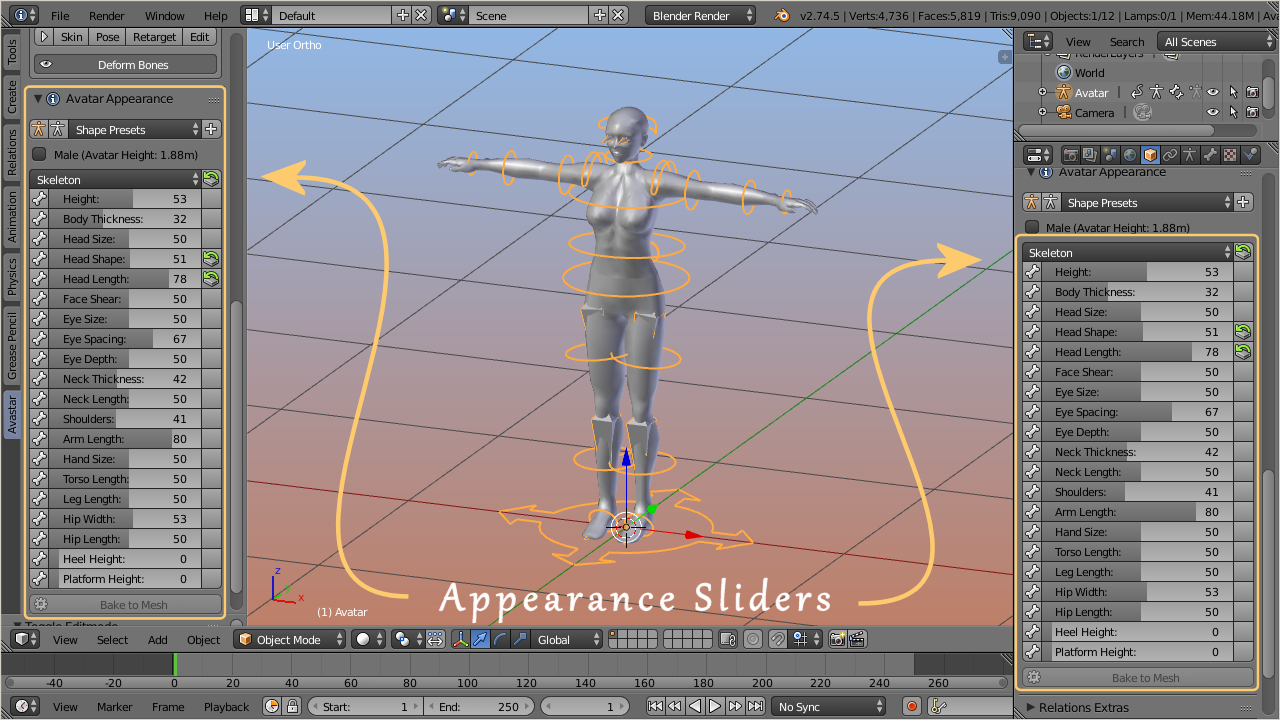
After you got your Avastar character you might want to change its shape, or maybe you prefer to work with a Male character instead of the default female Avastar? This is where the Appearance Sliders Section comes into play:
How to use the Appearance sliders - Read more...
In a Nutshell: We support the same Appearance Slider system that you can find in SL, OpenSim or other compatible worlds. You find the Appearance Sliders in the Toolshelf – Avastar Tab:
- Go to object mode.
- Select the Rig (RMB on the yellow circles around the mesh).
- Open the Tool Shelf – Avastar Tab
- Locate the Appearance Panel (see image).
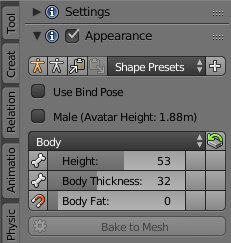
The UI Elements of the Appearance Sliders
It may look small and easy to use, but it is also a very powerful tool in your daily life with Avastar. So there is a lot of activity behind the scenes. The tool actually loads a complex extra set of data and this consumes a few seconds of load time.
Load Appearance Sliders…
When you have just started Blender you may find the appearance sliders are not yet available. Instead you find a button to load them…

Click to activate the Appearance sliders
You only need to load the sliders once and they stay available as long as Blender is running, even when you switch to other blend files.
The Appearance Panel is divided into 3 sections…
Shape Presets Section
The top row of the Panel already contains a powerful set of actions.:
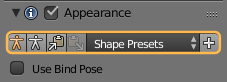
- Orange Stickman: Set SL Default Shape (Identical to create new Appearance in SL)
- White Stickman: Set the SL Neutral Shape (SL Restshape, see additional note (*) below)
- Backup to Shape Buffer: Quick backup the current Shape without need to permanently store it in a Shape Preset
- Paste from Shape Buffer: Restore the shape from the Shape Buffer back into the Sliders
- Shape Presets: Here you can add your own Slider configurations. When you click the white “+” sign the current shape slider values get stored as a new Preset (see also below)
(*) Where the White Stickman preset makes sense
- Using as Animesh: When you intend to use your mesh as Animesh in SL then please make sure you select the white Stickman icon before you do your export. This makes sure that what you export will be the same as how your Animesh will look later when it moves in world.
- Import from other tools: The White Stickman preset may be useful when you bind to a mesh that was made for the SL Skeleton in its neutral shape (like workbench or avatar.blend, or imports from other tools like Maya or 3DS Max)
- Working without Shape Sliders: The SL Restshape is also needed when you disable the appearance sliders (see the section Appearance Sliders and Custom Rigs below)
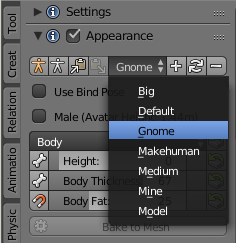
The Shape Presets Selector
The Preset Selector can be used to store your custom Shapes. For example when you attempt to work with a fixed set of Standard Shapes, you can create Presets for each of your supported Shapes.
All you need to do is:
- Define your shape (by moving the Shape Sliders, see below)
- Create a new Preset
Shape Properties Section
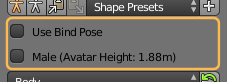
- Use Bind Pose: Treat the Restpose of the Rig as a Bind Pose. This is mostly used for slightly modified Rigs (e.g. A Posed Rigs).
- Male: When enabled, the Shape switches to Male gender. The current absolute Avatar Height is displayed in parentheses.
The Sliders Section
The section subpanel of the Avatar shapes panel contains the Shape Sliders. the sliders are organized almost identical to the Appearance Editor in SL. The values assigned in SL match exactly with the slider values in Blender.
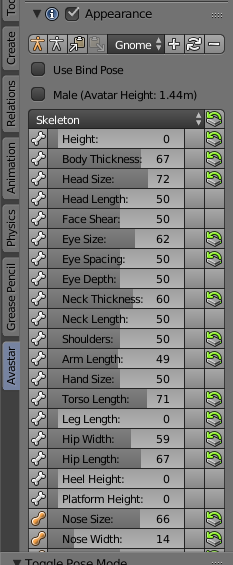
- Some sliders have a small Bone icon on their left side. This indicates the slider affects the bones (bone sliders).
- Some sliders have a small magnet icon on their left side. This indicates the sliders affects a fitted Mesh bone (Collision Volume bone)
- Sliders with no icon on the left side affect only the System Character mesh (Morph sliders). They have no influence on your Custom Meshes.
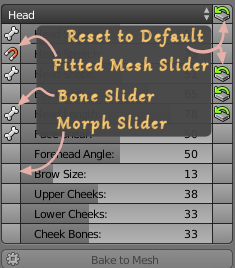
Fitted Mesh Sliders indicated with a magnet
- Sliders with a peach colored Bone Handle on their left side indicates the sliders affect the new Bento bones. But note: Some of the Bento bones are also affected by the other sliders. This is not indicated in the Avastar Appearance Settings. Please take a look at the Bone-Slider map.
The icons on the right side of the sliders indicate that the slider value has been changed. Click on these icons to reset the corresponding Slider Value to its default (Then also the icon disappears)
Note: The Reset icon on the Top Right of the section panel resets the entire Bone Section to its Default Values.
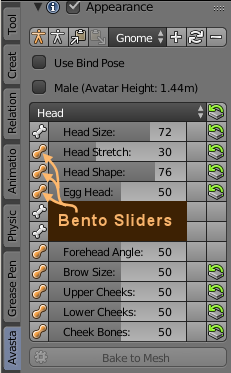
Bento Sliders indicated by a peach colored Bone Handle
Slider to Bone Mapping
Avastar maintains a built in mapping between sliders and affected bones. The mapping is hidden as a pull down list.
The list is expanded/collapsed by clicking the leftmost icon of a slider. The bone list contains
- Green checkmark: the Bone is not edited
- The Bone Name
- ‘Trans’: The slider moves the bone
- ‘Scale’: The slider scales the bone
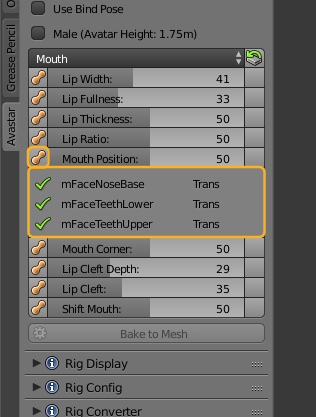
Note: The slider mapping is directly taken from the Avatar definition files. It is supposed to be an exact mapping.
Appearance Sliders and Custom Rigs
In general, the appearance sliders also work when the rig has been edited (when the Armature was modified in edit mode). However the sliders behave slightly different for bones which have been edited. Especially when sliders not only scale bones but also translate them (like for example the eye distance slider or the Shoulder distance slider) then as soon as the bones are edited, they only can be rotated and scaled. Any translation component is then suppressed!
The Appearance Sliders in Avastar behave in the same way as they do in Second Life, but we have added a visual hint, that indicates when a slider affects one or more bones with custom joints…
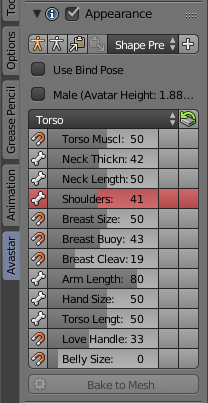
Assume you have edited the Shoulder Bones and separated them a bit (see image). This means the Shoulder bones (actually mShoulderLeft/Right to be precise) are now treated differently. And now all sliders which directly move the Shoulders will be colored in red.

What is the meaning of red sliders?
One pretty obscure feature of the SL appearance slider system is that it distinguishes between bones with edited joints and bones without edited joints. As soon as a joint is edited, all sliders which directly affect the bone no longer apply bone translations to the bone. However Bone scaling remains intact even for edited Bones. Becasue of this feature we have marked all sliders with a red background when they affect bones with joint edits.
In this example you see the red Shoulders slider indicating that it no longer translates the mShoulderLeft/Right bones as before.
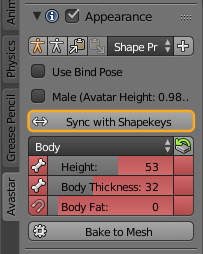
Appearance Sliders and Shape Keys
Avastar supports the usage of Shape keys with your custom rigs. However shape keys and Appearance sliders are somewhat intertwined. When your custom mesh has shape keys defined, then you occasionally need to update the Appearance sliders data.
This is done with the operator Sync with Shapekeys in the Appearance Sliders panel.
When to use the Sync with Shapekeys
- You changed the Appearance sliders while (after) you are editing a shape key
- You renamed your shape keys
- You modified the order of your shape keys
Tip: Set the sliders to white stickman (the icon in the top of the Appearance slider panel) before editing shape keys
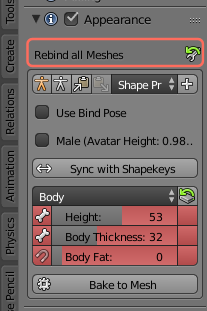
Caveat: (Important to know!)
Whenever you edit a custom mesh, Avastar marks the mesh as modified and adds a Rebind all Meshes button on top of the Appearance sliders panel. When you use Shape keys there is an unfortunate twist.
his is also true for the Skinning panel where the repair reference mesh button shows up in red. We are aware of this inconsistency and try to make this more elegant.
Working only with the SL Restshape
By default the Appearance sliders are enabled. This allows you to test the behavior of your meshes in regard to the Avatar Appearance sliders, before the meshes are even exported. However, sometimes a rig becomes so complicated and the creator decides that the usage of the Appearance sliders is actually not wanted. In this case Avastar allows you to disable the sliders by unchecking the check mark in the header of the Appearance panel.
Important: When you want to disable the appearance sliders, then it is best to set the white stickman mode first. This makes sure that your rig matches the neutral skeleton. While this is not strictly necessary we still recommend that you enable the white Stickman shape prior to disabling the sliders. Then you can be sure that if you ever want to enable the sliders again, you will not suffer from unwanted stretching of the skeleton.
The Special Sections
- We have added 4 extra sections (Changed, Fitted, Extended and Skeleton) which do not appear in the Second Life Shape editor:
- The Changed section is empty by default and will be populated by the list of changed Shape sliders of your Avastar.
- The Fitted Section contains all Sliders which affect Fitted Mesh Bones (Collision Volume Bones).
- (new): The Extended section is the collection of sliders which affect the new Bento Bones.
- The Skeleton section (see image) contains all sliders which affect the bone length of the Avastar character.
- On top of the list (in the Section Header) you see a Reset button. This button will reset all shape sliders of the current Section to its factory defaults.
- Each slider can be dragged, or you can click on it and then type in a number.
- If a slider has been changed then you see a reset icon right to the slider. Clicking on that icon resets the slider to its default value.
Bake to Mesh:
This function makes all slider changes permanent for the active (and selected) Custom Mesh. Take care: This function deletes all Shape keys (should you have defined Some) and the Mesh gets permanently and irreversible changed!
Hint: This option is not available (greyed out) for the Avastar Meshes.
Special Feature: The Mesh deformer
The Mesh deformer is an old development that came about a couple of years ago, but the project has never gone public in Second Life. However we keep basic support for the Mesh deformer available, because other compatible online worlds might possibly support the Mesh deformer.