Sometimes you want to modify the Rig itself beyond what you can do with the Shape Editing sliders. The 2 most apparent reasons for editing the rig are:
- The proportions of your human Mesh Model do not match to the SL Skeleton
- Your mesh is not human and needs a complete reordering of the Bones in the skeleton
- The Good news: You can Edit the Rig in Avastar
- The Bad news: You must follow some strict guidelines to avoid very unpleasant behavior
In this document we will try to help you getting things done nicely. But beware, this is no cakewalk here!
Most important: First edit the rig then bind the mesh
When you edit the Rig then you make changes on a very low level. When you have already bound meshes to your rig then any attempt to edit the rig will most probably affect your meshes in unforeseen ways. So please please do not edit your rig while you have meshes bound to it!
- Add -> Avastar -> rig only
From here on you have 2 possible ways to go:
- Use pose mode
- Use edit mode
Both methods have their pros and cons as you will see below

Edit your rig by using Pose mode
When you use Pose mode then you can benefit from all pose tools which are available, including IK tools and Auto IK.
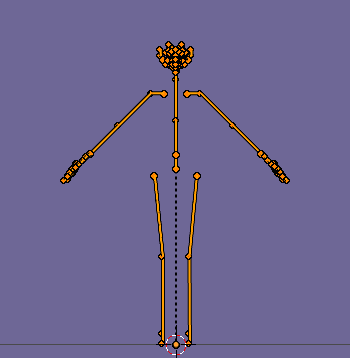
So for example you can just bend the arms from T Pose to A pose and you can be sure the Volume Bones, attachment points, Deform Bones, hands and fingers remain where they belong.
Convert to new Restpose
Once you have posed your Skeleton into the desired new restpose, you only need to convert your new pose into a restpose.
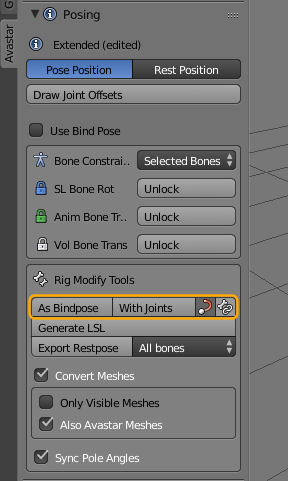
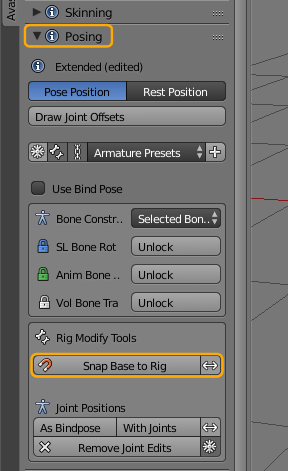
- Open the Posing panel
- Locate the rig Modify Tools and decide:
- As Bindpose: If you have only rotated your bones for making an A Posed human rig and have not used any translations.
- With Weights: When you have modified the rig massively, also with using Bone translation. This is what you do for creatures (non human rigs)
What has changed after converting
You will now notice 2 major changes:
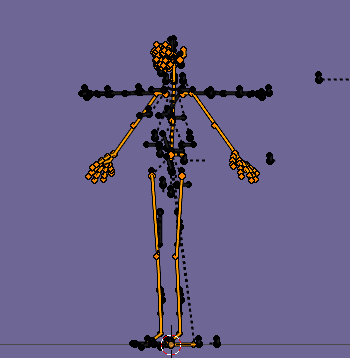
- The Joint Positions table in the Data properties section gets populated with entries (left image below)
- When you enter Edit mode you no longer see the T Pose but your newly created pose (right image below)
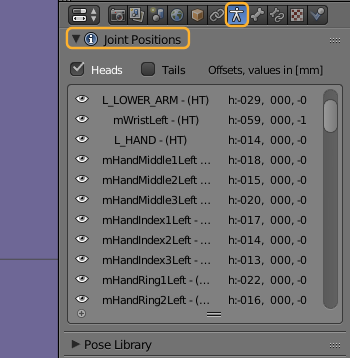
The Joint positions table in The Armature Data options panel
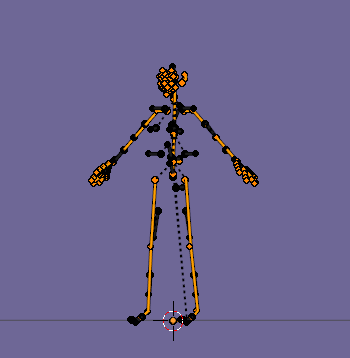
In edit mode you find that all related Bones are placed where they belong (volume bones and deform bones are shown in black here)
Pros and Cons of using Pose mode for editing your rig
Pro
- You do not need to care so much about keeping related bones in place
- You can use all pose tools to adjust your rig
- Super easy to use and does not break anything until you Convert to Bind Pose
- You can use your edited rig either with the Bind pose option or as a true edited rig (see below)
Con
- You can use this method only when your modifications are meant to optimize a human rig
Sidenote: The Bind pose option
The Bind Pose option allows you to use your modified rig “as if it were in T Pose”. Although it actually uses another restpose. When you export your Meshes later with the “Use bind pose” option enabled, then Avastar will automatically recalculate the Rig as a T posed rig and add the necessary transformations to the exported data. In that case you will not import your rig with Joint offsets!
However you are not forced to use the Bind pose option. You always can import your rig with Joints. When you do that, then you effectively upload the edited rig to SL.
Editing your Rig in edit mode
You may need to make massive changes to your rig, like rework it from a human rig to a quadruped etc. In this case you might not be happy with the first editing method as described above.
In this case you will switch to edit mode and do your editing right on the bones.
We recommend highly that you edit only the green animation bones. Avastar knows how to adjust the blue deform bones for you. So there is no need for you to get into deform bone editing.
You will find out quickly that editing the bones is more complicated than posing them.
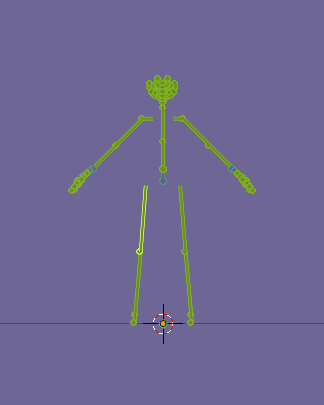
Adjustments to the related bones
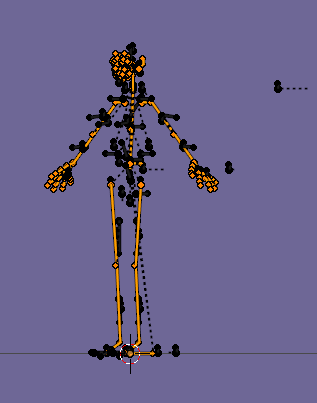
After you have edited the animation bones, you may find that many related bones (deform bones, volume bones, attachment bones, IK…) are no longer in place.
You can get around this by directly moving all bones together.
But we also have a bone snap tool that can be helpful in some cases to get your task done. However this tool is not a one click thing (see below)
deform bones, attachment bones and volume bones displaced after editing
Conserving your edits
You may sometimes find that after leaving Edit mode your edits are gone. In that case your bone edits have not been permanently stored.
Avastar tries on its own to decide when it has to store your edits. However this sometimes fails. So you can take care of this on your own. One method that often works is when you just click on the “Joint edit” Workflow preset once you have done your edits (see image aside).
Although you already might be there clicking this button tells Avastar to store the edits.
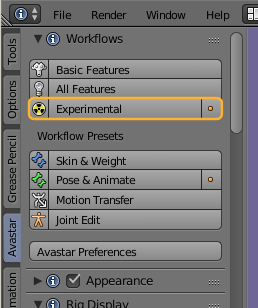
But you also can store the joint edits manually. Please make sure you are in Experimental mode! The image aside shows the Workflow panel. This is very new and available in Avastar-2.3-7 However older versions of Avastar-2 also have the Experimental settings (in the Settings Panel
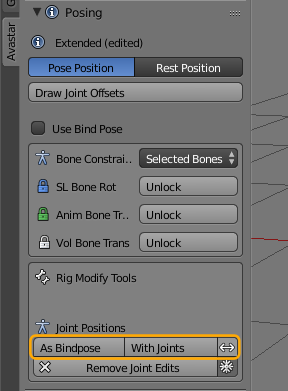
Manually Store your edits
Now you find a section for storing your Joint Positions within the Posing panel. When you click on one of the provided buttons, then Avastar stores your edits and it will automatically propagate all modifications of your (green) Animation bones to the blue Deform Bones (mBones).
Important: Initially you will see no visual difference if you use As Bindpose or With Joints. However you will notice that your rig behave different when you use the bone changing sliders.
Important: This tool will not(!) adjust the attachment points and the Volume Bones! If you need to do that, then we have the Bone snapping tool.
As a rule of thumb:
- Use With Bindpose only when you want to use an A posed human rig where bones are only rotated relative the Default Rig.
- Use With Joints when you have modified your rig more substantially (for a creature, non human rig)
The Bone Snapping Tool
You find the snapping tool also in the Pose panel, it is the Snap Base to Rig button (see image on the right side)
Once you have clicked the button, the Operator redo Panel (at the bottom of the Tool Shelf) will open up and give you more options to play with (see image below)
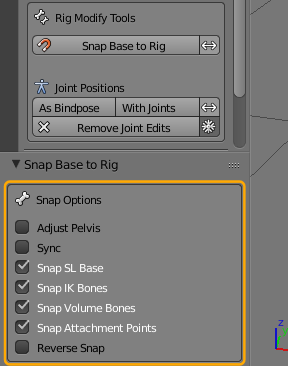
And the final result may be almost like you want it. But you will find that you need to do still some manual editing on some bones
After using the snap tool many bones are adjusted to convenient places. But not the tool has issues with setting the bone tails correctly!
Pros and Cons of using Edit mode for editing your rig
Pro
- You have maximum freedom
Con
- You must take care to adjust all bones individually
Final words
When you get into editing the Rig then you have left the comfort zone. Then you are operating in a territory full of dragons and snakes. You must be prepared that things do not work nicely first. There are many things that can go wrong. And the Avastar tools are not yet so stable that they can handle all ideas that users may come along with.
Please understand that we can not really support your efforts other than trying to make our tools more stable and easier to use. This needs your feedback and your proposals for where you believe things can be made better. We try to help, but we can not do this on a one on one basis. Life is too short for that 🙂