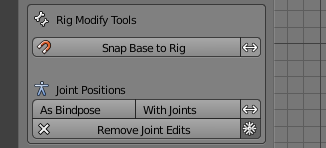
Posing Panel in Edit Mode
When you edit an armature while the User interface is in Experimental Mode, then you get access to some additional operators:
- Snap Base to Rig (Snap Rig to Base)
- As Bindpose
- With Joints
- Remove Joint Edits (only if joints are stored)
For more details see further down.

Pose Bone Constraints
Pose Bone Constraints
Pose Bones are tied together by constraints. For example you normally can not tear a limb bone out of its bone chain. Or normally the blue Deform bones (the SL Bones) are fully controlled by the green Animation bones. Or the Volume Bones can not be moved away from their parent bones.
However, sometimes you want to get more freedom over the bones, especially when you work with non human rigs you may want to use individual bones for very different purposes and not necessarily in the way the original Rig has been set up. So we added a tool for controlling the Constraints
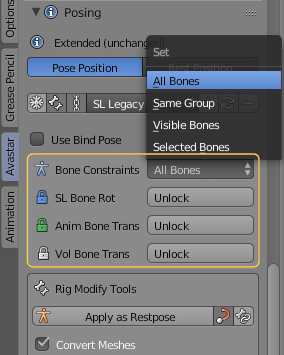
Bone Constraints
The Scope of the operation. You actually can limit the scope to one single Bone, a group of selected bones, or even all Bones in the Rig. We allow to control 3 sets of constraints…
SL Bone Rot
The Deform Bone rotations are normally fully controlled by the Animation bones. But this operator lets you Unlock the rotation constraints.
Now you can rotate the deform bones separately from the animation bones.
But beware: You want this only(!) when you are testing the Bone Weights. You never use this for animation purposes!
Unlocking SL Bone rotation actually disables the animation bones from animating the Model
Anim Bone Trans
the Animation bones are normally tied together so that you can not move them separately. Furthermore all animation bones without connected bone parents can normally not be moved around. This is good for keeping the skeleton structure intact while posing. Here you can unlock the parent connection so that animation bones can be placed without affecting the placement of their parents.
However note: the unlocking only works towards bone parents. So if you unlock only one single animation bone then you can move it separately from its parent bone while all its children are still connected and move along with it.
Note: You may want this mode especially when you do Facial animations where separate bone movements are sometimes needed. Or when you want to achieve special animation effects on your model.
Important: When you use Bone translation in your animations then you also must tell the Animation exporter to export with Translations.
Vol Bone Trans (very experimental)
We are not sure if the animation of Volume Bones is officially supported. However we added this option to the set. So when you Unlock Vol Bone Trans, then you can place the Volume bones freely.
Some restrictions apply:
- Currently Unlocking Vol Bone Trans always uses the All bones scope (this is a known bug)
- The Bone rotation is still inherited from the bone parents. Also the relative Movement of the parent bones is still propagated to the Volume bones. We need feedback to understand what animators expect to get here.
SL allows to modify the SL Rig by overriding the joint positions of the rig. Avastar supports the Rig editing as well, basically by switching the Armature to Edit Mode and then edit the bones by moving them around as needed.
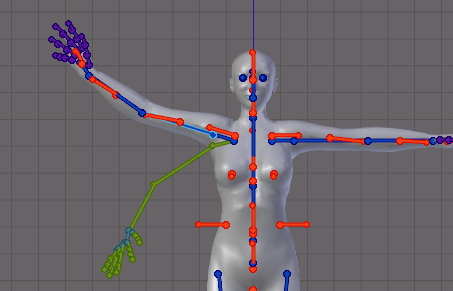
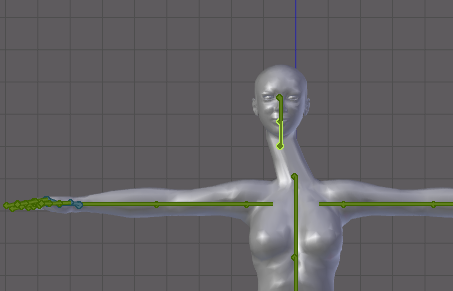
Editing the Rig in Edit mode
Bones often depend logically on each other. For example Volume bones (Orange) are normally clamped to SL Deform bones (blue). You want to move them together. then we have bone chains where children Joints are connected to their parent bone tails. You do not want to break this unintentionally.
Lets take a look at an example: Creating an A posed arm.
This is actually a lot more complicated than it looks on first glance when you use the Rig Editor. You always have to take care that you move all children of a modified bone as well. In this case rotating the shoulder bone makes it necessary to rotate all children accordingly.
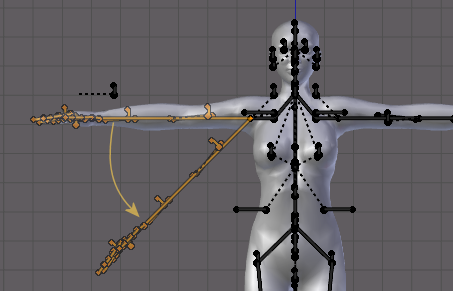
Editing the Arm into A pose may be more complicated as it looks.
Just figure for example what happens when you forget to move the Collision volumes or the attachment points along with the arm bones…
Rig Modify Tools in Edit mode
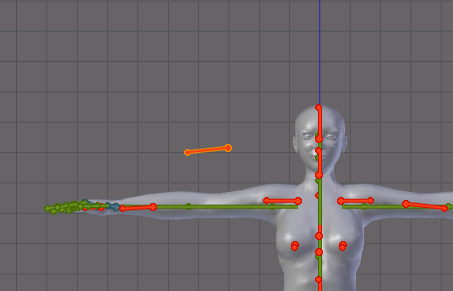
Snap Base to Rig
match the Blue SL Deform Bone locations and rotations to the corresponding green animation bones.
Note: The double headed arrow on the right side reverts the snap direction (so you also can snap the green animation bones to the blue deform bones)
- Snap Base to Rig (Double headed Arrow disabled):
The blue Deform bone moves upward to match the green Animation bone. - Snap Rig to Base (Double headed arrow enabled):
The green Animation bone moves downward to match the blue deform bone.
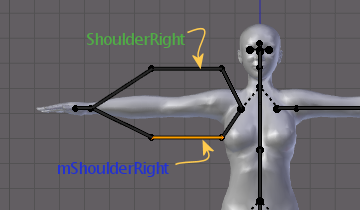
example: Deform Bone and animation bone both edited to different locations
As Bindpose operator
The Rig is treated as if its Restpose is the Secondlife Default T-Pose with an additional pose (the Bindpose) super imposed to it. To get this to Secondlife you only have to import with Weights. This corresponds to the Use Bind Pose option described further up.
- When you click on As Bindpose
- Then your Rig remains in T-pose plus
- the current pose is superimposed to the Rig.
- You later import with Weights
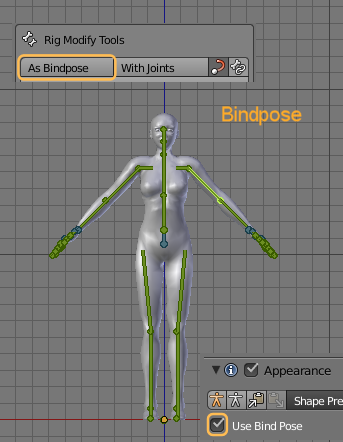
Hint: When using bindpose, then the arm length changes along the arm long axis regardless to where the arms point.
With Joints operator
The current pose is treated as the new restpose of the rig. So to get this to Secondlife you must import the Rig with Joint Positions.
- When you click on With Joints
- Then your current pose is baked into the Rig
- And your current Rig becomes the new Restpose.
- You later import with Weights and with Joint Positions
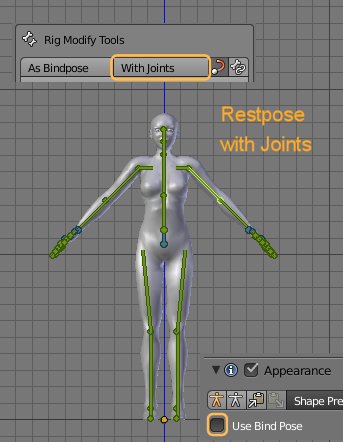
Hint: When using with Joints, then the arm length changes only along the x-axis!
A word of Warning
If you try to enforce to use a restpose different from a Developer kit, you always will end up with mismatched clothes!
Remove Joint Edits
Remove the Avastar joint data. The rig is reset to the SL Default Rig.
Note: When you enable the white snowflake icon, then only the Avastar data is removed. The skeleton itself is not reverted to the SL Default Rig in that czse.