Rig Modify Tools in Rig Edit mode
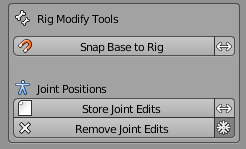
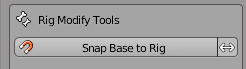
Snap Base to Rig / Snap Rig to Base
Enforce the synchronization between the blue deforming Bones and the green animation Bones. The double sided arrow right to the Button sets the direction of the synchronization.
Note: The snapping happens automatically when you switch from edit mode to pose mode. But it works only correct when you edit the green animation bones!
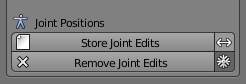
Store Joint Edits
Tell Avastar to calculate and store the control values for the appearance sliders after the Armature has been edited.
Notes:
- Important: We recommend that you edit only the green animation bones and let Avastar handle the blue/purple deform bones automatically!
- Hint: Edited Joints are stored automatically as soon as you switch from Edit mode to Pose mode. Also the adjustment between animation bones and deform bones (snapping) happens automatically. assuming you follow our recommendation and edit only the green animation bones . then…
- Hint: By default Avastar automatically snaps the deform bones to the edited green animation bones whenever you store the edited joints. But when you enable the double headed arrow right to the Store Joint Edits button, then Avastar snaps the animation bones to the deform bones before storing. (this is only good for users who insist to edit the blue bones)
Remove Joint Edits
Revert the skeleton back to the SL default Skeleton. If the Snowflake icon is enabled, then the rig edits are kept (it is not reverted to T-Pose). Only the Joint edits as recorded by Avastar are removed in that case.
Note: You currently can not selectively remove edited joints. For now this is a “none or all” operation
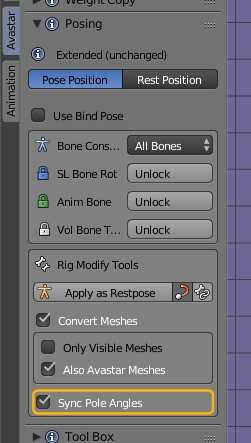
Rig Modify Tools in Pose Edit mode
In Pose Mode
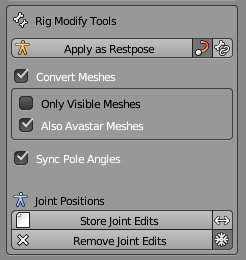
Apply as Restpose
Applies to: not rigged Mesh that was made for a rig that used Bind Pose
Some Mesh Development kits do not use the SL Rig restpose (the T-Pose) but they use a bind pose. The good news is: Avastar-2 supports bind poses with only very little extra work on your side. But…
It is very popular to use A-Pose rigs, that is where the arms are bended downwards into an A-Pose. And sometimes also the legs are bended a bit outwards (see image).
for technicians: Blender does not support Bind poses. Therefore we must convert the original Bind pose (that was used by the mesh creator) into the new Avastar Restpose. And when we export the rig we must revert the conversion of the rig back into a T-Pose Rig. Avastar is ready to support all of this for you in the background.

A typical A-Posed Rig
- Select the Avastar Armature in Pose mode.
- Then adjust the Avastar pose to the development kit mesh until the rig matches the Mesh as needed.
- Finally open the Pose panel and in the Rig Modify Tools use Apply as Restpose
Since Avastar-2.3: The Convert Meshes option has previously been a white snowflake icon on the right side of the Apply as Restpose button (formerly named Convert to Bindpose). We have extended the functionality of the operator and moved the snowflake for better clarity into the next line and named it “Convert Meshes”.
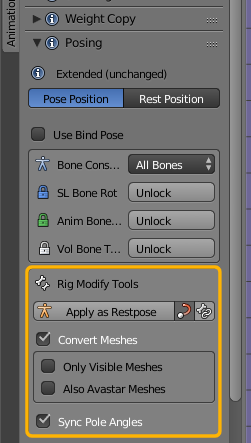
The Apply as Restpose options
When you take a closer look at the Apply at the Apply as Restpose Conversion button (See image above) then you notice 2 small icons inside the button (right aligned). Those options are explained below:
Record Bone Tails information (enabled by default)
Strictly spoken only the Bone heads are important for the Rig. However in some cases, especially for the leaf bones (at the end of bone chains) you usually want to also record the bone tail information to make sure that the rig keeps the intended look. If you disable this option you may get unexpected results.
Record IK Joint Offsets (Experimental, disabled by default)
Avastar tries to auto adjust the IK Rig. However this only works nicely when you work with human rigs. For other rigs the automatic adjustment might not work. So you can try to adjust the IK Bones manually and then enable this option.
Convert Meshes
When you want ot use the current pose as new Bind pose then in almost all cases you want to do:
- Apply the current pose to the mesh(es) (unbind)
- Set the current pose as the new Restpose
- Bind the meshes to the new restpose
So you almost always will want to enable this autobind option
Beware of Pitfalls
We found that the most used workflow for converting to Bind Pose results in a rather unexpected behavior:
When you Convert a Rig to Bind pose then all assigned meshes are frozen (See freeze option). This includes the Avastar meshes. So if your Rig has Avastar Meshes then those meshes will become regular custom meshes. But this implies the character no longer reacts to the sliders like the SL system character does (by using shape keys). In summary:
This becomes very important when you are working with Fitted Mesh.
Note: When all you want to do is fitted Mesh for the system character, then please do not use the Convert to Bind Pose option!
Basic workflow for Apply as Restpose
The most simple workflow for using this option was described further up in this document.
The Operator Redo Panel
Right after you have clicked on the Button an operator panel will show up at the bottom of the Tool Shelf (lower left corner). You might need to scroll down the Tool shelf to spot that panel.
The Operator Redo Panel gives you some control over how the Bind pose conversion is performed
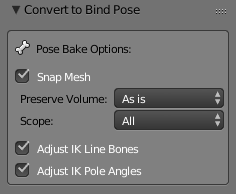
- Snap Mesh: When enabled then the bound meshes are altered to the new shape (similar to Alter to Restpose from previous Avastar releases)
- Preserve Volume: Set the Preserve Volume feature of the Armature Modifier
- Scope: Selected Bones, Visible Bones, or All Bones.
- Adjust IK Line Bones: Will adjust the connection bones between the IK Pole Targets and their constrained Bones
- Adjust IK Pole Angles: Will adjust the Pole angle (see below)
Sync Pole Angles
Pole Angles become important when you work with IK Targets. It is important to have the Pole angles adjusted correctly because otherwise you will see remarkable changes of your pose when you switch between FK and IK mode.
Normally you want to keep this Option enabled.
So what is the Pole Angle? ...
Now look on the other image. The green (selected) bone is the lower arm. This Bone can possibly have a longitudinal rotation angle relative to the pole plane. This angle is the Pole Angle:
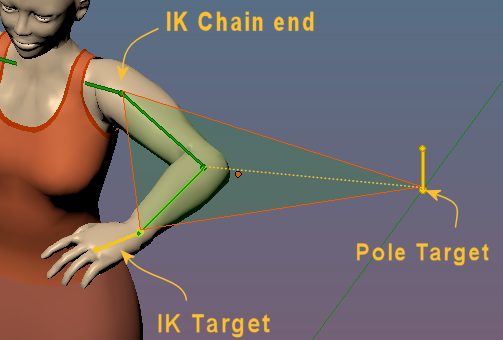
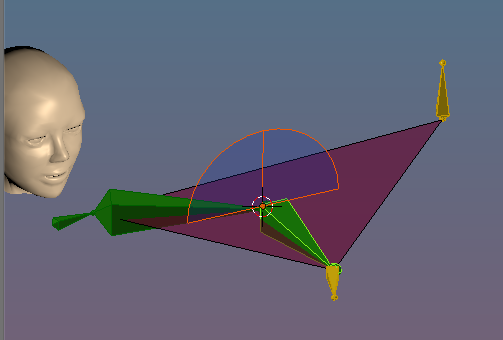
Note: The pole angle is always defined for the Rest Pose. The bending of the Arm in the images above just makes it easier to spot how the pole plane is constructed.
For a simple Rig like the Avastar Rig the Pole angle is typically 0°,90°,180° or 270° but it can have any angle actually. Blender allows to set the Pole angle manually. Avastar provides a function that calculates the optimal pole angle automatically whenever you switch from Edit mode to pose mode.
Our course Non Human character Creation tells more about this. You also find some information about the Pole Angle on the Web. You find some resources with Google, see blender pole target