About this Document...
Content:
- Export a Shape from Second Life.
- Import a Shape to Blender.
- Export the Mesh to Collada.
- Import the Mesh to Second Life.
The Video content:
- Export Shape from Second Life.
- Import the Shape to Blender.
- Modify the Mesh.
- Export the modified Mesh to Second Life.
What does Avastar provide?
Avastar basically supports the creation of animate Models (Avatars&attachments) and the creation of animations. Therefore the tool adds various functions and user interface elements to Blender.
The full functionality of Avastar can be a bit overwhelming on first sight. You should be prepared to spend some time and patience to get it all working nicely for your projects.
What does this Document provide?
You learn how to get a visual exact copy of your Avatar’s Shape into Blender and modify the Shape by using the Appearance Sliders. Finally we move the modified Mesh back to Second Life.
This document only shows you how you transfer your Avatar between Second Life and Blender. What you actually do with your Avatar inside of Blender is only limited by your own creativity.
We expect that you have basic knowledge about Blender.
Export your Shape from SL or OpenSim
The procedure to export the Character shape may vary depending on which viewer you actually use. We use the default SL Viewer.
How to export your Shape from SL
Enable the Develop Menu

Call Appearance to XML


By now your current Shape data has been copied to a local file on your computer. You find this file in your application folder. For me (on Windows 7) it is in:
C:\Users\gaia\AppData\Roaming\Second Life\logs\Gaia_Clary_nnn.xml
(where nnn is a number)
Note: the file path contains your Windows user name (mine is gaia) and your SL user name.
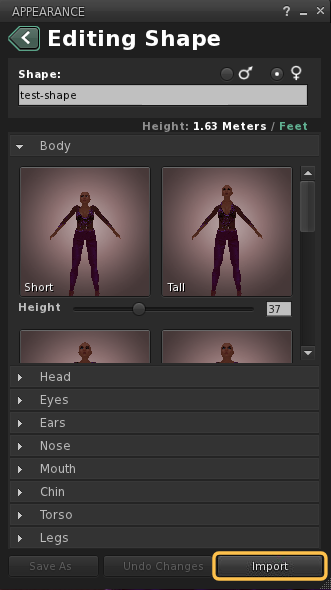
Import the Shape to Blender
How to Load your Shape into Blender
Suppose you start a fresh Project with an empty scene. You already have downloaded your personal Shape from Second Life as a local Shape file (in XML Format). All that you want is to create a new Avastar character with exactly this shape.
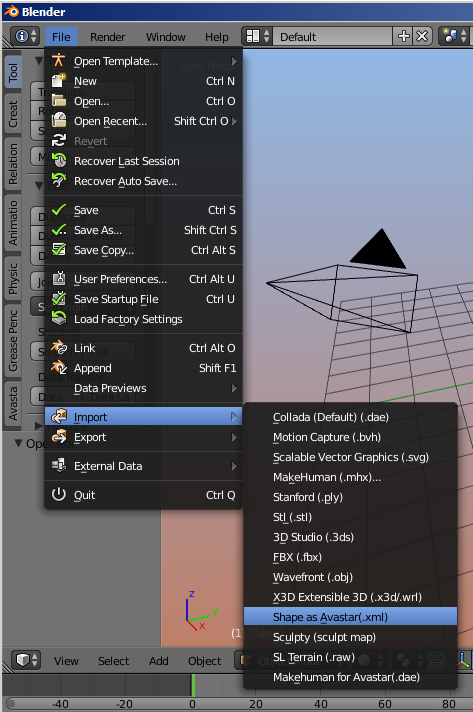
For this purpose we offer the XML Shape importer within the regular Blender Import menu (Also see the map in the zoom icon in the upper right corner of this page):
File -> Import -> Shape as Avastar
The Importer first opens a file selector where you select the XML shape that you want to import.
When you click the Import button then the tool creates a new Avastar character, and finally applies the imported shape to the new character.
Load Shape into existing Avastar
Loading a Shape file into your existing Avastar works almost identical to the previous scenario. The only difference is that now you already have an Avastar character in the scene. You select the Avastar character, and then you call the Shape importer just as described above.
The Shape importer figures that you have selected an Avastar Armature and automatically applies the imported shape to the selected rig instead of creating a new Avastar
Avatar Shape IO Panel
The Shape importer is also accessible directly from the user interface, in the Object properties of the Avastar Armature:
- Go to object mode.
- Select the Rig (RMB on the yellow circles around the mesh).
- Open the Properties window.
- Navigate to the “Object” properties.
There you find a panel Avatar Shape IO. This panel displays a Preset selector and a subpanel with 4 main functions:

The Avatar Shape IO Options
Load Shape (Import a shape)
This function allows you to upload a Shape that you have previously exported from your online world: In most viewers there is a shape export option hidden in the advanced menu (“Advanced” -> “Character” -> “Carter Tests” -> “Appearance to XML”). This will silently create a file called:
[application_folder]\Roaming\Second Life\logsThis file contains your current shape and can be loaded into Avastar, where [application_folder] is the viewer’s application data folder. For Windows this folder is located at:
C:\Users\<username>\AppDataSave Shape to
Note: Some viewers support the upload of shape file to SL (e.g. Firestorm, Singularity). To see the file, switch to the Blender Text editor and locate Shape for: Avatar (Avatar stands for the name of the Armature). Useful when you need to update the shape in SL with the values from blender.
Refresh Shape:
Delete Avastar Meshes
Remove all Meshes of the Avastar character. You will want this when you use the rig for non human characters where keeping the Avastar human meshes make no sense.
Load Appearance Sliders
When you load a blend file which contains an Avastar Character, then the Shape panel sometimes only displays the “Load Appearance sliders” Button. This happens when you just have started Blender.

Hint: The sliders are a bit slow sometimes. Currently there is not much that we can do about that.
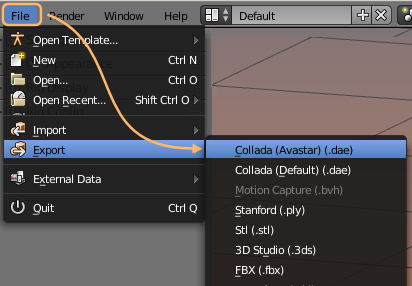
How to use the Collada Exporter - Read more...
The Collada exporter exports your Mesh character or mesh attachment to a form that is recognizable by the target System (SL, OpenSim or any compatible online world). You find the Mesh Exporter in the Blender Export menu.
The Exporter opens with a file selection window where you can select the file to where you want to export, or you can type in a new filename.
Note: If you prefer to see the Collada exporter in the Tool Shelf, then you can customize the Avastar Add-on Preferences.
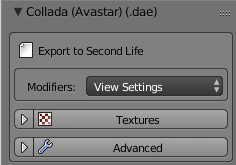
The Export option Panel

Hint: You usually can keep the default settings and just click on the “Collada(Avastar)(.dae)” button in the upper right corner of the Window (see zoom icon in this chapter title).
A File Selector will pop up. Here you can navigate to your export directory and then export your file as a Collada file (using the file extension “.dae”)
Tip: If you intend to use your exported mesh for Animesh then please note that Animesh currently does not support the Appearance sliders. Your mesh will always shows as when you enable the white Stickman preset in the Avastar Appearance slider panel.

The Export option Sub-panels
The Exporter provides a couple of export options for special cases. Please use these options with care.
Modifiers
By default Avastar applies all mesh changing Modifiers except the Armature Modifiers to the exported meshes. However, some modifiers offer 2 sets of options, one option set is for rendering, the other option set is for the Viewport. We offer 3 options here:
- Apply according to the View Settings (the 3D Preview settings)
- Apply according to the Render Settings (the settings for Blender’s own Renderer)
- Don’t apply modifiers and only export the base mesh
The exporter by default applies the View settings. These settings are very closely related to the Blender Render System. In most cases you can actually just use the defaults. We will get back to this when we talk about how to use (or not use) Modifiers.
Side note: The Armature Modifier
Armature Modifiers define the relation between your meshes and your Skeleton (Armature). Avastar never applies the Armature Modifiers when exporting because the mesh would be transformed to static non rigged Meshes. This is almost never what you want.
For the curious: You find the Armature modifier in the Modifier Stack (see image). Remind: Armature modifiers are always defined in the mesh modifier stack. Armatures them self have no Armature modifier.
We will get to armature Modifiers in the “Create an Attachment” tutorial.
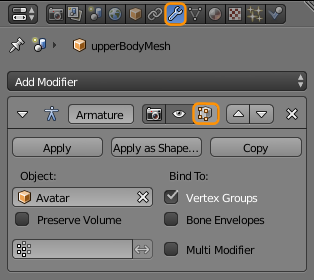
Hint: You want to display the modifier in edit mode and adjust edit cage to modifier result
Textures export (advanced)
Note: But for rigged meshes the images are not recognized.
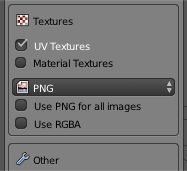
- UV Textures & Material Textures: Blender supports Material based textures and UV textures (which are directly assigned to polygons). Normally you want to export only the UV textures. In rare cases it is more desirable to export the material based textures instead. But beware, Blender does not export the render results, but only the source images!
- Image Type: The image format is typically predefined in the Blender Render settings. However we found it convenient to offer an immediate setting in the Exporter. By default the exporter applies the image type only to generated images.
- Use ‘Image format’ for all images: If you set this option, then Blender will use the selected image format for all exported images. If you disable the option, then only the generated images are affected.
- Use RGBA: Blender can export the Alpha channel for images. Normally you set this in the render settings where you can specify to use either RGB or RGBA for image exports. If the selected export format supports Alpha then enabling RGBA here will export images with Alpha channel even if the render settings are set to RGB and vice versa.
Hint: You may want to NOT use RGBA because of the Alpha glitch. However this is not a general advice. There are many situations where using Alpha images is even recommended (when you want to create an Alpha mask).
Hint: If the format of the exported image(es) does not support an Alpha channel then the “Use RGBA” option is simply ignored.
Advanced options
The Advanced Options are related to special scenarios. You should normally keep all options set as they are. This makes sure that your exports are well suited for SL. However in some situations you will have to get back here and set the options according to the descriptions below.
Warning: You must really know what you do when you set an advanced option. Handle with care!
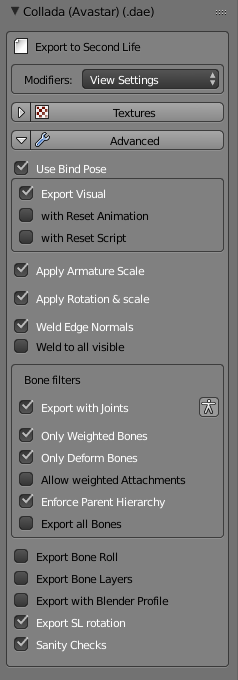
Use Bind Pose: The Use Bind Pose option is largely documented in the Bind Pose Workflow
You normaly set this option in the Appearance Sliders. We added it here only for convenience.
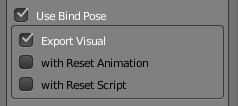
Following options are only available when the Use Bind Pose option is enabled:
- Export Visual(new in Avastar-2.6): Avastar tries to minimize the number of translation components in joint offsets to achieve the best possible (the easiest) rig configuration. Normally you want to keep this option enabled. If you find that this option does not work for you,m then please send us a note, so we can improve the feature.
- with Reset Animation (new in Avastar-2.6): Avastar generates a 0-priority single frame animation of the current Restpose. This animation can later be used in SL together with an animation reset script (see below)
- with Reset Script(new in Avastar 2.6): Avastar generates an LSL Script ready for usage in SL. In SL you copy this script together with the Reset Animation (see above) into your model’s inventory. You need this especially when you are not exporting in white stickman mode (see Appearance sliders)
Bone Filters
Export with Joints: When you have edited the Armature to adjust the Rig to your special character (Alien, creature, pet…) then you normally want to keep your edited Armature when you export your Meshes.
Hint: You want this option disabled only when your rig is so complex that Avastar can not calculate the Neutral Rig for your situation. In that case please set the sliders to SL Neutral and never touch the sliders again.
Disabled: Export the Rig visually as it is. Note: You must make sure that the Appearance Sliders are reset to the SL Neutral Shape (White Stickman Icon). Otherwise Avastar rejects the exports.
Enabled: Calculate the neutral skeleton from the current rig settings (temporary set Sliders to Neutral SL Settings) but apply the current Slider settings as bind pose. Pleased refer to the Bind Pose document for further explanations.
Only Weighted Bones: Avastar can export all deform bones of the Rig. However in most cases it is enough to only export the deform Bones which are actually used (weighted to meshes)
Hint: You want to enable this option in most cases.
Enabled: Export only those bones which are actually used (have weights for meshes)
Only Deform Bones: Avastar has many control bones (mainly for IK-animation, targetless Animation and attachment points) Avastar can export all Bones of the rig, or only the Deform bones
Hint: You want to enable this option in most cases.
Enabled: Export only deform Bones
Include Parent Hierarchy: Ensures that all parent bones of exported bones are also exported, even if they have no weights defined.
Details: When you enable the above bone filters then it can happen that not all bones of a Bone chain are exported. This becomes a problem when one or more of the not exported bones have Joint edits defined. Those definitions would then get lost during export.
Hint: You want to enable this option in most cases.
Enabled: Take care that all parent bones of exported Bones are also exported.
Export Bone Roll: Export Bone Roll using the Blender Collada Scheme.
Hint: This is only useful when you want to later import back the Dae file to Blender.
Enabled: Export the Bone roll according to Blender’s Collada Scheme
Export Bone layers: Export Bone Layer Data using the Blender Collada Scheme.
Hint: This is only useful when you want to later import back the Dae file to Blender.
Enabled: Export the Bone Layer data according to Blender’s Collada Scheme
Export with Blender Profile: Use Blender Collada scheme for exporting Blender specific Information
Hint: This is only useful when you want to later import back the Dae file to Blender.
Enabled: Export Extended Options according to Blender’s Collada Scheme
Export with SL Rotation: When you export an Avastar Rig then it must be rotated according to the SL Standards (so that the character looks into the positive X direction).
Hint: You want to enable this option when you export to Second Life or similar worlds.
Enabled: Rotate the Rig by 90 degrees to make it compatible to the SL specifications
Accept Attachment Weights: SL does not allow weighting of attachment points. Hence we suppress the export of weights for attachment points by default.
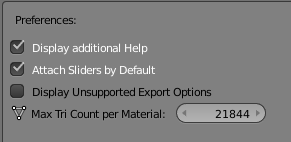
Sanity Checks: Perform tests on the Mesh (tricount, texture face counts, etc…)
Hint: You want to enable this option in most cases.
Unsupported Options
Avastar also provides some advanced export options. However those options are not shown by default as they are only rarely used.
You enable these options in the Avastar Add-on Panel (where you initially enabled the Add-on after you installed it):
Tick the advanced export options to get the buttons in the UI

Advanced Export Panel with unsupported options enabled
Limit Weight Count: In SL the number of weights per vertex is strictly limited to 4. We believe this number is enough for all weighting tasks. In cases where you think this limit is too low, we always found the real problem was due to bad mesh topology and bad rigging.
Setting this number affects the maximum number of weights which are exported by Avastar. We strongly recommend to keep this number set to 4.
Troubleshooting an export- Read more...
Import your Character to SL
Once you have exported your Mesh character, you only need to import it to your target System (like SL or a compatible online world). Although this is easy in principle, there are a few pitfalls in your way. So let us take a deeper look into the Mesh Importer.
The Video explains:
- How to import a rigged Mesh to SL, OpenSim or similar online worlds.
- How to use an Alpha mask for hiding the default character
- How to use image textures to texturise your character.
- Potential problems with your meshes (visible seams, wrong shape, missing face animations)
The Upload Panels in detail
Upload the model (import the Collada file to SL) - Read more...
 You can start an upload directly from the main menu bar as shown in the image above.You also can start an upload from within the repository view.
The LOD Panel (The entry page) - Read more...

The Options Panel (Here you enable rigged mesh) - Read more...

Step 4: (Optional) Import your Shape back to SL
Sometimes you might have modified your Shape In Avastar. And maybe you want to get your modified Shape back into Second Life. While the default SL Viewer does not provide a Shape Importer, most other third party viewers offer such an option nowadays.
Exporting a Shape from Avastar
You can export your current shape from Avastar to File as follows:
- Ensure Blender is in Object Mode
- Select the Avastar Armature
- in the Object Properties locate the Avatar Shape panel
- There you find a Save Shape To option

Importing a Shape to Second Life (using Firestorm)
You can import your shape back to Second Life with the Firestorm viewer as follows:
- Enter the Appearance Editor in your Firestorm Viewer
- Down in the right lower corner of the editor you find an Import option
The Firestorm Viewer provides an Import Option right within the Appearance Editor.
Now we are done with our first Mesh creation. You can simply wear the mesh and see how it moves with the default animations…