
I assume you have loaded your attachment into blender.
- Create a new Avastar.
- Align (fit) your mesh to the Avatar.
- In Object mode:
Select the Attachment and the Avastar Armature. - In the tool shelf:
Open the Skinning Panel. - Set the “Weight ” Option to your likes.1
- Click “Bind to Armature”.
Hint: Hover the mouse over the magnifier above to see where to find the Skinning Panel.
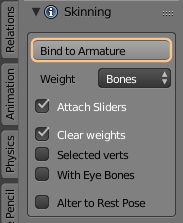
1: We provide a couple of options for setting the weight sources of your Binding. Maybe you need to experiment a bit to find which choice is best for your particular situation. In the toggle box below you find a little bit of explanation and a decision guide:
Details about Bind to Armature
- Copy weights from other meshes (see below).
- Rig meshes which are not in Rest pose
- Exclude Eye bones from getting skinned. This is needed to avoid distortions on the mesh character caused by the animation of the eye bones.
If you are unsure about which option to use, then please give yourself the time to experiment a bit and try out a few. There is no general rule about which weight sources will give you best results. However here are some guidelines. Set the weight option to:
- Keep, if you want to keep the Mesh weights as they are. You do this when your mesh already has weights (maybe it is a copy, or it is reused from another project, or it has been weighted within another software.)
- Meshes, if you want to copy from all other meshes which are bound to the same armature. You do this when your new meshes are significantly similar to already existing meshes for which you already have approved weights. For example you have created a weight template character for your projects, or your meshes are very similar to parts of the Avastar character.
- Bones, if you want to Automatic Weight from Bones algorithm (see Blender Manual: Groups_and_Parenting). This gives very smooth results in general. However the used method tends to spread the weighting too far away from the Joints.
However, you can be sure that regardless of which choice you take, you will almost ever have to carefully check your animation and fix issues. The rest of this article is about how to manual fix weights.
What to do when binding fails?
When you decide to get your weights from Bones (as i proposed above), then sometimes Blender reports back that it could not calculate weights for one or more vertices. This is typically caused by malformed meshes. You might need to check:
- Is your mesh made of multiple submeshes?
- Do you have intersecting faces in your Mesh?
- Do you have duplicate vertices in your mesh?
Often this problem appears when you Join separate Meshes into one mesh before you rig them. In that case you better rig the meshes first and join them later when the weighting is finished..
Go to Practice: Binding a Skirt mesh
Once you mastered the easy case, you are read to step into more complicated stuff.
Bind it
- Open the blend file with your mesh (the Skirt)
- Create a new Avastar character (Add -> Avastar -> Basic)
- Select the Rig
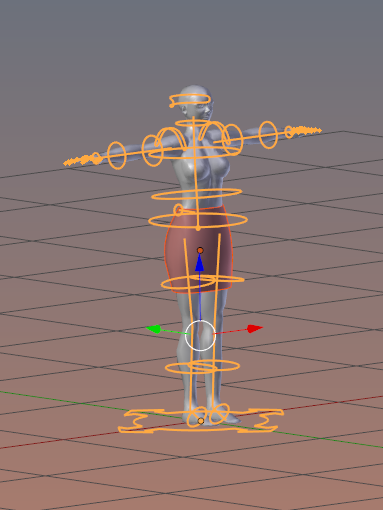
- SHIFT Select the mesh (the Skirt)
Now your screen may look similar to the screen shots aside. The Skirt Mesh and the Armature both selected bones displayed as circular handles
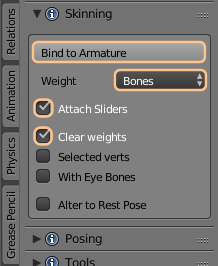
- Open the Avastar Toolshelf
- Locate the Skinning Panel
- Use the settings as shown in the image aside
- Bind to Armature
Now your mesh is bound to the Rig. Proceed with the next chapter: