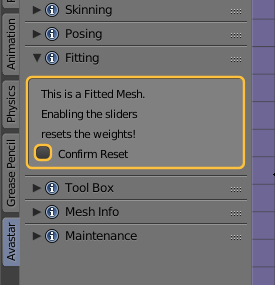
Before you can use the fitting sliders they need to be initialized once. You normally start your fitting work without having weights on the fitted mesh bones. In that case you jsut can go ahead.
But if your meshes already have Fitting bone weights defined (for example from a developer kit), then you get a popup text with a confirm button. Take this serious! the fitting sliders do not work well when you already have fitted mesh data!
Ok, so the fitting sliders are enabled…
The strength Sliders move your weight values of each fitting pair (see above) between the deform bone and the corresponding collision volume.
- Slider – Left: All weight is on the deform bone
- Slider – Right: All weight is on the collision volume
Note: By default the sliders do not affect your mesh shape instantly. If you want to see how the modified weightmaps affect the shape, you need to click the button Apply Shape at the bottom of the slider section. Unless you have enabled Apply Immediately (see above).
At the top of the Slider section you find 3 filter buttons for restricting the Display to:
- The Selected Fitting Bones
- The Weighted Fitting Bones
- All Fitting Bones
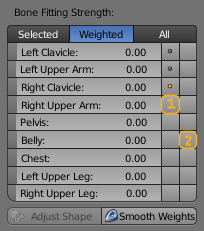
Right to each slider you find 2 – by default empty – fields for:
1: Click here to select the slider and the affected bones. You can SHIFT click to select multiple sliders at once. The selected sliders are affected when you call the smooth weights operator. In the image above you can see 3 sliders are selected (markers), and the RightClavicle slider affects the active pose bone (yellow marker)
2: Discard (reset) the weight Data after you have used the fitting sliders in edit mode and you want to reset to the mode before you edited the maps.
Note: You can store the slider settings into Presets (see further up on this page)