From time to time Avastar provides new versions to keep up to date with Second Life and Blender. We assume that you also want to keep up to date and you update your Avastar installation as well.
However the implementation of the Avastar Rig itself also changes over time. This article describes what you need to do to get your Avastar updated and work with your “old” rigs in the new environment.
Update the Avastar Software
Updating Avastar is as simple as:
- Download the newest Avastar version
- Update Blender to the most current release
when the update fails - read more...
When you update an Add-on in Blender, then normally the following steps are performed:
- The installer disables the current version of the Add-on.
- The disabled Add-on is removed from the system (deleted from disk),
- The new Add-on version is installed.
- You now can enable the new version manually
However sometimes the first step (disabling the Add-on) does not disable all of the software. So it may happen that the old Add-on leaves some traces which may result in subsequent errors when the new version is enabled in step 4.
When the above situation happens to you, then please proceed as follows:
Step 0: Remove traces
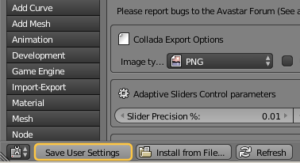
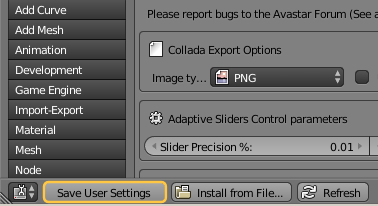
- Save User Setting at the bottom of the User Preferences Panel:
- Then close Blender
It is important that you really close blender.
Opening a new scene or pressing F8 are not enough! - Open Blender and open the User preferences again
- Type “Avastar” into the Add-on search field to locate your Add-on
- Then Enable the Add-on
In most cases this is all that you need to do. The Add-on will enable without errors.
If the above procedure does not work for you, then you need to put blender into a clean state as follows:
Step 1: Remove Avastar
You find the Remove Button in the expanded Avastar Add-on Panel:

Step 2: Save User Settings
You find the Save User settings Button at the bottom of the User Preferences Window:
Step 3: Restart Blender and Install the new Avastar Add-on
Proceed by installing your Add-on:
Downloading older Versions of the Software
If you have an account on the Machinimatrix website, then you can find most of the older Add-on versions in the Archive folder

Update your Models
The Problem:
Whenever you create an Avastar in a scene, then a fresh character is created with its own meshes and its own Armature. So, when you upgrade to a newer version of Avastar, then the Rig is not upgraded automatically. This may result in compatibility issues.
The solution
We have included the Rig Upgrade Tool into Avastar. This Tool will take your Avastar model and migrates the Armature to the newest Avastar version in place. Below you find the Tool Help Page.
The Rig Transfer Tool
This mode is entered when you have selected a foreign (not Avastar) Armature. In that case the conversion tool offers to Convert the Armature in place.
When you want to use a character that is distributed as Collada file (.dae), then you must follow the notes below!
How to Import a foreign rigged character from Collada. more...
- Open the Collada Importer by using:
File -> Import -> Collada
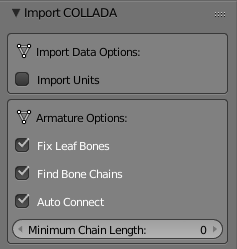
- Locate the Operator Redo Panel at the bottom left of the File selection Window (See image). Please ensure that the following options are enabled (check marked):
Fix Leaf Bones
Find Bone
Keep Bind Info (importing Fitted Mesh Bones, see below)
Note: Autoconnect can be disabled in most cases. Please test what works best for your case!
- Import the Model
- For Blender 2.77 or older:
The Auto Connect option is not shown in the user interface, but it is always enabled. - Keep Bind Info:
is only available with Blender 2.79. - For Blender 2.8:
Blender 2.8 is the next generation Blender that will become available by end of 2018. Don’t use it together with Avastar (it won’t work yet).
Important: The keep bind info feature is especially needed for development kits that are made for other restposes than the SL T-Pose. If you intend to import those development kits to Blender/Avastar, then please ensure that your Blender version is 2.79 but please do not yet use Blender 2.80.
Once you have imported your foreign Rig from Collada you can safely proceed as explained below. Please make sure that you have selected the Rig in Object mode. then proceed as follows:
When converting a foreign Rig to Avastar the Rig Transfer Tool shows a different set of conversion options. In detail you now can specify:
- Source Rig type
- Joint type
- Gender
The detailed description of the options follows below…
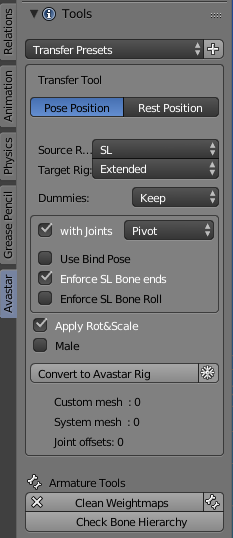
The Header Section
Transfer Presets: Here you find prepared configurations which have been tested with known Foreign Rigs (devkits). You also can store your own configurations as custom presets.
Pose/Rest Position: To Switch your Rig from the Current Pose to Restpose (the same can be found in the Armature Rig data Properties section (right side of the Blender Screen)
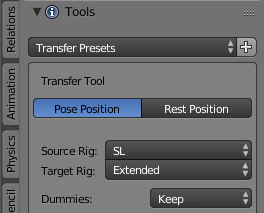
Source Rig: d We support 4 different rig types
- Avastar: When the source rig is an Avastar Rig. Please ignore this option unless you are explicitly told to use it.
- Generic: The rig is oriented like the Avastar Rig, but it is otherwise fully compatible to the SL Rig
- Manuellab: The rig has been created by Manuellab (or MakeHuman)
- SL: The Rig has been imported from the workbench, avatar.blend or any compatible SL Rig in its neutral Shape.
Target Rig: You can select either Basic Legacy Rig or Extended Bento Rig (with hands, face, wings, …)
Dummies: You can decide to Keep, Hide, or Delete the Avastar Meshes in the converted Rig. For non human creatures you normally want to delete the Avastar meshes. For human characters you most probably want to delete or hide the Avastar meshes.
Note: Only if you import a rig that was made for supporting the System Meshes, but does not have those meshes attached, then you will want to keep the Avastar meshes.
The Update Options
The Import Options allow you to define in more detail how exactly your old Rig shall be Updated. Finding the right options can be tricky at times, depending on the nature of your Rig. The options are explained below
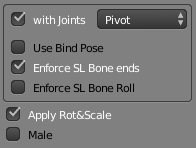
With Joints: Tell Avastar to record the details of the imported skeleton. SL supports 2 slightly different Rig definitions, namely the Pivot Rig and the Pos Rig. Those rigs only differ in their precision of defining the Joint locations. However small the difference is, it is visual.
It is very important to know which of the 2 Rig versions has been used to create the foreign rig. If you choose the wrong rig version here, you later will end up with small deviations from the original. So, best is to make some experiments before you decide which is the correct rig version to use here. Then conserve your finds by creating a new Preset for later reuse.
Use Bind Pose: When the imported Rig is mostly human and does not differ much from the SL Default rig only by bone rotations, like for example the Belleza devkit or the TMP devkit, then your best bet is to enable the use bind pose option. Because then all Appearance Sliders behave very similar (but not identical!) to the default system character.
Note: You can enable/disable this option at any time later (in the Pose Panel)
Enforce SL Bone Ends: When you have imported a devkit from a Collada file, then the bone ends of the imported bones are not defined. In this case Blender creates some fictive bone ends based on some reasonable assumptions. While the bone orientation of the end bones does not matter a lot, you still may want to match those end bones to the corresponding SL Bones.
This option ensures the lengths of the end bones (especially the Fitted mesh bones) are adjusted according to the SL settings.
Note: This option may be cosmetic. Actually it should not matter if you enable this option. If you are in doubt, keep this option enabled.
Enforce SL Bone Roll: The Bone roll is the rotation of bones along their long axis. If the Bone Roll is wrong then you can end up with very odd issues. This option tries to reset the Bone Rolls of your armature Bones to the Roll as used with the Default SL Avatar. This option is only rarely necessary, but very handy when it is needed.
Show Offsets: (in Experimental mode) When you enable this option then Avastar draws grease pencil lines to indicate the locations of the Bones in the T Posed Rig compared to the bone locations in your edited rig.
Note: This is only for debugging purposes and normally is not needed for your daily work. The feature only exists when you use Blender 2.78 or newer.
Apply Rot&Scale: Often your Meshes contain Scale and Rotation in Object space. While this is not entirely wrong, it often creates unwanted and unforeseeable issues. So it is normally best to apply Scale & Rotation during the update.
Male: Bind your meshes to the Avastar Male rig (instead of the female rig)
How to correctly import a Rigged Character from Collada
For Male characters you need to take some special care. You will typically follow this workflow:
- Import the dae file with the male character as usual
- Before you convert this character to an Avastar, ensure that the gender switch is set to Female!
- Now convert to Avastar Rig
- Finally set the gender switch to male (optional)
Also right before you export your mesh, you may need to follow this workflow:
- Set the gender switch to Female
- Export the mesh
- Set the gender switch back to male
While this works in general, it possibly might not work like this for all collada files!
You need to do some own experiments to find out the correct usage for your
case!
The Operator section
The Snowflake icon: When this option is enabled, then the original rig is applied to the meshes (the current pose is baked) before updating. You only want this option when your original Rig is not in Restpose.

Below the Update Rig button you find an information section which tells you some details about your Rig and the bound meshes:
- Custom Mesh: The number of user made (custom) meshes bound to the Rig
- System Mesh: The number of Avastar meshes (head, body, eyes, …) bound to the rig
- Joint Offsets: The number of maintained Edited Joints (Todo: this option always shows 0, it should be removed)
What happens during the update
When all settings are done, then you click the Update Rig button (see image above). Avastar will now step through following activities:
- The original Armature is applied to the Meshes (when snowflake icon enabled)
- The meshes are unbound
- A new Avastar armature is created (Basic or Extended Rig version, Pivot or Pos Rig type)
- The Avastar bones are aligned to match the original rig (If check for joint edits is enabled)
- The meshes are bound to the new Avastar armature
- Depending on the other options the new Avastar meshes are kept, hidden or deleted
Example: Converting the Belleza Development Mesh
There is nothing special about the Belleza Devkit. It just happens to be an ideal candidate for showing how to do a Migration in practice.
Step 1: Import the Devkit
- Open the Collada Importer by using:
File -> Import -> Collada
- Locate the Operator Redo Panel at the bottom left of the File selection Window (See image). Please ensure that the following options are enabled (check marked):
Fix Leaf Bones
Find Bone
Keep Bind Info (importing Fitted Mesh Bones, see below)
Note: Autoconnect can be disabled in most cases. Please test what works best for your case!
- Import the Model
- For Blender 2.77 or older:
The Auto Connect option is not shown in the user interface, but it is always enabled. - Keep Bind Info:
is only available with Blender 2.79. - For Blender 2.8:
Blender 2.8 is the next generation Blender that will become available by end of 2018. Don’t use it together with Avastar (it won’t work yet).
Important: The keep bind info feature is especially needed for development kits that are made for other restposes than the SL T-Pose. If you intend to import those development kits to Blender/Avastar, then please ensure that your Blender version is 2.79 but please do not yet use Blender 2.80.
Step 2: Set the Migration options
- Open the Tool Shelf and locate the Avastar Tools Panel
- We have a ready made Preset for Belleza (see top of panel). Select this preset
- Or alternatively set the options manually as follows:
- Source Rig: SL
- Target Rig: Basic
- Dummies: Hide
- With Joints: Enabled
- Use POS as Skeleton definition
- Use Bind Pose: Enabled
- Enforce SL Bone Ends: Enabled
- Enforce SL Bone Roll: Enabled
- Show Offsets: Disabled
- Apply Rot&Scale: Enabled
- Male: Disabled
- Snow Flake Icon: Disabled
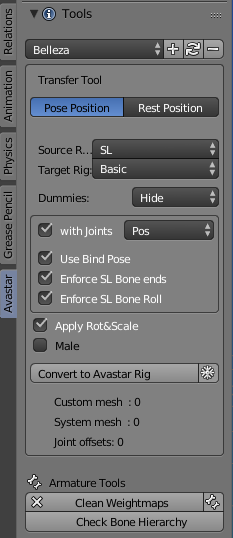
Important: Keep the Male switch disabled when you convert a male Belleza Mesh!
Now you are ready to click the Button Convert to Avastar Rig.

Belleza Mesh right after Import (Collada)

Belleza Mesh after conversion to Avastar. The 90 degree rotation is on purpose.
If you are working with another Devkit then you can store your setup into your own Devkit Preset for later reuse. Actually we have done exactly that to define the Belleza Preset.
Dear Developer kit owners:
Step 3: Prepare the Export
The Belleza Rig is an ideal Candidate for been used with Bind Pose. Just to remind you: You can enable or disable the Bind Pose option at any time.
- Open the Settings Panel
- Ensure you have set Advanced Settings
- Open the Pose Panel
- Enable the option Use Bind Pose

Step 4: Check the Sliders (optional, out of curiosity)
- Open the Appearance Panel
- Select the Torso Section
- Check how the arm length changes with the slider values
Now make an experiment:
- Disable the Use Bind Pose option
Right above the Appearance sliders - Now check how the Sliders work totally different on the Arms
Gotcha? Perfect!

Arms in Bind Pose mode
In Bind Pose mode the arm length changes as one would expect:

Appearance Slider – 0

Appearance Slider – 100
Arms in Joint Offset mode
In Joint Offset mode the arms are shifted sideways instead of lengthened along the limb:

Appearance Slider – 0

Appearance Slider – 100
Important: If you do not understand why the Appearance Sliders work different when you have enabled use Bind pose, then please take a moment and find out about the Slider behavior. It has been largely discussed in the SL Forums and in the SL Wiki…
Step 5: Check the export
Now do a regular Avastar Mesh export and see how your mesh behaves (you can use Aditi for testing). We tested it as follows:
- Important for Belleza: Before you export your mesh take care to disable the Male gender setting (export as female)
- Upload the Belleza Devkit file to SL
- Upload the Avastar export to SL
- Wear both meshes and
- inspect them in Wireframe mode
Avastar and Belleza show an almost perfect match when inspected in wireframe mode