User Interface Settings
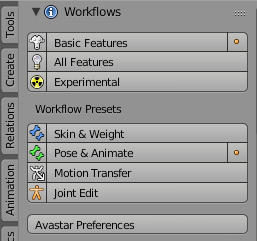
You find the Workflows Panel in The Tool Shelf (in the Vertical Avastar Tab, see image) The User interface settings are:
- Basic Features: Good for newbies and occasional usage. Displays the most important options (This is the default setting for a new installation)
- All Features: Good for Blender safe users who work with modified Human character rigs, Developer Kits and Creature Rigs.
- Experimental: Really special stuff, mostly for trying out things or preparing stuff that will show up in future releases. Also useful for Users who are doing extraordinary things which go well beyond what average users ever will do with the tool set.
The Basic Avastar Workflow Presets
We have identified 4 very common usage cases (Workflows) for Avastar. We have added 4 Workflow Presets which take care to adjust the panel options of various panels in a best possible way so you do not need to do all the settings on your own:
- Skin & Weight: is used when you want to do weight painting on your Mesh. This preset will enable the SL Bones and also unblocks their rotation setting so that you can rotate the bones for testing your weights.
- Pose & Animate: is used for all your animation work. This preset enables the green control bones which are optimized for your Animation tasks. This is also the default preset for Avastar.
- Motion Transfer: is used when you want to import another Animation from a BVH file.
- Joint Edit: is used when you want to edit the Bone’s Rest poses, for example when you create a creature or a you want to adjust the Rig to a specific non standard model
These Presets only set attributes in the best possible sense. So for example when you press the Skin & Weight, then only the related properties are optimized for skinning and weighting. But you are free to set all attributes manually

Note: Avastar marks the last clicked Preset button with a small yellow dot. But beware: This means only this preset was called last. It has no other meaning!

