Note: The video shows an older version of the tool in action. The tool works on newest Blender very similar to the video, but the user interface has changed. However, this text document is up to date
Tip: If you use this method for single bones, the weight parameters are retained. When you repeatedly use this tool on the same bone, the generator always begins with the same parameters that were used on that bone. If you use this tool on a more than one bone, then the retained parameters of the active bone will be taken as initial generator values.
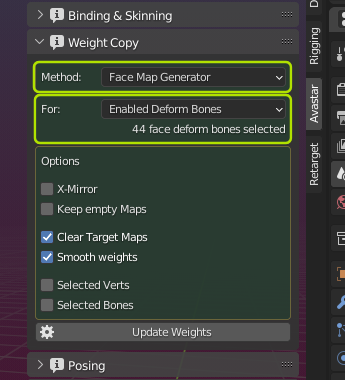
The For Bones selection defines which weight maps may be created by the generator. we have following select options:
Selected Enabled Deform Bones
Use this to create Weight maps for the selected deform bones. Prepare the rig additionally as follows:
-
- Select the Mesh
- SHIFT select the Armature in Pose mode
- Select all deform bones you want to take into account for the weight copy tool.
Visible Enabled Deform Bones
Use this to create weight maps only for the currently visible bones. Prepare the rig additionally as follows:
-
- Select the Mesh
- SHIFT Select the Armature in Pose mode
- Make all bones visible which you want to take into account for the weight copy tool.
Tip: Making Bones visible or invisible:
- You can hide/show bone groups using the Rig Display panel.
- Or you can open the Armature in pose mode and hide individual bones: Use “h” to hide selected bones and “ALT h” to make hidden bones visible again.
Enabled Deform Bones
Use this to create weight maps for all bones enabled below. Prepare the rig additionally as follows:
-
- Select the Mesh
- Avastar take all Deform Bones into account for the Weight Copy tool.
Generator options
You have further options to specify what exactly the generator shall create for you. See below for a more detailed description
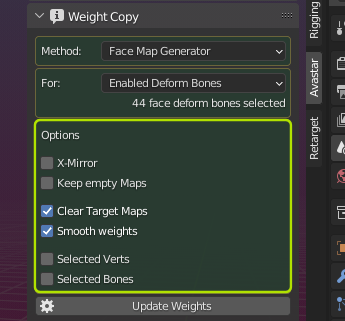
X-Mirror
Makes sure that when you have selected bones only from one side of the rig, the bones on the opposite side are also included even when not selected.
Note: Known glitch in Avastar-2.5: The number of target maps found currently does not count deselected mirrored bones, however the generator still creates the mirrored maps as expected.
Keep empty Maps
The generator always creates all Target maps, even if they turn out to be empty. Normally you do not want to keep empty weight maps. However this option allows you to change that at will
Clear Target maps
When enabled then the weight maps are cleared from all weights before the weight generator adds new weights to them. This is ideal when you want to renew entire weight maps.
However sometimes you want to recreate the weights only for a subset of selected vertices (see next option). In that case you may want to keep the weights of the deselected vertices unchanged. In that case you will disable this option.
Smooth Weights
After generating the weights perform an additional smoothing step in order to make the mesh behave a bit smoother when animated. You need to experiment with that a bit. You may like it or not.
Selected Verts
Generate weights only for the selected vertices. This allows you to fine control for which exact parts of your meshes weights are generated or regenerated. Please take into account the previous option above.
Selected Bones
Generate only for the selected Bones. This allows you to fine control for which exact parts of your Rig you want to generate or regenerate the weight maps. Please take care here when you also enabled the previous option Selected Verts, because you can easily end up with no weights at all generated when the selected bones are not close to the selected verts
The Operator Redo Panel
Once you have called the Face Weight Generator the initial weight maps are generated. But an Operator Redo Panel is made available (3D Viewport, in the lower left corner) where you can modify generator parameters interactively.
for the details see below
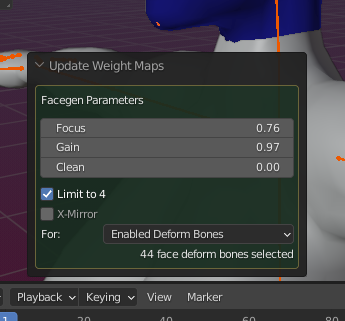
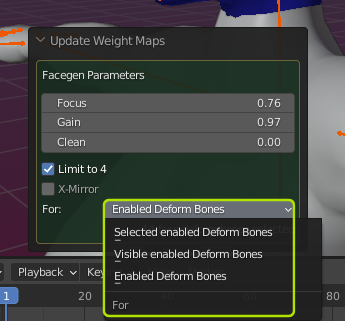
The weight Parameters
Focus
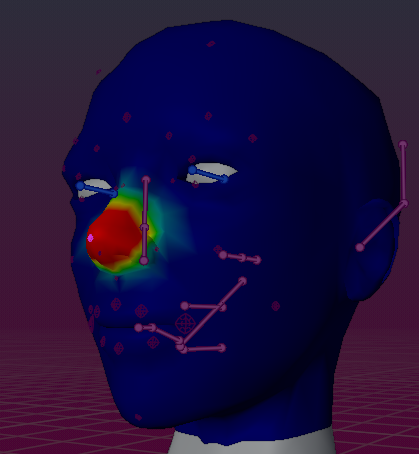
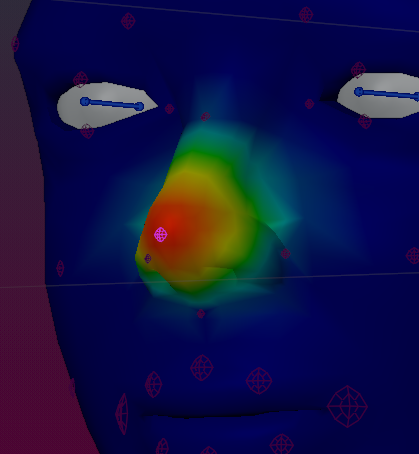
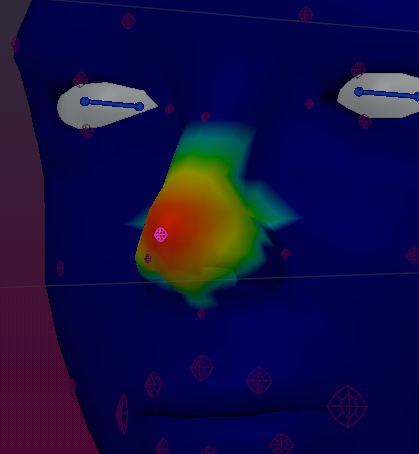
The focus varies the spot size and its center intensity. However the relations between the focus and its actual weight distribution that is generated is different for each bone and depends on the bone distance and orientation relative to the mesh. Below you see some examples for the nose with different Focus values. the focus can range from 0 to 1.5
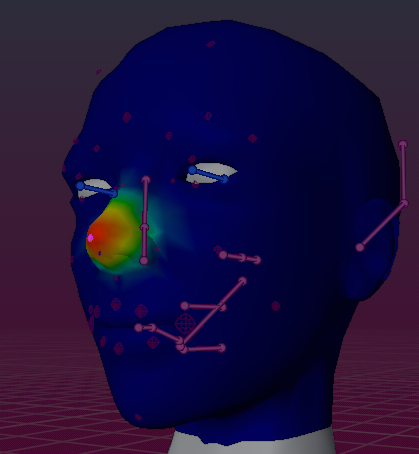
focus = 0.0
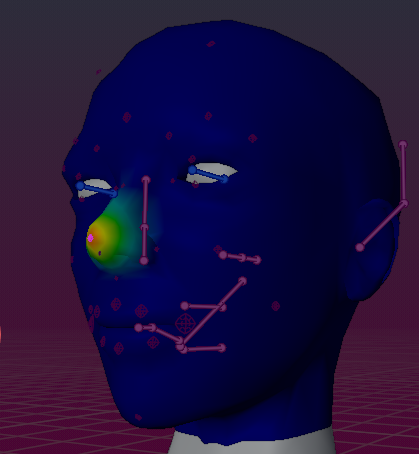
focus = 1.0

focus = 1.2
Gain
The gain varies the strength of the weights. This is actually just a factor that is multiplied to the original weights. You can leverage the weights or diminish them. Below you see some examples for the nose with focus = 0.0 but different gains. The gain can range from 0.0 to 10.0

gain = 0.2
gain = 2.0
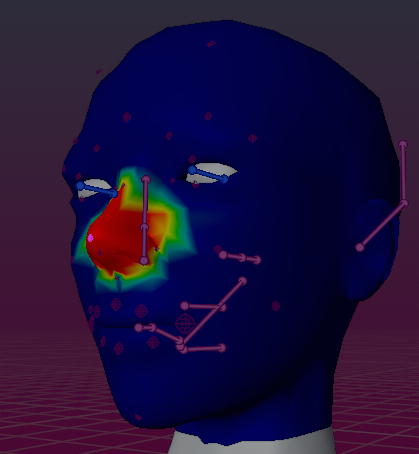
gain=10.0 (extreme)
Clean
The clean value is a threshold for removing weights. For example when you set the threshold to 0.7 then you will only keep yellow and red weights. Below you see some examples for the nose with focus 1.0 and gain=10.0 (an extreme value) but different clean values. The clean value can range between 0.0 and 1.0
focus=0.0 gain=0.0 clean=0.0
focus=0.0 gain=1.0 clean=0.4

focus=0.0 gain=1.0 clean=0.8
Tip: The parameters Focus, Gain and Clean are interacting in a rather complicated way. You may need to get some experience in order to get the weights to work for your purpose.
X-Mirror
You can select one or a few bones on one side on your mesh. When you have X-mirror enabled, then Avastar will also search for the mirrored bone and add it to the set of bones for which the weight maps are generated.
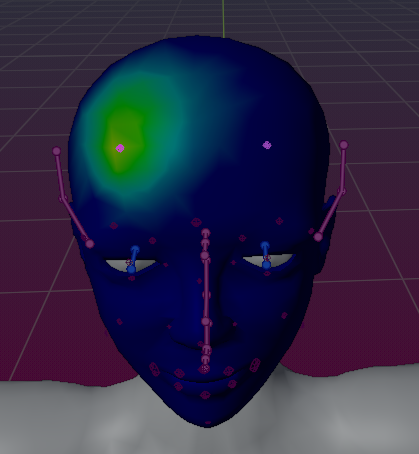
mFaceForeheadRight is selected
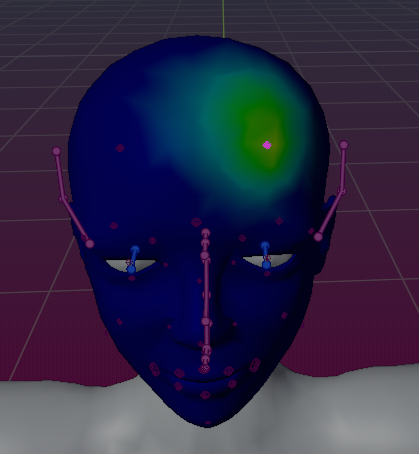
mFaceForeheadLeft is automatically added
Important: The mirrored bone does not necessarily be on the physical opposite side of the rig. Avastar only looks for the bone names in this case.
For: Bones section
This is exactly the same value that you used when you initially called the Face Weight Map Generator.