Glossary: Skinning
Skinning is the process of creating a connection between a Mesh (the Skin) and a Rig (the Armature). More specifically in the Skinning process we connect each bone of the Rig’s Skeleton to each vertex of a mesh, giving a connection strength named bone weight. the weight is a percentage of influence where 0% means the vertex fully ignores the bone’s movement, while 100% means the vertex follows the bone’s movement as if it where glued to the bone.
The weights of all vertices of a mesh are organized in weight maps with one weight map for each deform bone in the rig. Note that weight maps belong to the Mesh and not to the Armature. this way each mesh object can have its own weight maps. In Blender weight maps technically are Vertex groups.
In practice, for a polygonal mesh character, each vertex is related only to one or very few bones of the Rig. This means on the contrary that each weight map contains only vertices having weight for the related bone.
The process of Skinning includes:
- Binding the Character to the rig in a specific Pose (basically establishing an association between the Rig and the Mesh)
- Weighting the Mesh to the Armature bones (create the Vertex Weights)
Note: When binding a Mesh, then typically some form of automatic Skinning is applied as well to populate the mesh weight maps with initial data. Those initial weight maps might need manual optimisation.
Special cases
- If a vertex is not weighted to any bone: The vertex is not controlled by the animation rig
- If a vertex is weighed to one bone: any weight > 0 will be treated like 100%
- If a vertex is weighted to a bone with weight 0%: identical to vertex is not at all weighted to the bone
- If a vertex is weighted to 2 or more bones: the sum of all weights of the vertex is always 100%
Must know
weights are typically not stored as percentage but as fractions (0…1) with 0 meaning 0% and 1 meaning 100%. While it is possible to make the weight sum for a vertex differ from 1 (100%), Blender actually handles this by automatically normalizing the weights such that the 100% rule (see above) always applies regardless of the weight sum.
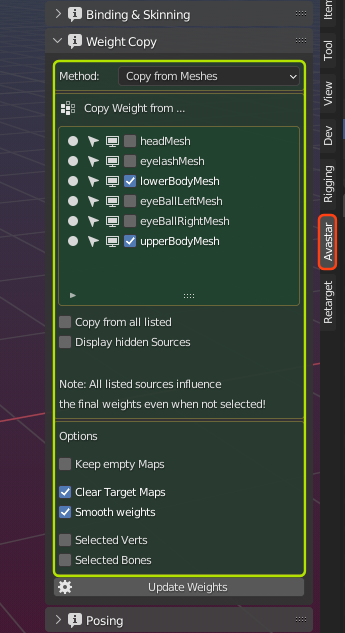
The Weight Copy panel is only available for Custom meshes which are already bound to an Avastar Armature. This panel is used to create or replace weights for your meshes.
The weight Copy panel is admittedly complex. However, once you understand the elements in the panel and how they interact, weight copy should no longer be a mystery for you.
Just for completeness: You see the weight Copy panel only when the active Object (selected Object) is a Mesh Object that is already bound to an Avastar Rig.
Tip: We offer more Weight Tools in the Armature Tool Box Panel. Also Blender provides a set of basic weight related functions.
A Gentle reminder
Especially when you try to copy weights from other meshes in m0st cases you have to refine the weights manually. All that you can achieve is to get a starting point for your work. This may work nicely, or not.
If you are trying out the Fitted Mesh Weighting, then we recommend to avoid using the default Avatar weights. Please consider to use Automatic Weight from Bones instead. That gives better results in many cases. Blindly using the weights from the default Avatar never works!
The example below shows 3 identical meshes: The left mesh is weighted to the classic mBones, the right mesh is weighted to the Collision Volumes (cBones) using the same weight values (for the system character).

The character in the center is the Avastar default character which is fully identical to the default Avatar in SL when you use exactly the same Slider Settings (Shape) in SL as you use in Blender.
For Fitted Mesh (Collision Volume Bone weighting) you can get much better results when you manually optimize the weights.
Available Weight Copy methods
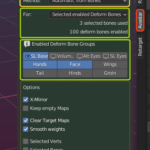
Automatic from Bones
Copy from Meshes
Empty Groups

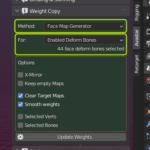
Generic Face Maps