Note: You find the Rigging a Horse Video on Youtube.
The Video was made with Avastar-1
but is still mostly valid.
About this Document...
Content:
Bind a Quadruped (Horse) to a prepared Rig
The Video:
Binding a Quadruped Mesh to a prepared Rig
What does Avastar provide?
Avastar basically supports the creation of animatable Models (Avatars&attachments) and the creation of animations. Therefore the tool adds various functions and user interface elements to Blender.
The full functionality of Avastar can be a bit overwhelming on first sight. You should be prepared to spend some time and patience to get it all working nicely for your projects.
What does this Document provide?
This document is a quick start into Armature Editing. In this section you will learn how to prepare Avastar for your work on non human meshes. We use a Horse as the modelling example.
However this article only scratches the surface of Avastar’s feature set, so there is a lot more to detect and we invite you to make your own experiences as well.
We expect that you have basic knowledge about Blender.
Step 1: Preparations
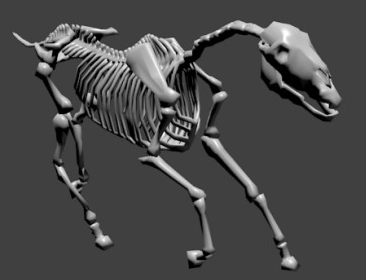
This document is about binding a quadruped. We have chosen to use a spooky horse mesh (well, actually a skeleton) from neurocase at blendswap You can decide to use it right away or just follow this document by using any other quadruped you like. There shouldn’t be much variation in how to proceed.
And now lets dive into the fun part…
More about the creator at www.dazpetty.com
The image shows our model cleaned up and almost ready to bind. We used the following checklist for preparing the model…
Checklist (use as a guideline)
Tip: Consider to prepare a blend file that contains only your model, prepared according to the checklist below and with all Orphans removed. This way you can reuse your initial model at any time and you have a reference model should you ever run into issues.
- If the model is rigged to its own rig, then unparent it and remove the other rig.
- Make sure there are no animations assigned to the mesh (rare, but happens)
- Take care that the model matches your Rig in size and orientation as good as possible
- Apply Rotation and Scale to the model before you bind it.
- Consider to join parts of the model into one single mesh, especially when the original was made of many pieces.
Step 2: Adjust the Rig
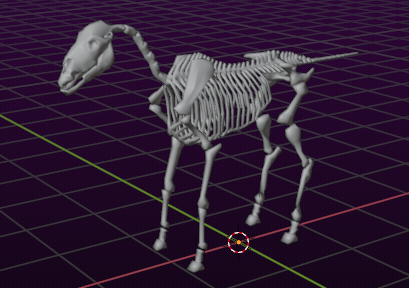
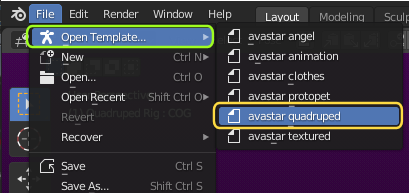
In the previous document we have created the Quadruped rig. This rig is ready available as Blender template, so we will use that for this tutorial. But of course you also can use your own rig as starting point:
- File – >Open Template -> Avastar Quadruped
- or just load a blend file with your ready made rig
By now we have the rig in the scene. Just take care that the rig origin is placed at the scene center (recommended)
Now append your Mesh to the scene.
Important: Please make sure that your mesh is cleaned up as i mentioned further up.
- File->Append->blendfile->Object->model
The appended Mesh probably needs to be adjusted to the rig:
- Select the Mesh in Object mode
- Adjust the mesh scale, rotation and location roughly to the rig’s proportions
- Apply Scale & Rotation to the Mesh
- Make sure the Hind legs of the mesh match with the hind legs of the armature.
- Ignore all further mismatches we take care of that later
Tip: It is important to Apply Scale & Rotation before you bind. Otherwise you may get surprises.
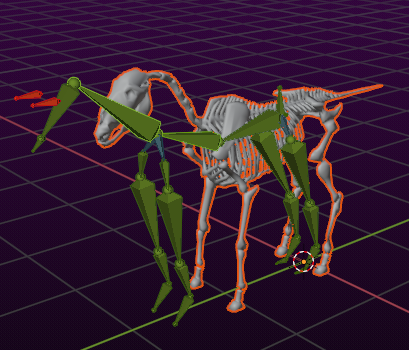
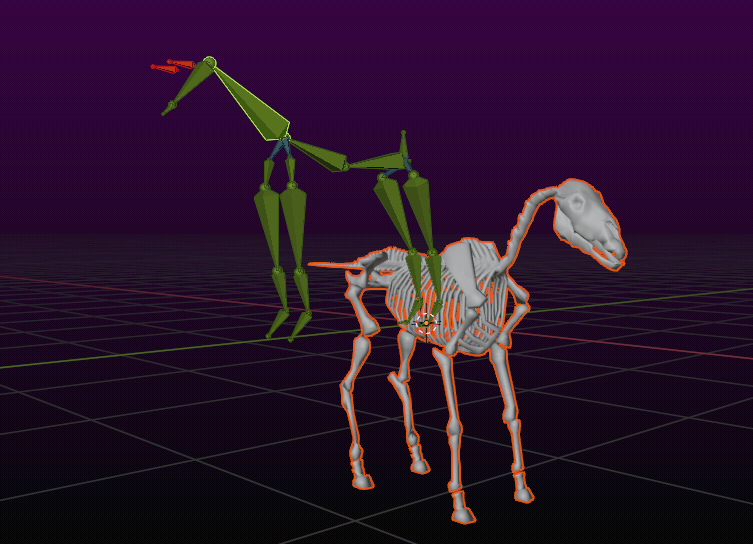
Open the Armature in Edit mode and drag the bones around to match the mesh. This should be an easy step for you now because the Rig is already well prepared and you only need to drag the bones a bit into place.
Important: Switch back to Pose mode when done!
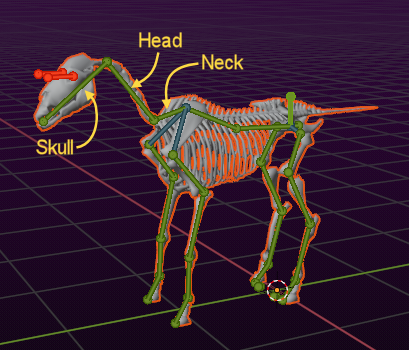
Note: I have rearranged the head part a bit, see where Head and Skull are now located to get one more joint on the long neck part.
Attention, Spoiler alarm: We will have some fun with the head soon.
Now lets see if the rig works for you.
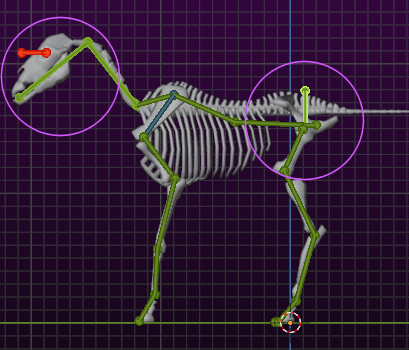
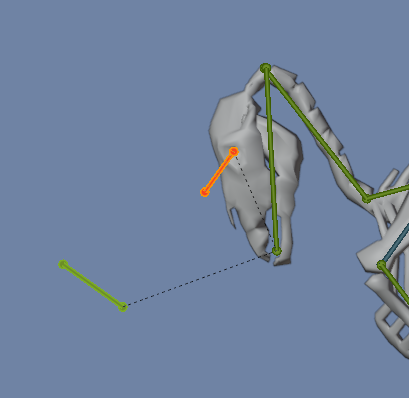
In the image i marked two spots where you likely will get some more serious issues with the Rig. We have to check these locations and possibly fix them, preferably before we bind the model to the rig.
The first evil spot are the eyes. The Eyes are children of the Head bone, so they move when the Head bone is rotated.
But we have used the Head bone for the neck of our creature. So the eyes only move when we rotate the creatures neck (which uses the Head bone), but not when we rotate the creature’s head (which uses the Skull bone) .

Note: The image above was made with an already bound mesh, so that you can see the issue better. So if you try it yourself now, then the mesh should not move when you pose the rig.
You actually could skip this part for now, just bind the mesh (see below) and then return back here after you see what goes wrong. However, we aim to begin with a working rig, so we try to do all adjustment work before binding.
The fix is actually super easy. We only need to reparent the two green eye bones from the Head to the Skull. And while we are at it we also can reparent the EyeTarget bone from the Head to the Skull (exercise for you).
Hint: You must switch the Armature to Edit mode before you can reparent the bones.
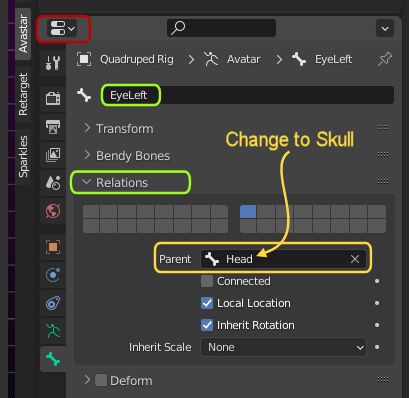
Why can the parenting be changed here?
You might have been instructed all the time that you can not reparent the Bones of the Secondlife Rig. And that is absolutely true!
But the green animation bones are no Secondlife Bones. They are just there for Animation. And their parenting can indeed be changed.
In our case we just reparent the EyeLeft and EyeRight from the Head to the Skull. But we do not(!) touch the related mBones. The mBones (mEyeLeft and mEyeRight) will follow the animation bones and when you make animations for your rig, Avastar will handle the transformation from the animation of the green bones to SL compatible animations of the blue bones.
You don’t get it right away? well yes, it is not easy to understand. But think of it like so:
- Green bones: Blender animation bones
- Blue Bones: Secondlife Animation Bones
- Avastar: converts this stuff for you
- You: Take care only of the green animation bones for rigging and animation
- You: Take care of the Deform bones (blue/purple) only(!) for weighting tasks
After we have made the changes in the parenting of the green animation bones, the rig now behaves correct. You also can see from the relation lines that now the Eyes and the EyeTarget are children of the Skull:
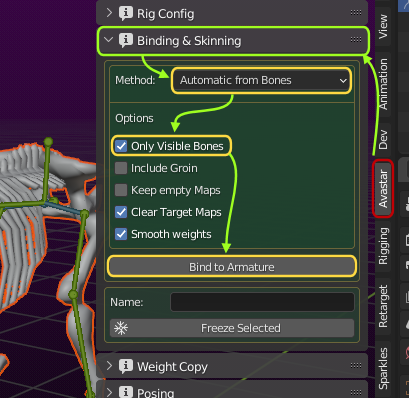
Step 2: Now lets Bind the Mesh
- Select the Mesh in Object Mode
- SHIFT LMB the Rig
- In the Binding&Skinning Panel:
Method: Automatic from Bones
Options: Only visible Bones - Bind to Armature
Now test how the mesh reacts to the animation bones…
Step 3: Fix SL weight limits
when you use the automatic weight from Bones method then Blender tries to find an optimal weighting. However it does not care much about the number of weights it assigns to each bone. This is not a bug but a consequence of how the weights are actually calculated.
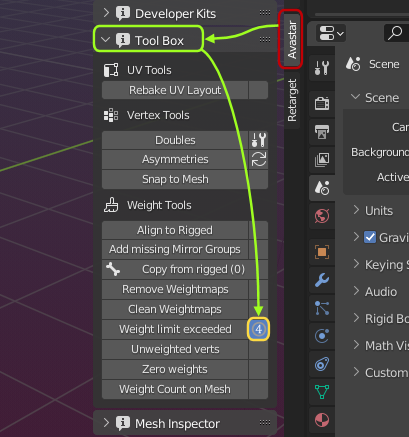
How to check weight limits
You can check if your weighted mesh complies to the SL limits:
- Select your Mesh and switch to Edit Mode
- In the Avastar Tool tab open the Tool Box panel
- Call the Weight limit exceeded Operator
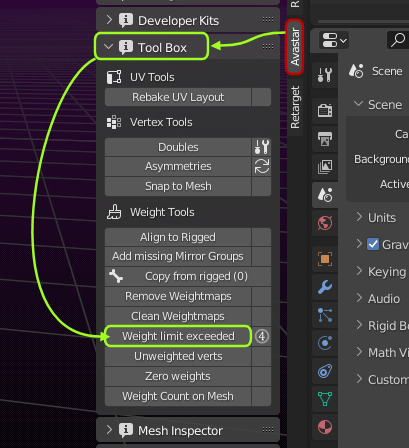
The operator reports back in the Top Blender Bar if it found vertices with more than 4 weights as shown in the image below:

Also all troublesome vertices are now selected (in Edit mode) as seen below:
How to fix weight Limits
- Select your Mesh and switch to Edit Mode
- In the Avastar Tool tab open the Tool Box panel
- LMB the circle icon with the embedded number “4” right to the Weight limit exceeded Operator
However you must check if your weighting still works! You might need to tweak the weight values a bit. Again: This is just how it is, this is not a bug.
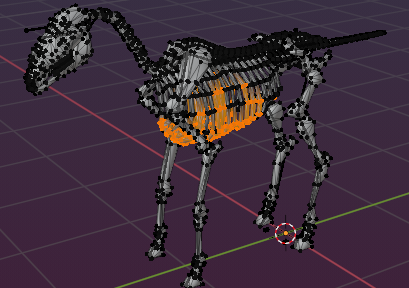
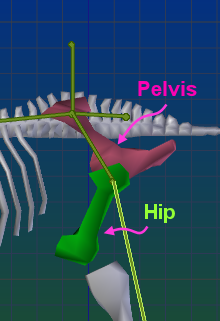
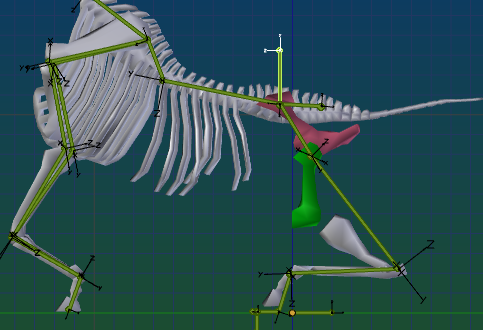
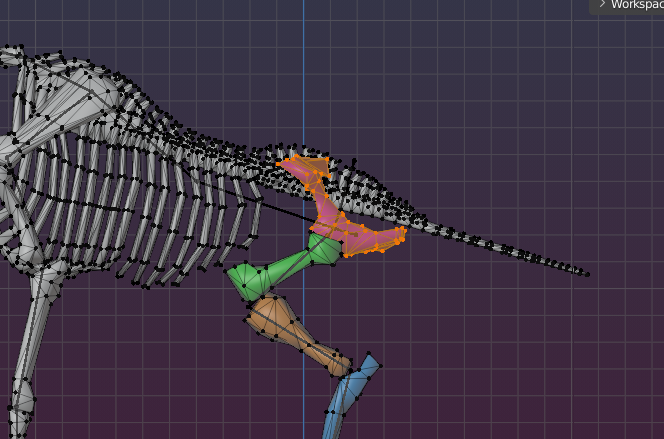
Step 4: Fix weight issues with the Pelvis area
You see the pivot point for the Hip Bones is wrong. The problem here are the HipLink Bones. We placed these bones as if they where regular Deform Bone. But they are structure bones which do not exist in Secondlife and which do not carry weights.
The Automatic Weight from Bones decided to only use the mHip bones here, But this results in slightly wrong movement:
- The upper part of the hip mesh (purple) does not rotate as much as it should
- The lower part of the hip mesh (green) distorts
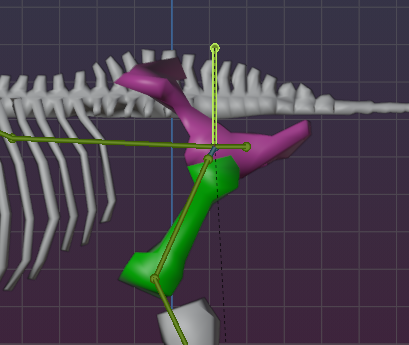
The easy fix is to manually weight the upper part of this area only to the mPelvis (marked in red) while we weight the lower part only to mHipRight and respectively mHipLeft (marked in green)
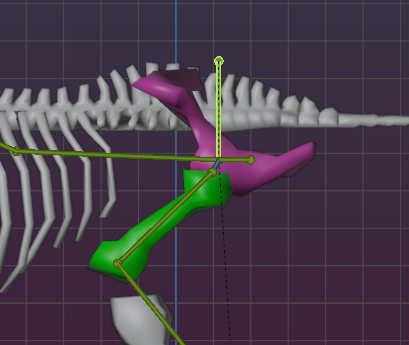
In theory you also could modify the Rig structure itself. We can not give a good recommendation, except:
Try and choose what works best for your needs.
Now the red part of the Hip Bones no longer rotates when you move the Skeleton up/down, While the lower (green) part still rotates together with the Hip Bones. I think this is more of how it should be.
How to assign Materials
While this is not really a necessary step, it still is very useful to use materials for checking your binding and manually modifying weights on parts of the mesh. In this case we are working on a skeleton mesh which happens to need stiff meshes (as the mesh actually represents a collection of bones, though this is not the usual case). So lets take this as an opportunity to learn something new. we will add materials for the Hips, Pelvis, Thighs and Ankles:
Open the Material Properties Panel and add a new Material. Or, if you already have materials, select one from the material picker left to the new button.
As soon as you click on the New button a new material will be added to the list widget (a typical Material name is: ‘Material, Material.001’, ‘Material.002’, …)
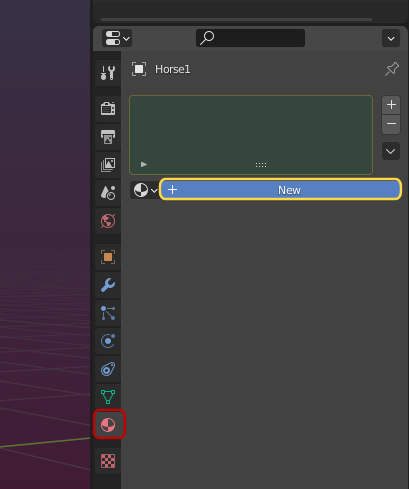
Note: Since this is the first defined Material for the Mesh Blender will automatically assign all vertices to this material. Lets keep this material for now and proceed as follows:
Click four times on the “+” button in the material list to get four additional empty Material slots.
- Then select the first empty slot (see image)
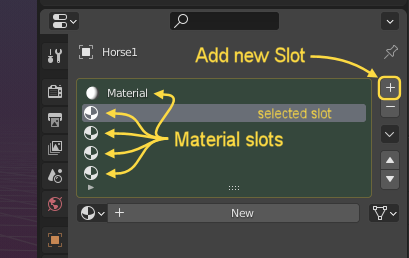
- Click on the New button again to create a new Material
- Rename the material to Hips
- Select the next empty slot
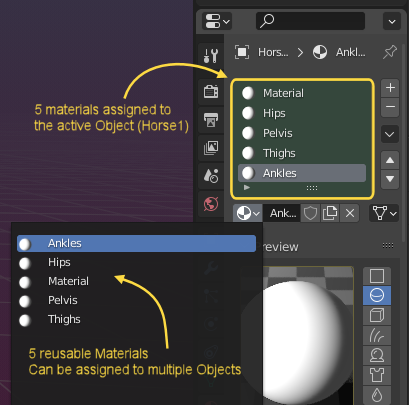
Repeat this for Pelvis, Thighs and Ankles. At the end your widget should look like in the image.
By now all 5 Materials have the very same properties (i.e. a light grey color) and although the 5 materials are assigned to the Horse mesh, all vertices are currently assigned just to the first material in the list. We have to change that next.
We begin with the Hips
- hover the mouse over the left Hips area
- Press ‘L’ (Now all vertices around the left Hips bone are selected
- do the same for the right Hips area
- Assign the vertices to the Hips
Next we will colorize the Hips in the viewport…
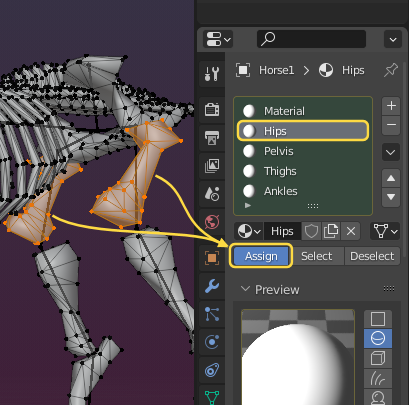
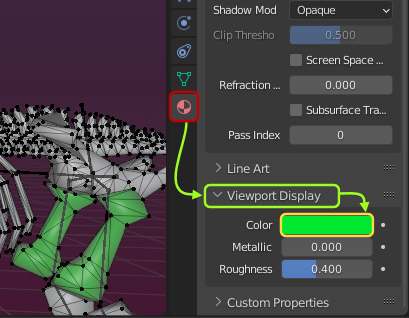
Blender actually provides two color definitions, one for the renderer and one for the Viewport. We are only interested in the Viewport color for now. Let us begin on the hips:
- Make sure the Hips Material is Selected in the Material List
- In the Material Properties scroll down to the Viewport Display Panel
- Select a color of your choice (i use green here)
Proceed in the same way for Pelvis, Thighs and Ankles by first assigning the vertices to the Material (see above) then setting the 3D Viewport display color.

How to assign Weights
Our mesh has a huge benefit: It is made of a bunch of stiff parts (bones actually). the good thing is that such a mesh can be easily weighted by hand, so here is an opportunity to learn how the basic weight tools work and how we can cleanup the hind bone weightss and avoid odd distortions during movement. You may want to cleanup all other parts on your own.
Lets begin with the Pelvis this time:
- Make sure the Mesh is selected in Edit mode
- select the Pelvis material
- Click the Material’s Select button
Now you have all Pelvis vertices selected
We want the Pelvis mesh to be assigned to the Pelvis bone and nowhere else. here is how it goes:
- Open the Vertex Groups (Data Properties)
- From the Tools Drop down list select Remove from all Groups
Now the selected vertices have no weights at all.
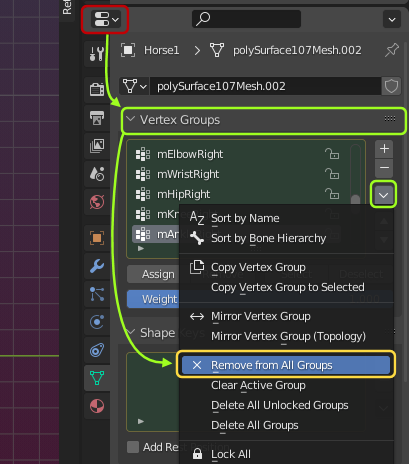
- Select the mPelvis deform bone group in the vertex group list
- Set the weight value to 1.0
- Assign the weight to the selected vertices
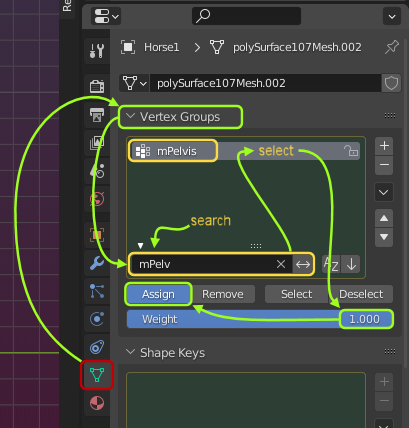
Now the pelvis mesh is assigned to the mPelvis bone and moves as a stiff bone as wanted. Now we are ready to do the same procedure for the Hips, the Thighs and the Shanks, then we are done and the hind now move really like they should move.
And now it is your turn to apply what you just learned to the entire horse mesh.
The End of Tutorial