Glossary: Skinning
Skinning is the process of creating a connection between a Mesh (the Skin) and a Rig (the Armature). More specifically in the Skinning process we connect each bone of the Rig’s Skeleton to each vertex of a mesh, giving a connection strength named bone weight. the weight is a percentage of influence where 0% means the vertex fully ignores the bone’s movement, while 100% means the vertex follows the bone’s movement as if it where glued to the bone.
The weights of all vertices of a mesh are organized in weight maps with one weight map for each deform bone in the rig. Note that weight maps belong to the Mesh and not to the Armature. this way each mesh object can have its own weight maps. In Blender weight maps technically are Vertex groups.
In practice, for a polygonal mesh character, each vertex is related only to one or very few bones of the Rig. This means on the contrary that each weight map contains only vertices having weight for the related bone.
The process of Skinning includes:
- Binding the Character to the rig in a specific Pose (basically establishing an association between the Rig and the Mesh)
- Weighting the Mesh to the Armature bones (create the Vertex Weights)
Note: When binding a Mesh, then typically some form of automatic Skinning is applied as well to populate the mesh weight maps with initial data. Those initial weight maps might need manual optimisation.
Special cases
- If a vertex is not weighted to any bone: The vertex is not controlled by the animation rig
- If a vertex is weighed to one bone: any weight > 0 will be treated like 100%
- If a vertex is weighted to a bone with weight 0%: identical to vertex is not at all weighted to the bone
- If a vertex is weighted to 2 or more bones: the sum of all weights of the vertex is always 100%
Must know
weights are typically not stored as percentage but as fractions (0…1) with 0 meaning 0% and 1 meaning 100%. While it is possible to make the weight sum for a vertex differ from 1 (100%), Blender actually handles this by automatically normalizing the weights such that the 100% rule (see above) always applies regardless of the weight sum.
The Binding & Skinning panel
Here is where your Mesh(es) get connected with your Rig. From the name of the panel it might look like binding a mesh to an Armature and skinning a mesh (by adding weight maps) are somehow the same thing. But actually the Binding tells a mesh to put itself under control of an Armature, not more not less. While skinning tells the armature how its bones shall influence the movements of the mesh.
So binding and skinning are not the same thing but they are very closely related to each other. Indeed in Blender a Binding can add initial skinning data (weight maps) so that right after binding you already have some basic weight maps to start with.
Therefore the terms Binding and Skinning are often used interchangeably and refer to a combination of:
- Connecting a mesh to an armature (In Blender this is done with an armature modifier)
- Adding weight maps and (in most cases) automatically populate them with initial Data
However, in most cases you have to adjust the weight maps after binding, because any automatic skinning process is very likely to not create optimal results.
The Panel Main Section
Please make sure that you have selected your armature AND one or more meshes that you wish to Bind to it.
By default (when none of the selected Meshes is already bound) we have following Binding function at the bottom of the panel:
- Bind to Armature (when the mesh is not yet bound)
Note: If you have more than 2 meshes selected, then the number of selected meshes is displayed in parentheses.
Note: When one or more of your selected objects is already bound, then the panel also contains an Unbind Section. See chapter The skinning panel for already bound Meshes (at the end of this document) for more details
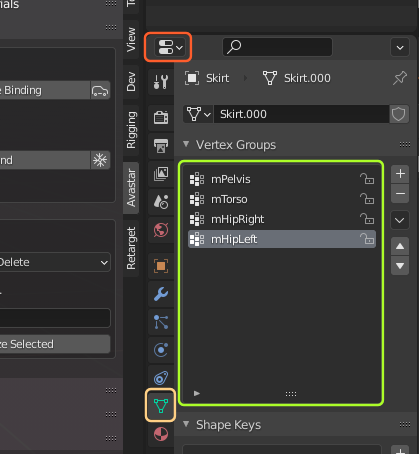
Tip: Where are the Weight maps located?
Important: The Weight maps (which get created during binding) are stored in the meshes. You have access to the weight maps in the Properties Editor, in the Mesh Data section, Vertex Groups Widget. Weight maps have the same name as their corresponding bone.
Tip: In Blender the Bone Weight maps are implemented as Vertex groups. This is why you see the weight maps in the Vertex Groups widget (see image). Thus you can create weight maps manually by creating a new vertex group and name it like the bone for which the map is supposed to be used. If the mesh is Bound to an armature this group is automatically used as weight map.
The Binding Method
You have different options for creating the weight maps for the initial binding. Technically this is all about from where the mesh gets its weight maps. Below you find more details about the supported methods

Method: Preserve Weights
No weight maps will be created. However, if the mesh already has weight maps they will be preserved. You want to use this option when your mesh has already been weighted, and or when you want to manually weight your meshes.
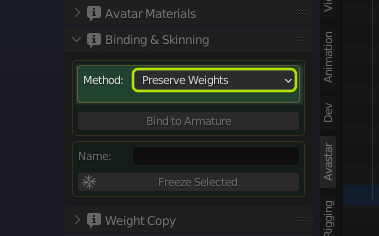
Note: This option only makes sense when you have weight maps on your mesh. Such as when you needed to Unbind a mesh (see below) and later want to rebind the mesh to your Armature, then you might want to preserve the weightmaps from the Mesh instead of creating new ones.
There are no more options available for this Skinning method.
Method: Create empty Groups
Weight maps will be created, but not populated (no weights will be calculated). If the mesh already has weight groups assigned, then these groups will be preserved. You want to use this option when you later plan to assign weights manually.
Note: This option creates empty weight maps for all rigged deform bones. In most cases this is not what you want, because…
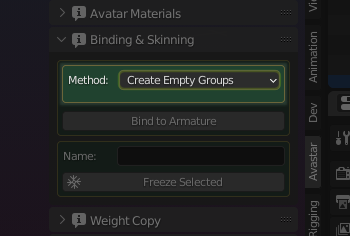
Important: …You can add weight maps at any time later. In fact many of the available weight tools automatically create weight maps when they are needed. So, please also take a look at the skinning method Preserve Weights as it is described in the previous section (see above). In most cases this is the better choice because it does not create unnecessary maps.
There are no more options available for this Skinning method
Method: Automatic from Bones
the weight maps are generated from the Skeleton by using the Bone heat algorithm. This method generates weight maps depending on the location of the skeletal bones and the locations of the meshes. The method is based on Blender’s automatic weight from Bones.
It normally creates reasonable results, but you often need to tweak the data manually. However, sometimes the heat algorithm fails to find solution for one or more bones…
This method has options…
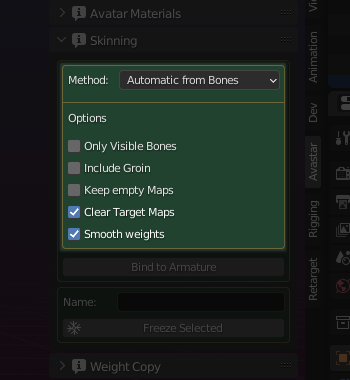
Options
Only Visible Bones
Only take weight from the visible bones.
IncludeGroin:
By default mGroin is not used as deform bone. Setting this option enables the mGroin bone as a deform bone.
Keep Empty Maps:
Keep weight maps even when there is no weight in them. Take care: Normally you want to keep this option disabled.
Clear Target Weight maps:
Remove any preexisting entries from the weight maps to make sure the bone weights are added to clean maps. Normally you want this option to keep enabled
Smooth weights
The automatic weight from bones often creates weights which have too strong gradients, leading to unpleasant distortions when bending the bones. the smooth weights option may be interesting in that case (you need to experiment, every mesh is unique, so every mesh has different behavior regarding weight maps!)
Troubleshooting
Sometimes the automatic weight from Bones algorithm creates unexpected results. Here are some tips for troubleshooting:
Face and eyes
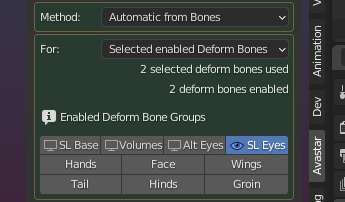
When you create weights for the face, then you need to take special care of the eyes. Actually you want to disable the Eyes Deform groups in most cases! The reason is: The heat from bones algorithm is based on the relative distance between bones and meshes. So, bones closer to a vertex create higher weight values.
As a consequence the eye bones are will falsely add weights to the face mesh. Normally this is not what you want. Actually the eye bones should only create weights for the eye meshes and nothing else. So you will deselect the eyes and only enable SL Base and Face bone groups.
Note: In the example below we have added the SL Base to make sure the mHead and mNeck bones are taken into account as well. This is normally what you want, but it is not necessarily correct for every case. You need to find out what is right for your project.
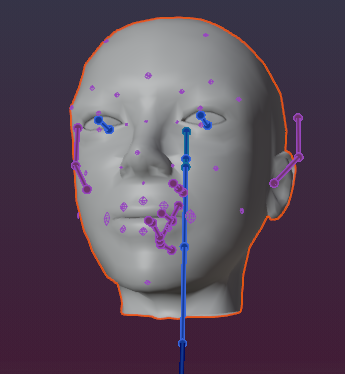
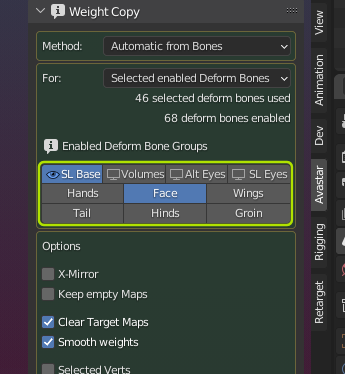
On the contrary: If you want to generate weights for the eyes alone, then you will enable the eyes and the eyes deform group:
Hint: we have Eyes and Face Alt Eyes. Make sure you select the correct pair of eyes here depending on your project.
Failed to find solution…
The automatic weight from bones algorithm normally creates reasonable initial results. However, sometimes the heat algorithm does not calculate weights for a subset of the mesh vertices. And sometimes it even rejects to create weights for the entire mesh.
There was a topic about this on Blender stackexchange: See fails to find solution for one or more bones…
Here are some tips how you might get rid of the issue:
- Fix duplicate vertices
- Fix mesh polygon intersections.
- If the mesh object has 2 or more unconnected submeshes, then try to split the submeshes into separate objects, then weight again and finally join the submeshes back into one single object
- Check if the Mesh uses modifiers (e.g. subdivision). Disable the modifiers before binding, then add them back after binding.
- Check if the bone deform flag is set for all bones where you expect to get weights.
- Be sure you are not selecting the green animation bones or the yellow IK bones . Remind: the green bones are only used for Animation. They should never have weight maps.
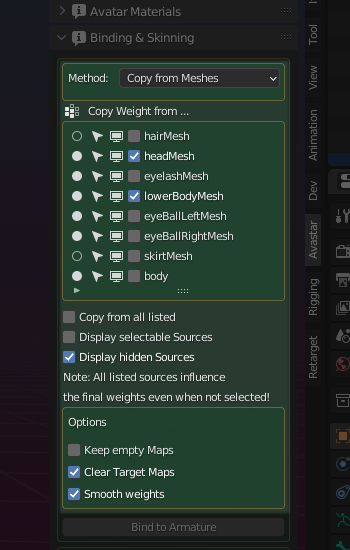
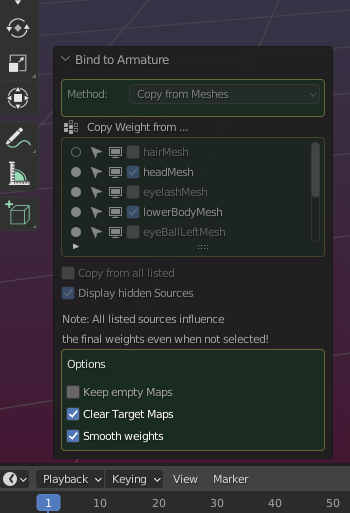
Method: Copy from Meshes
The Weight maps are taken from other Meshes currently attached to the same rig. The list of weight sources is available in the Copy Weight from … subsection (see image) where you can select the weight sources individually.
The list of displayed meshes can be modified:
- Copy from All Listed:
Take weights from all meshes listed in the widget, regardless if they are selected. - Display hidden sources:
Also list the meshes which are currently hidden.
About the icons in the list
- The white circle Icons:
When you disable the circle icons, then the disabled meshes are not used as weight sources - Selectable Icons (for convenience):
Allows to set selectability of the Mesh. this is a shortcut for the same operation in the Outliner, so it is nothing special - Monitor Icons:
disable/enable object from scene. - Checkmarks:
all checkmarked meshes are treated as weight sources. If the Copy from all Listed Option is enabled, then this option is not taken into account
Note: You can not expect that this function automatically creates optimal results! You later need to fine adjust your weights manually. Please look at the Create an Attachment tutorial on this website.
Options
Keep Empty Maps:
Keep weight maps even when there is no weight in them. Take care: Normally you want to keep this option disabled.
Clear Weights:
Remove any preexisting entries from the weight maps before adding the bone weights. You want this option be enabled in most cases.
Smooth Weights:
The automatic weight from bones often creates weights which have too strong gradients, leading to unpleasant distortions when bending the bones. The smooth weights option may be interesting in that case (you need to experiment, every mesh is unique, so every mesh has different behavior regarding weight maps!)
The Redo Panel
As soon as the Binding has finished, a redo panel appears. In this panel you can change some of the displayed actions interactively. The properties which can be changed here depend on which Method you have selected.
The skinning panel for already bound Meshes
When the selected meshes are already Bound, we get these sections instead:
- Bind (if your selection also contains Objects which are not yet bound)
- Unbind (if yous selection contains Objects which are bound)
- Unbind (if yous selection contains Objects which are bound)
Note: When the Auto icon in the Update binding button is enabled, then the update happens automatically. You find more about this panel in the document about Unbinding.
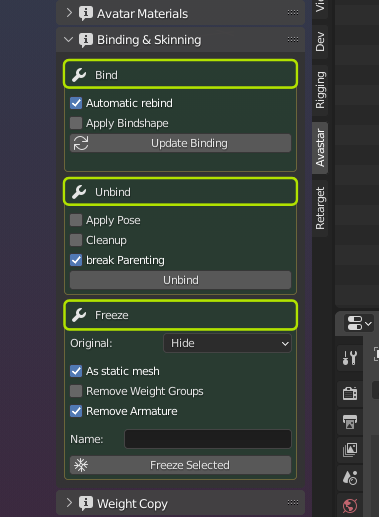
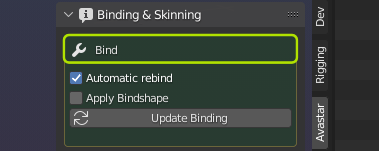
The Bind Section
- Automatic rebind:
- Apply Bindshape
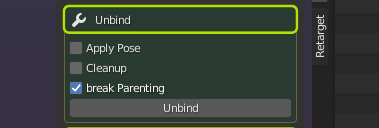
The Unbind Section
- Apply Pose: Bake the current pose into the mesh
- Cleanup: Remove all Avastar related data from the Mesh Object(s)
- break Parenting (on by default)
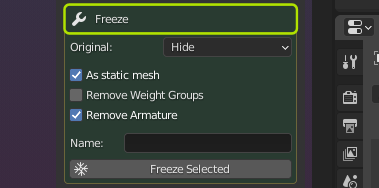
The Freeze Section
- Original: can be Keep, Hide or Delete
- As static Mesh: Unbind the mesh from the armature
- Remove Weight groups: as it says
- Remove Armature: as it says
- Name: The name of the frozen Object