keywords
- retarget tool
- rig transfer, motion transfer
- animation transfer, animation copy
- fbx, dae, bvh
In a Nutshell
- Create a new Avastar Character (or use an existing one).
- Import your animation file.
- Map the corresponding Bones.
- Transfer the Animation.
Loading an animation file
Blender supports the import of some animation formats out of the Box.
You find the importers in the Top menu at:
File -> Import -> Motion Capture (.bvh)
File -> Import -> FBX (.fbx)
File -> Import -> Collada(Default) (.dae)
Note: The SL default animations are all available as BVH files from the SL-Wiki:
We use the avatar_dance8.bvh for this document
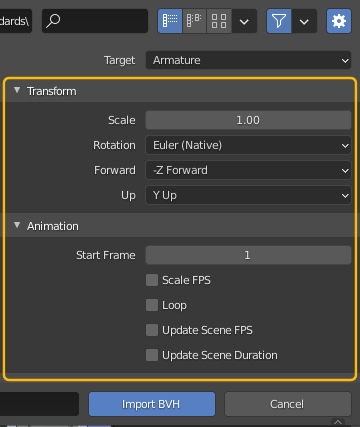
The BVH Import options are at the upper right corner of the Import File Browser
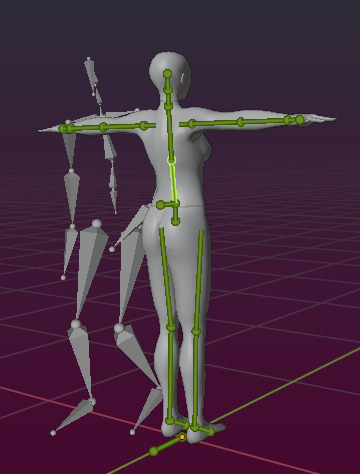
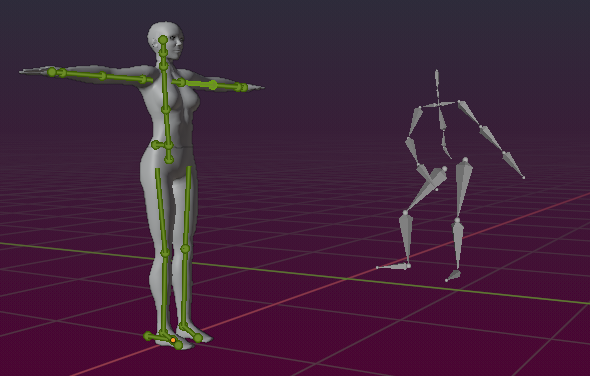
Note for BVH: You can set – but you do not strictly have to set – the Scale factor to match the imported Armature and the Avastar armature. However if you do not fix the scaling during import then you can easily end up in a situation like in the image above.
Tip: If you import an animation that was made for Secondlife then its unit of measurement is Inches. In that case you can use the factor 0.0254 to rescale the figure to Blender units when you import the BVH file.

BVH File imported with wrong scaling
Note for FBX: Unfortunately there are a few different versions of FBX and Blender does not support all of them equally well. We found that animation files in FBX 7.4 format work best.
Tip: Always enable the import option Automatic Bone Orientation
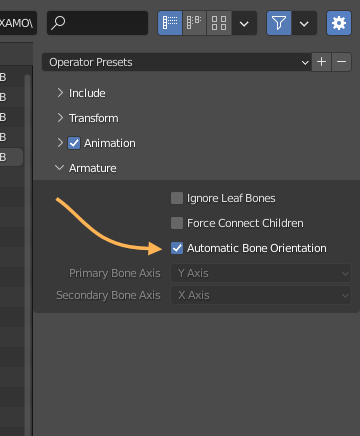
FBX: Automatic Bone orientation must be enabled
Quick fix for Scaling mismatch

The Match Scales function rescales the imported Animation rig in Object space to match the Avastar rig’s Skeleton. However, we get the scaling value only from the Z-Axis and apply the same scale to the X- and Y- axes as well. In most cases the result is good enough to work with. But you always can manually adjust the armature scale in Object mode.
Tip: Most animations use translation components only for the Root bone (typically the Pelvis) All other bones are typically only rotated relative to each other and never moved. In this case when your imported animation only uses Rotation components, then a strict bone to bone match is less important.
Important: If you need to edit the rigs to get better results, then always(!) edit only the Avastar Rig. Do your editing before you do the motion transfer! Editing the imported rig will destroy your animation.
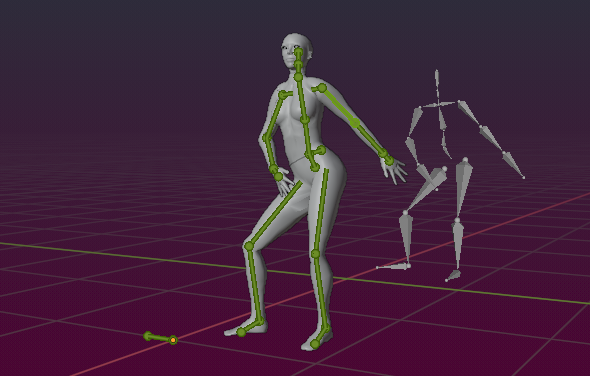
Note: If you take a closer look then you sometimes see the Avastar and the imported animation look in opposite directions. This is nothing to worry about. For some reason many of the internal SL animations have a starting pose that is rotated to look backwards. We have no clue why that is, but it is not of any harm.
Note: The retarget tools are not fully fail proof and your retarget results depend on the comparability of the Avastar rig with the imported rig. You always need to inspect your results carefully for bad movement and sometimes you need to do manual corrections. Please experiment to see what works best for you.
Mapping bones
When you import an animation file, then the used Bones can have arbitrary names. Also your animation Rig can have different bones than the target Rig. This issue can be solved by using a Bone Map.
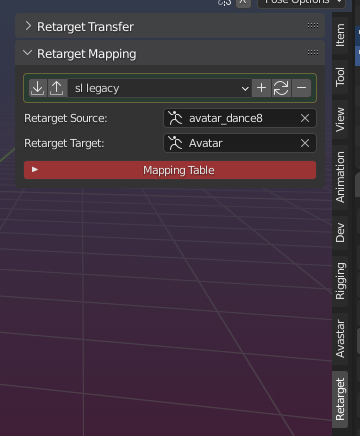
The Bone map is in the Retarget Mapping Panel and by default it is collapsed. You can expand the Map by clicking on the small white arrow left to the Mapping Table button.
Note: When the button is shown in red, then you have no mapping defined yet.
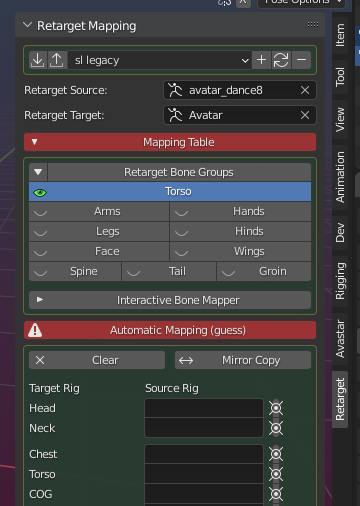
Once you open the Mapping table section, you will see 4 parts:
- A Panel for the most important Retarget Bone groups: This is a subset of the Rig Display Panel in the Avastar Main Tab and there is no substantial difference when you do your settings here or in the Avastar Rig Display Panel. It is just added for ease of use.
- The Interactive Bone Mapper (by default collapsed): Here you can map bones directly in the 3D Viewport. For Details, see further down
- The Automatic Mapping tool (Guess): Avastar has some built in knowledge about a few Rigs. If it recognizes a rig type, then it fills corresponding bone names into the bone map (see below). When the button is red then no bone has been mapped yet.
- The Mapping table: Contains pairs of bones that are connected.
- Target Rig (left side of the list) refers to Avastar Bones
- Source Rig (Right side of the List) refers to bones in the imported animation rig
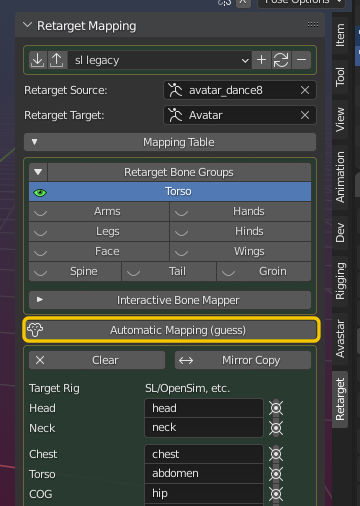
In general you can type Bone names of the Source rig directly as text. This is a tedious task and you may need to do this only for fixing mapping errors. The automatic mapping tool an be of some help when your imported rig is an SL rig or a Carnegie Mellon Rig. Other rig types are currently not recognized.
In our case Avastar can figure out that indeed we have an SL Rig in place. As soon as we hit the Automatic Mapping button, all formerly Red buttons in the Retarget Tab now turn into their default color.
Now you can inspect the Mapping table and see which source bones are mapped to which Avastar bones. Now it is also time to verify that your mapping is correct and fix bones when the mapping is wrong.
Tip: For the Extended Rig the map has 151 entries. You can control which of the entries are displayed by enabling/disabling the Retarget Bone Groups (see above)
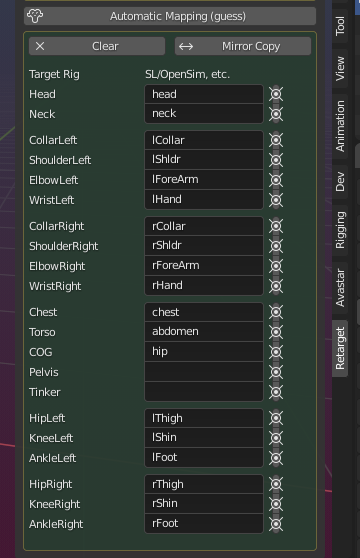
In our case the guessing tool has identified the Animation Rig to be an SL/OpenSim compatible rig, thus all available Bones are automatically assigned and we do not need to bother with that.
Note: Some mappings are not filled, for example Tinker, FootLeft and FootRight (see image) are not assigned to any bone in the imported animation. We do not need to bother with that for now.
The Bone Picker
ok, you are not happy with what the guessing tool has fabricated for you? Maybe it did not recognize the Rig, or it made mistakes in the mapping, or it did not find any mapping at all… For this case we have added the bone picker that allows you to quickly fix or build the bone map manually:
The Bone picker lets you select one Source bones from the Animation Source rig and manually map it to a bone on the Target rig:
- Open the Animation source Rig in pose mode
- Select a bone in the Source Rig
- Click on the corresponding assign icon in the map (see image)

Now the source bone is assigned to the corresponding target bone (In the example rThigh of the Animation Source is assigned to HipRight in the Avastar target)
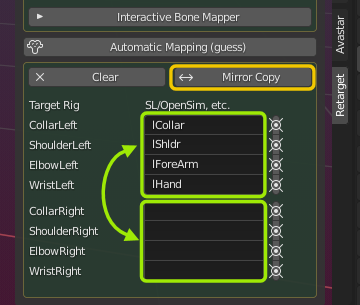
The Range Mirror Copy
The Range Mirror Copy lets you copy the limbs. Thus you only need to assign one half of the bones, then use this tool to automatic fill the symmetric bones on the other side.
- Assign one side of your animation source Rig to the corresponding bones in the Avastar rig
- Click on Mirror Copy to transfer the assignments to the other side of the Rigs.
The Clear Tool
The Clear Tool removes all associations in the Bone Map.
You will use this function only when you want to reset your mapping completely and restart from the begin.
Note: As soon as you have called the Clear tool, the Guess Button (see further up) becomes red again, indicating that no mapping is set.
C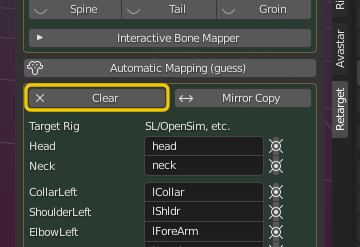
Pose tools
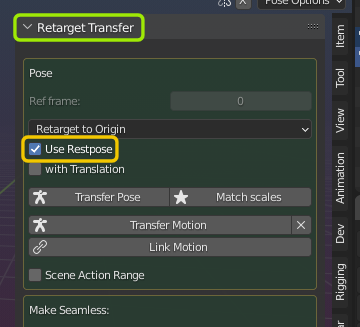
After you have setup the mapping as described above, we also need one time frame in which the Source animation and the target animation have the same pose (or at least a closely matching pose). This Reference Frame will then be used as guideline for the transformation tool.
Important: If both Rigs use the same or at least very similar restposes then you can simply enable the Use Restpose option. Then the Ref Frame option is greyed out and you do not need to create a reference frame.
Notes on the Reference Frame
The Reference Frame is not required to be part of the transferred set of frames in the timeline. for example in most cases frame 0 in the timeline is not used by the imported Animation. So it could be used to create a matching pose.
Important: It is not required that the matching poses are Rest poses! The only requirement is that both poses match as tightly as possible to make sure the animation transfer is creating reasonable results. It is up to the user to decide how far you want to go. If you want precise match,m then you need to do precise adjustments in pose mode (which needs some time)
Transfer Pose
If one of the two following conditions is matched:
- Either the Animation and the Avastar use the same Restpose
The Use Restpose option is enabled. - Or the Ref frame contains the same Pose for the
Animation Source Rig and the Avastar Target rig.

Only then it is possible to reliably transfer single poses from the animation into the Avastar: In that case the Transfer Pose tool transfers the pose of the current selected frame on the timeline from the Source rig to the currently selected Bones of Avastar Rig. You can select whichever frame you want to copy.
Timeline frame 18 before pose has been transferred
Timeline frame 18 after pose has been transferred
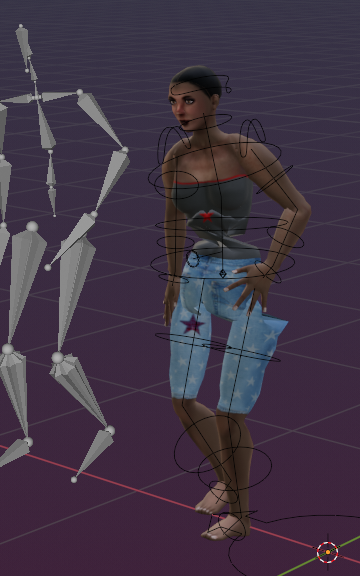
When the rig distorts…
It can happen that your target model distorts around the hips. In most cases this is caused by a wrong bone mapping. Normally you would map the Pelvis bone of the source to the COG Bone of the target, because they both serve about the same purpose.
However, this does not work always (an explanation still needs to be found). But there seems to be a workaround…
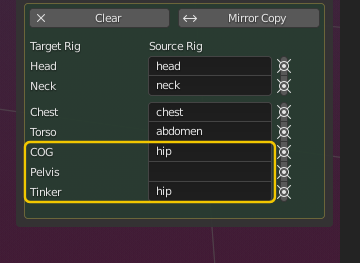
When you look into the Bone Map, then you find 3 closely related bones in the target rig: COG, Pelvis and Tinker
Those bones are used for different purposes in the target rig, but they may need to use the same source bone for animation. So if you find the rig distorts like in the image above, then first try to add a second mapping from the source’s hip bone to the Target’s Tinker bone. This actually seems to be the only alternative to just mapping the COG bone. And as indicated above, there is currently no really good explanation for this. (suggestions are welcome)
Make Seamless animations (experimental)
This tool is used when you want to create a periodic Animation cycle. Lets assume your imported animation was not exactly created for looping. then this tool can be used to interpolate rotation changes and location changes such that the first frame and the last frame of the animation loop smoothly.
The numbers define the timeline frame range over which the easing shall take place for Rot frames (rotation)and for Loc frames (translation)

Simplify (experimental)
Simplify can be used to reduce the number of key frames used in the imported Animation. We provide 3 options here:
- No Simplification (default)
- Lowes Global
- Lowes Local
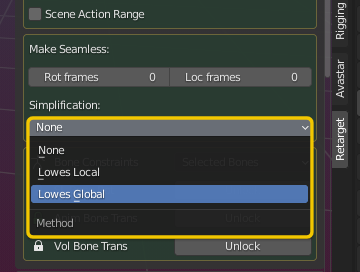
Note: The Simplify feature makes only sense when your animation contains hundreds of key frames. This mostly happens when you import motion captured animations. Handle this feature with care.These simplification methods are described nicely by Eyuphan Bulut in a scientific paper about Key frame extraction from Motion data
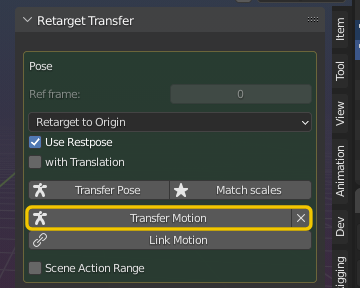
Transfer Motion
The Motion Transfer will transfer the motion stored in your imported animation timeline to the Avastar timeline. You can think of a Pose transfer (see above) that is calculated for every time frame. You have to ensure that all parameters as explained above are correctly set, otherwise your animation might become distorted.
Tip: Before you trnasfer a long animation, you can always test the transfer by moving to some important frames in the time line and then call the Transfer Pose operator (see above). If the pose transfer works nicely, then you can safely start the Motion transfer.
Note: The Motion Transfer Tool generates an Action that works with the Avastar Rig. This action can later be exported as an SL compatible animation either in BVH format or in ANIM format.
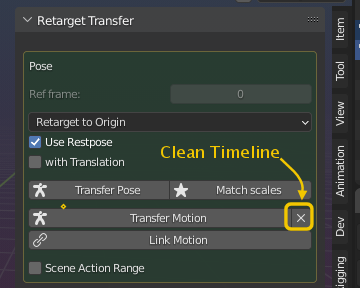
Clean Timeline
The little white cross is a nice helper tool too. Lets say you have found your animation is broken in the Avastar timeline, then you can wipe it out by clicking on this erase button.
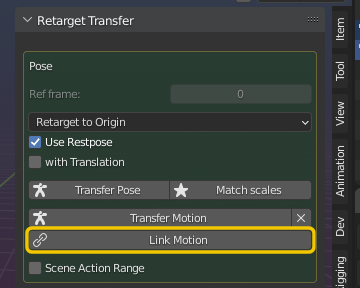
Link Motion
The Link Motion tool is an alternative method for transferring Animations from a Source rig to a Target rig. This operation uses bone constraints instead of transferring the animation frame by frame. The constraints are setup such that the Target rig (Avastar in our case) moves in synchronization with the source rig action.
The nice thing about this feature is that it operates in almost no time. That means: The animation of the Avastar rig will start as soon as the tool is called independent of the length of the source animation!
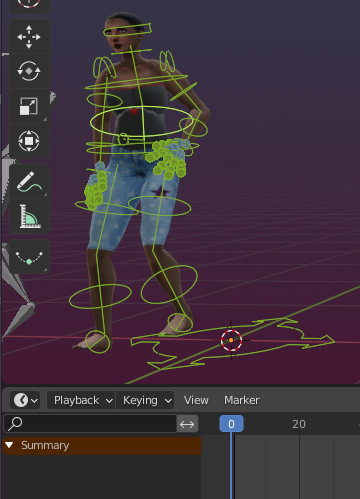
Note: You will notice that the Avastar Action is plain empty, even when you select all pose bones of the Avastar rig (see image). This is so because the Avastar is only controlled by the movement of the action in the source rig!
However, you actually can add your own extra poses and animation into the Avastar Action. the tool then combines your poses smoothly with the linked action of the source rig.
You can use this feature for adding extra movement that is not contained in the original animation. Or much more important, you can interactively tweak your animation to achieve better results on the Avastar rig.
Tip: When you find that your target rig deforms or even distorts as soon as you enable the Motion Linker tool, then you first should check if your bone mapping can be optimized (see further up in the chapter about Motion transfer)
You also may want to compare both rig rest poses for compatibility…
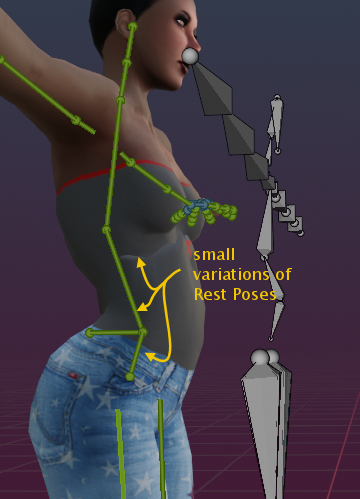
Especially not exact matching rest poses can lead to mesh deformations as you can see on the upper body in the example image.
The good news is: You can fix that rather easily:
- Open the target rig in Pose mode
- Select any frame on the timeline that is not used in the animation (frame 0)
- Then pose the bones on the target rig such that the distortions are eliminated
- finally add a keyframe for all modified bones of the target rig.
These corrective keyframes are then used over the entire animation and effectively fix your distortions…

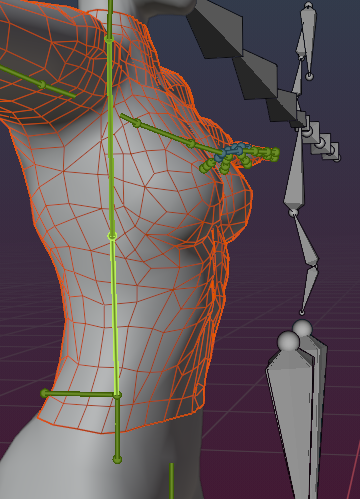
In this specific case the fix was to adjust the pose bones back into rest pose while the motion link is active (see image).
Tip: You actually can fix every pose bone in the target rig by adding such corrective reposing. You even can change the reposing over the animation should a correction work nicely for one part of the animation but not on another part. This way you have many options to fine adjust your animation transfer.
Hint: Do not forget to key frame your adjustments, otherwise they will get lost as soon as you change the time frame
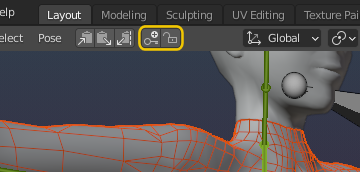
Tip: The smart Auto Key tool is a huge time saver for key framing all modified bones in a time frame, even when they are currently not selected.
And how to export the linked Animation ?
Just open the Animation exporter, Select the target rig (Avastar) and export the animation as usual. Avastar will automatically bake the entire animation into the exported file.
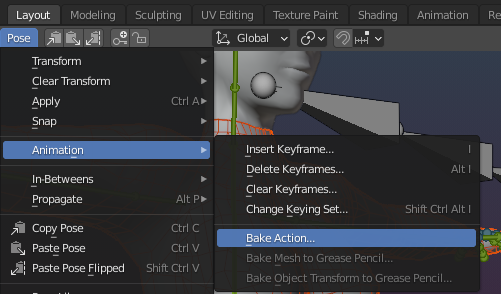
Can i also bake a linked animation into a new Action?
Select the Target rig (Avastar), then see image