However, sometimes you actually do not want Blender to do that. You might want to restrict the set of bones used for calculating bone weights to a subset of the rig, for example in most cases you do not want to get automatic weights from Volume Bones, although this might sound like a good idea (but it does not work very well!)
For human bodies your best bet is to begin with enabling the deform bone groups: SL Base, Hands and Face, but not the eyes (see tips & tricks below).
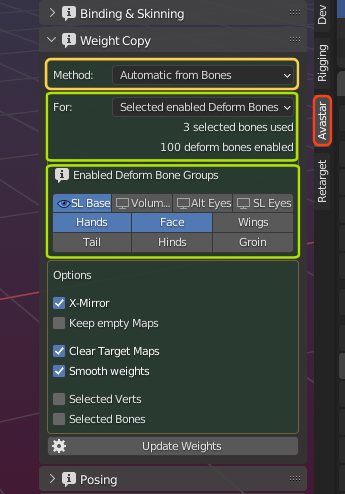
The Panel Sections:
- The Method Selector: is set to Automatic from Bones for this document
- The For Section specifies the bones for which you allow weights to be created. However, possibly not all deform bones selected in the For Section actually contribute to the weight maps!
- The Enabled Deform Bone Groups Section defines which bones actually contribute to the creation of weights. Normally you select all deform bone groups which are relevant for your skeleton, even if only a small fraction of those bones is selected in the For section!
Remind: The generated weights strongly depend on which bones are selected in the Enabled Deform Bone Groups Section. For human models you want to only enable SL Base, Hands and Face.
For (bones)
This property filters all bones depending on their selectivity and visibility. However, there is a caveat here:
Here we tell Blender for which bones we want to get Weights. However, we also must tell Blender the entire Set of bones that contributes to the generation of the weights, even if the For option only specifies a fraction of this set.
So please take care that whatever select option you choose here, you also must make sure that the Enabled Deform Bone set covers the region for which you want to get weights (see enabled deform bone groups further down)
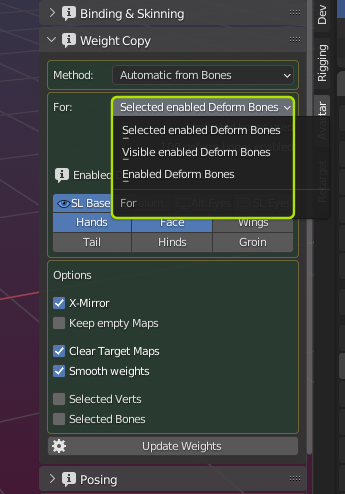
The For Bones selection defines which weight maps may be created by the generator. we have following select options:
Selected Enabled Deform Bones
Use this to create Weight maps for the selected deform bones. Prepare the rig additionally as follows:
-
- Select the Mesh
- SHIFT select the Armature in Pose mode
- Select all deform bones you want to take into account for the weight copy tool.
Visible Enabled Deform Bones
Use this to create weight maps only for the currently visible bones. Prepare the rig additionally as follows:
-
- Select the Mesh
- SHIFT Select the Armature in Pose mode
- Make all bones visible which you want to take into account for the weight copy tool.
Tip: Making Bones visible or invisible:
- You can hide/show bone groups using the Rig Display panel.
- Or you can open the Armature in pose mode and hide individual bones: Use “h” to hide selected bones and “ALT h” to make hidden bones visible again.
Enabled Deform Bones
Use this to create weight maps for all bones enabled below. Prepare the rig additionally as follows:
-
- Select the Mesh
- Avastar take all Deform Bones into account for the Weight Copy tool.
Enabled Deform Bone Groups
The content of the created weight maps is highly dependent on which deform bones contribute to the weights of a mesh. In general we actually do not want Avastar/Blender to take all deform bones into account. For example in most cases you do not want to generate weights for Volume bones as this simply does not work as you might expect.
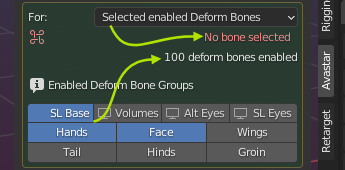
By default only the SL Base bones (the legacy skeleton) is enabled. For Extended (Bento-) Rigs also the Hands and Face bones are enabled by default. But you can change this configuration in the Enabled Deform Bone Groups Section (see image)
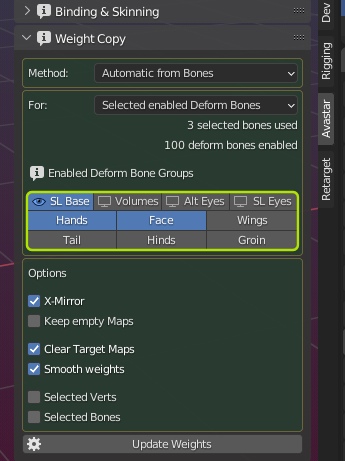
Note: The setting here only controls the behavior of the Weight generator! otherwise this setting is completely independent from what you have configured elsewhere in Blender (either in the Rig Config panel, or in the Bone properties window) .
Reminder: If you use the Automatic from Bones Weight method, then please keep the Volume bones disabled. Otherwise the generated weight maps will become totally wrong for this case.
Targets and Sources
Below the method selector you find 2 text lines:
- n Selected/visible/deform bones used.
- m deform bones enabled
The content of the 2 lines is derived from
- the For: Selection (for which bones you want weight maps)
- the Enabled Deform Bone Groups you have selected
- The visible/selected bones in the Armature
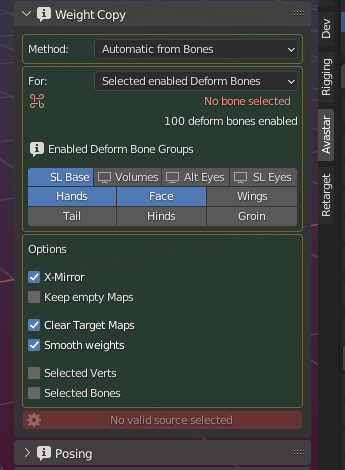
The first line:
In this example we have chosen the scope Selected enabled Deform Bones. However we have not selected any pose bone, hence No bone selected
Fix: Select at least one deform bone which is a member of one of the selected deform bone groups.
Hint: You must select deform bones. Animation bones are not taken into account here.
The second line:
Here you see the number of bones which are contained in the selected deform Groups (100 in the example).
Hint: When the scope is Enabled Deform Bones, then the number of target maps is identical to the number of Enabled Deform bones!
In this example we have selected the legacy bones (SL Base), Hands and Face, hence 100 bones contribute to the weight maps. But because no bone is yet selected on the rig, no weight maps will be generated.
Generator options
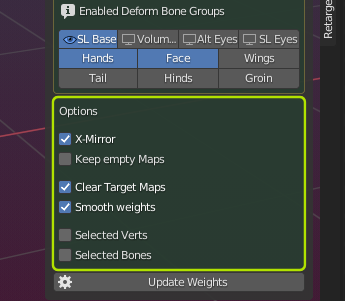
You have further options to specify what exactly the generator shall create for you. See below for a more detailed description
X-Mirror
Makes sure that when you have selected bones only from one side of the rig, the bones on the opposite side are also included even when not selected.
Note: Known glitch in Avastar-2.5: The number of target maps found currently does not count deselected mirrored bones, however the generator still creates the mirrored maps as expected.
Keep empty Maps
The generator always creates all Target maps, even if they turn out to be empty. Normally you do not want to keep empty weight maps. However this option allows you to change that at will
Clear Target maps
When enabled then the weight maps are cleared from all weights before the weight generator adds new weights to them. This is ideal when you want to renew entire weight maps.
However sometimes you want to recreate the weights only for a subset of selected vertices (see next option). In that case you may want to keep the weights of the deselected vertices unchanged. In that case you will disable this option.
Smooth Weights
After generating the weights perform an additional smoothing step in order to make the mesh behave a bit smoother when animated. You need to experiment with that a bit. You may like it or not.
Selected Verts
Generate weights only for the selected vertices. This allows you to fine control for which exact parts of your meshes weights are generated or regenerated. Please take into account the previous option above.
Selected Bones
Generate only for the selected Bones. This allows you to fine control for which exact parts of your Rig you want to generate or regenerate the weight maps. Please take care here when you also enabled the previous option Selected Verts, because you can easily end up with no weights at all generated when the selected bones are not close to the selected verts
Tips & Tricks
Face and eyes
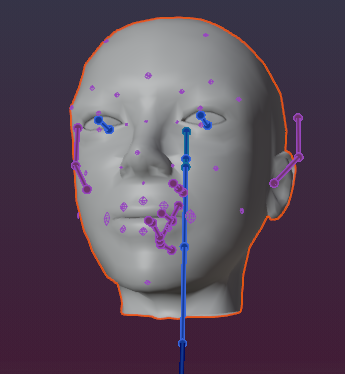
When you create weights for the face, then you need to take special care of the eyes. Actually you want to disable the Eyes Deform groups in most cases! The reason is: The heat from bones algorithm is based on the relative distance between bones and meshes. So, bones closer to a vertex create higher weight values.
As a consequence the eye bones are will falsely add weights to the face mesh. Normally this is not what you want. Actually the eye bones should only create weights for the eye meshes and nothing else. So you will deselect the eyes and only enable SL Base and Face bone groups.
Note: In the example below we have added the SL Base to make sure the mHead and mNeck bones are taken into account as well. This is normally what you want, but it is not necessarily correct for every case. You need to find out what is right for your project.
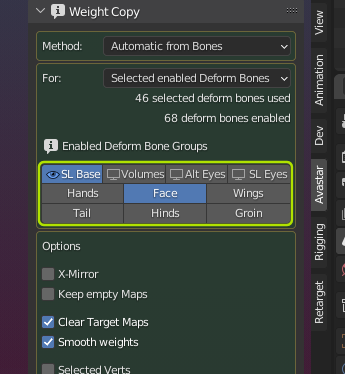
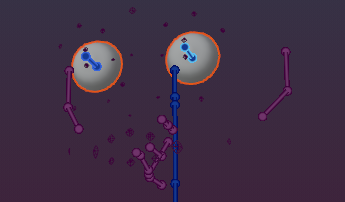
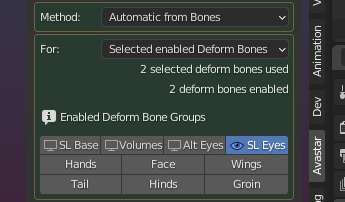
On the contrary: If you want to generate weights for the eyes alone, then you will enable the eyes and the eyes deform group:
Hint: we have Eyes and Face Alt Eyes. Make sure you select the correct pair of eyes here depending on your project.
Failed to find solution…
The automatic weight from bones algorithm normally creates reasonable initial results. However, sometimes the heat algorithm does not calculate weights for a subset of the mesh vertices. And sometimes it even rejects to create weights for the entire mesh.
There was a topic about this on Blender stackexchange: See fails to find solution for one or more bones…
Here are some tips how you might get rid of the issue:
- Fix duplicate vertices
- Fix mesh polygon intersections.
- If the mesh object has 2 or more unconnected submeshes, then try to split the submeshes into separate objects, then weight again and finally join the submeshes back into one single object
- Check if the Mesh uses modifiers (e.g. subdivision). Disable the modifiers before binding, then add them back after binding.
- Check if the bone deform flag is set for all bones where you expect to get weights.
- Be sure you are not selecting the green animation bones or the yellow IK bones . Remind: the green bones are only used for Animation. They should never have weight maps.

