
Glossary: Skinning
Skinning is the process of creating a connection between a Mesh (the Skin) and a Rig (the Armature). More specifically in the Skinning process we connect each bone of the Rig’s Skeleton to each vertex of a mesh, giving a connection strength named bone weight. the weight is a percentage of influence where 0% means the vertex fully ignores the bone’s movement, while 100% means the vertex follows the bone’s movement as if it where glued to the bone.
The weights of all vertices of a mesh are organized in weight maps with one weight map for each deform bone in the rig. Note that weight maps belong to the Mesh and not to the Armature. this way each mesh object can have its own weight maps. In Blender weight maps technically are Vertex groups.
In practice, for a polygonal mesh character, each vertex is related only to one or very few bones of the Rig. This means on the contrary that each weight map contains only vertices having weight for the related bone.
The process of Skinning includes:
- Binding the Character to the rig in a specific Pose (basically establishing an association between the Rig and the Mesh)
- Weighting the Mesh to the Armature bones (create the Vertex Weights)
Note: When binding a Mesh, then typically some form of automatic Skinning is applied as well to populate the mesh weight maps with initial data. Those initial weight maps might need manual optimisation.
Special cases
- If a vertex is not weighted to any bone: The vertex is not controlled by the animation rig
- If a vertex is weighed to one bone: any weight > 0 will be treated like 100%
- If a vertex is weighted to a bone with weight 0%: identical to vertex is not at all weighted to the bone
- If a vertex is weighted to 2 or more bones: the sum of all weights of the vertex is always 100%
Must know
weights are typically not stored as percentage but as fractions (0…1) with 0 meaning 0% and 1 meaning 100%. While it is possible to make the weight sum for a vertex differ from 1 (100%), Blender actually handles this by automatically normalizing the weights such that the 100% rule (see above) always applies regardless of the weight sum.
After you have modeled your mesh (Character or Attachment) the next step towards animating your work is
Skinning the Mesh
This is basically done in 2 Steps:
- Binding: Attach the mesh to a rig
- Weighting: Define the mesh weight maps
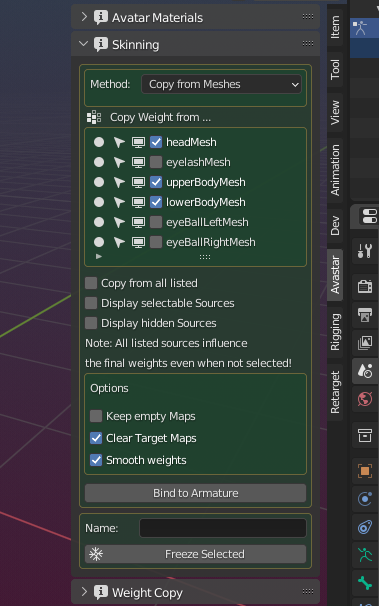
Avastar’s Skinning Panel provides a convenient starting point for this task by combining the initial Binding Step with a weighting step that automatically creates initial weights for the mesh. However, automatically created weight maps are always meant to be used as a starting point. In general you always have to optimize your weight maps once the mesh is rigged to the Armature!
As you can see from the image, the skinning panel has a rather complex user interface. This is because there are various ways to get your initial weight maps populated. Below you find all elements of the skinning panel explained in great detail.
Note: Avastar also provides a weight copy panel that appears after the mesh is bound to an armature. There you can redo your initial weighting with a few more options than we provide in the Skinning panel.
Before you Bind (Basic Preparations)
Cleaning up the Mesh
Make sure that the mesh does not have any implicit scale or rotation from one of its parent objects. This issue typically happens when your mesh is still parented to another object (Mesh, Rig, Empty,…) which has a scale and or rotation defined. Or when you have added scale and rotation to your Mesh Object(s) in Object mode.
If Avastar detects one of the above issues, it displays a warning message above the Bind to Armature button (in the Binding Panel).
When Avastar detects your mesh has negative scale values in Object mode then it also disables the binding button (button turns red).

Howto Fix:
Click the fix button in the Skinning Tools (see image) or do it manually as follows:
- Select the Mesh
- Object -> Parent -> Clear and Keep Transformation
- Object -> Apply -> Rotation and Scale
This cleanup avoids unexpected behavior and it ensures that your object can be bound to another rig without distortions.
Adjust the mesh to the Rig
- Make sure the Avastar Rig is in Restpose.
- Align your new mesh attachment as good as possible to the Avastar character.
Once you are happy with the alignment, proceed by selecting both the armature and the new mesh attachment as follows:
- Go to Object mode
- Select the attachment with RMB. If you want to bind multiple new attachment at once, select all of them now (the order does not matter).
- SHIFT RMB select the Avastar Armature.
Now you have selected the Rig and all mesh attachments which shall be bound to the Armature.

Reason: Avastar adds some extra information when it binds a mesh to an Avastar armature to support the appearance sliders .
Next, Bind your Meshes to the Rig…