The SL Rig provides 2 sets of eye bones: system eyes (mEyeLeft, mEyeRight) and Bento eyes (mFaceEyeAltLeft, mFaceEyeAltRight). Both eye-sets actually behave in a similar way, except that the system eyes are children of mHead while the Bento eyes are children of the mFaceRoot.
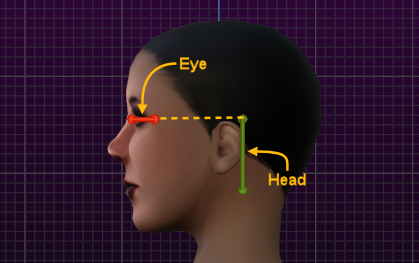
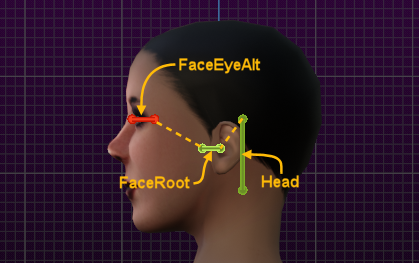
We do not know why the 2 bone sets have different bone hierarchies and why we exactly need two eye sets. However lets take this as granted. Also you need to keep this in mind because the different bone hierarchy has an impact on how the eye sets are animated
The most common pitfalls with Eye rigging
We found the most common issues with eye rigging can be summed up into 3 cases:
- Rigging to the wrong eye set
- Trying automatic weight from bones which does not work for the eyes
- Having weights for eye bones on vertices not belonging to the eyes
In the following chapters we will explain how to correctly setup weights for eyes and how to fix issues once you have fallen into a trap
Brief advice
As long as you only do classic weighting, rigging the eyes is easy:
- Take care that the eyes are separate mesh parts. You can either separate them as submeshes in your head object, or just make separate objects for each eye, it does not matter.
- Take care that the eyes are rigged to your Avastar. If the eye meshes are submeshes of the head, then they are already rigged together with the head. if they are separate objects, then take care to bind them to your mesh as usual.
- Take care that the entire eye mesh of the left eye is only weighted to the mEyeLeft bone.
- Likewise take care that the right eye is only weighted to the mEyeRight Bone.
- Make sure the heads of the eye bones are are located at the centers of the eye balls.
In the next chapter we show you how to make precise weight maps for the eyes by hand.
Weighting eyes manually
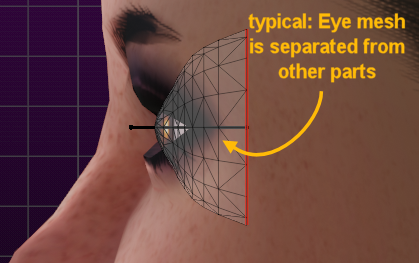
In almost every model the eyes are separated from the other parts of the body. This is because the eye movement (rolling eyes, looking right/left, etc) should only affect the eye balls and not the surrounding meshes.
To achieve this we typically use only the eye bones to animate the eye balls. And this can be setup by hand within seconds. Indeed this method does not even require the eyes to be already rigged.
So, here is the super simple eye rigging recipe:
- Select the eye balls (meshes) and go to edit mode
- Select all vertices of the right eye
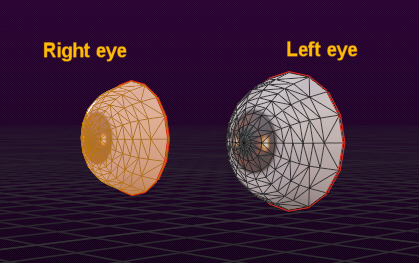
The right Eye
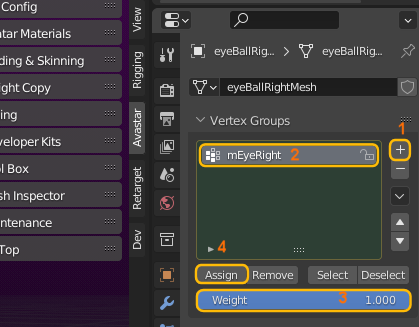
- Open the Vertex Group widget in the Mesh Data properties
- (1,2) Manually add a new Vertex group and name it mEyeRight
- (3) Set the weight value to 1.0 (the default value)
- verify that all vertices of the right eye are selected
- (4)click the Assign button in the Vertex group Widget
The left Eye
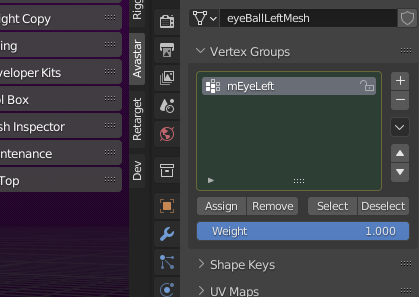
- Open the Vertex Group widget in the Mesh Data properties
- (1,2) Manually add a new Vertex group and name it mEyeLeft
- (3) Set the weight value to 1.0 (the default value)
- verify that all vertices of the left eye are selected
- (4)click the Assign button in the Vertex group Widget
Checking the weight maps
- Open the Overlays panel
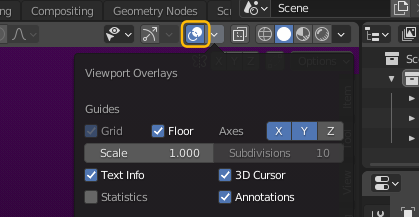
In the Mesh edit Mode section:
- Enable Edges
- Disable Faces
This gives more contrast in the view port
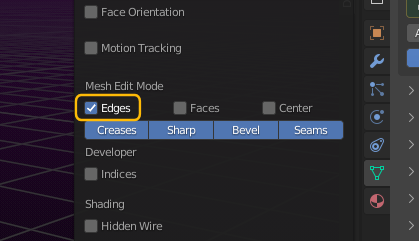
- Enable display Vertex Group Weights
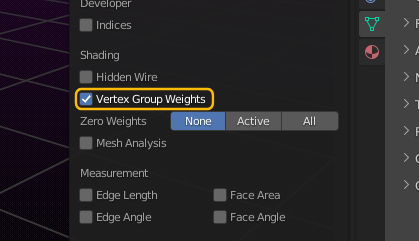
Now you can check if the vertices of your eyes are assigned to the correct vertex groups:
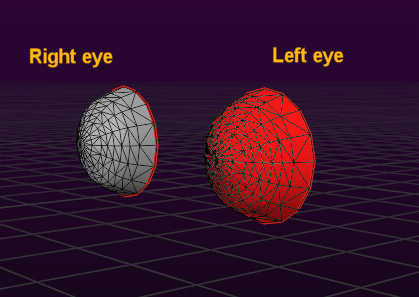
- Select the left eye
- in the vertex group widget make sure the mEyeLeft group is selected
- and in the 3D Viewport the eye is colored entirely red (see image)
- Make the same check for the right eye
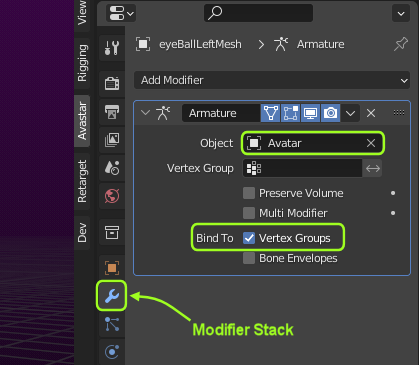
Important knowledge: A mesh is animated with skeletal animation when following conditions apply:
- The mesh contains one or more vertex groups which are named exactly like the corresponding bones in the rig.
- The mesh must have an Armature Modifier in its modifier stack that connects the Mesh to a specific armature.
Usually the process of binding a mesh to an Armature does most of the work automatically for you. Normally you should only need to tweak your weight maps slightly to optimize the skeletal animation.
Some (interesting) details for the System character
You can understand the following chapter best when you have knowledge about the principles of skeletal animation. We have created a document that hopefully helps to understand the basics:
Now lets take a more detailed look at what is going on with the Eyes in the Secondlife Avatar. So please do this in Blender (Avastar):
- Create a new Avastar using Add -> Avastar ..
- Select the left Eye
- In Avastar -> Settings select the preset named “Skin&Weight”
Now the Armature is in pose mode and the mesh is in weight paint mode.
When you select the left eye bone mEyeLeft, then you see the left eye turns red which indicates that the entire eye mesh is weighted to the mEyeLeft bone.

In the Object data properties of the Eye you see there is only one single vertex group (weight map) available, so the left eye has been fully weighted to the left eye bone.
Having each vertex of an eye weighted to exactly one bone and having all vertices of the mesh weighted to the same bone (mEyeLeft) is exactly the same as if the left eye is clamped to the left eye bone.
And just like the left eye has only one weight group named mEyeLeft the right eye also has just one weight group named mEyeRight. And this is all you need to know.. almost
Getting the eyes right during binding
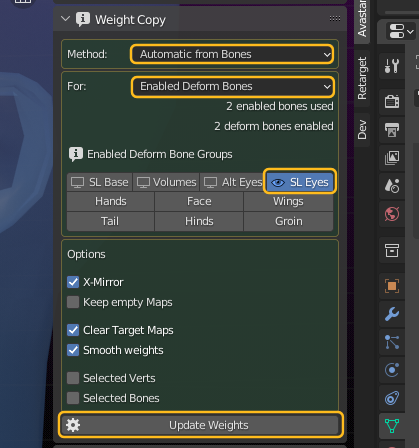
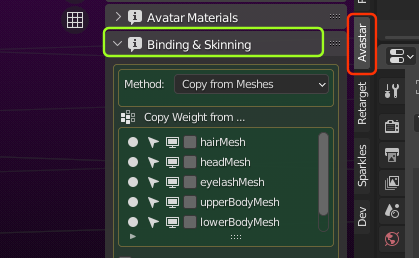
While it is easy and fully supported to add and fill the weight maps manually it might be much more favorable if the eyes could be weighted more automatically directly during binding. So lets see how we can achieve that. We assume the eyes have no weight maps yet and are not yet rigged.
Note: Currently (Avastar 3.00) the binding of eyes is a two-step process. This might be simplified in a future version of Avastar.
- Select your eye meshes in Object mode
- SHIFT Select the Armature
- Open the Binding & Skinning Panel
You now probably see the panel with a weight copy method Copy from Meshes. However, this is not what we want here…
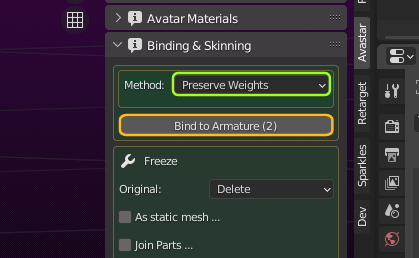
- Change the Method to Preserve Weights
- Then Bind to Armature
Now the eyes are bound to the armature but they still have no weight maps! This is what we take care about in the next step
- open the Weight Copy Panel
- Select the Method Automatic from Bones
- For: Enabled Deform Bones
- In the Enabled Deform Bone Groups section select the SL Eyes
- Finally Update weights
Now you can check that the eyes have got their weight maps as expected.