In the following we try to improve the skirt’s animation. And while fixing the various parts of the mesh, we will introduce a couple of helpful tools for the task.
Fixing the Waist
When we scrub along the timeline, then we see immediately that the skirt waist should not move along with legs. Instead we want to glue the skirt to the Avatar’s waist. And Avastar provides a tool for this:

The weight copy tool
- Ensure you are in Edit mode.
- Select the 2 top edge loops of the skirt (make sure that you only select the top edge loops)
Hint:
- use ALT LMB on the top edge to select the entire edge
- use SHIFT ALT LMB to add the second edge line
- select the Armature in POSE mode
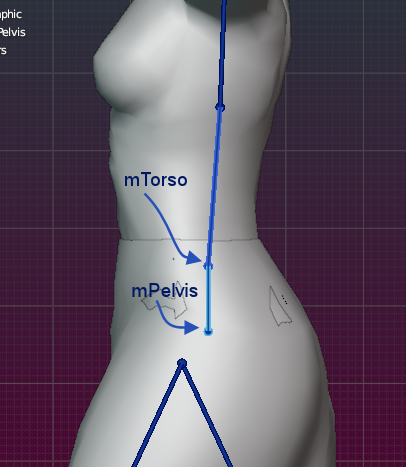
- Select the mPelvis and the mTorso
Explain: We want to tie the upper part of the skirt to the upper body. it looks like mTorso and mPelvis are the bones which are best suited to animate this part of the skirt.
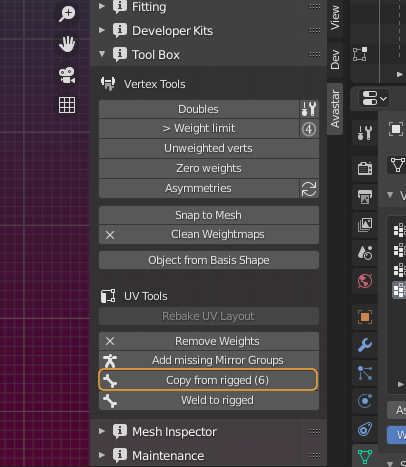
- Open the Avastar Toolbox
- Scroll down to the bottom of the Toolbox
- There you find the button Copy from Rigged
Explain:
This tool collects the weights from all attached meshes except from the current active mesh. It also checks which bones are currently selected in the armature. this determines which weightmaps will be created.
Hint: We have a weight copy tool which is much more capable, but it is also not so easy to use. For now this shortcut tool will serve well for our purpose.
Notes: When you work in weight paint mode and you are in Selection mask mode, or when you work in edit mode and have a subset of vertices selected. then only the selected verts receive new weight values.
In all other case the tool copies the source weights to all vertices of the target mesh.
Technical Details of the Weight Copy Tool
In the yellow box on the image above you can see that Avastar copies the weights from 6 other meshes. These other meshes are the “sources” of the weight copy.
Please be aware that the tool only takes meshes into account when they have been rigged to the same Armature as the skirt! Any other objects are ignored.
For the engineers: The weight copy function projects the weights from the source meshes to the target vertices.
The Copy weights Operator Panel
As soon as you have clicked on the button, another box opens at the bottom of the Tool shelf. This is the operator panel for the just called Copy weights function, and you want to enable 3 options:
- Interpolate: for calculating a better approximation of the transferred weights.
- Only selected Vertices: If not selected then the tool copies weights to the entire mesh.
- Clean Targets: Remove the weights for the selected verts before doing the Weight Copy(1).
Now the 2 top edge loops of the skirt should move almost in the same way as the Avatar meshes do. In our case that is: the selected verts no longer move with the legs. You can verify this by scrubbing along the timeline.

(1):If you select this option, then the tool cleans up the weight groups from any previously assigned weights. As a result your weight copy operates on a clean target. If you deselect the option, then weights are still copied, but all untouched verts keep their previous weights. You can use this when you do partial weight copies for different areas of your mesh.
When all is set and done…
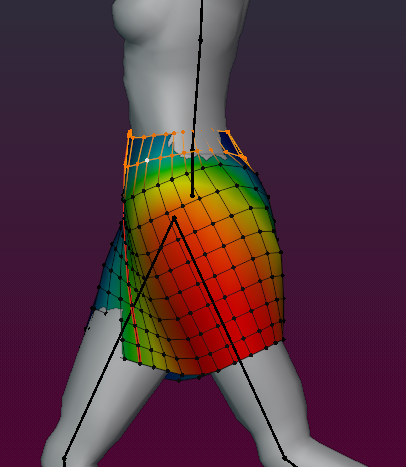
The Weight Copy tool apparently has glued the skirt’s top edge loops to the avatar body as we wanted:
However we realize quickly that fixing the 2 top edge loops gives us an ugly stepping in the 3rd edge loop. This becomes even more clear when we change the pose (for example by scrubbing our animation). But there is an easy fix for this, the Blend tool.
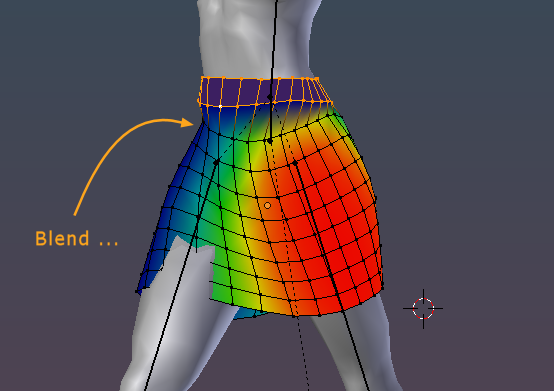
After fixing the top edge loops, the next loop needs blending
Smoothing
The Smooth tool is part of blender’s native weight tools. You find it in the Tools Sidebar and there in the Weight Tools Panel.
The tool works on each selected vertex by searching all its adjacent deselected vertices, then it averages the weights of the boundary vertices and applies them. So, if used with care, then you can get a nice smoothing of the weights.
click for larger view
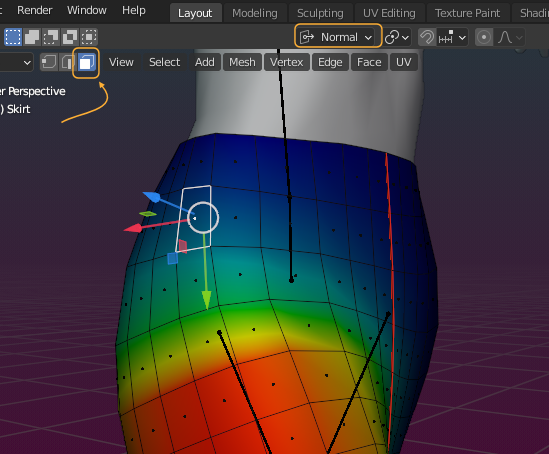
We use the Smooth tool as follows:
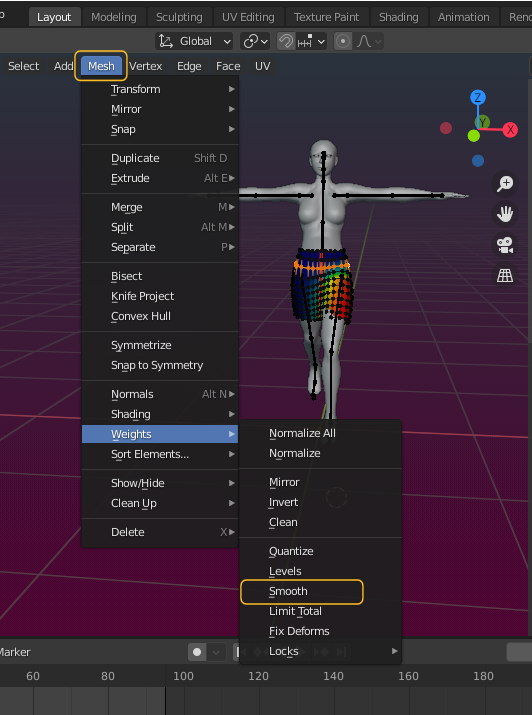
- Select the 3rd Edge loop which we now want to adjust.
- Call the Smooth tool from the Mesh Menu (see image above)
- Important: The Smooth Tool now smooths the weights on your mesh.
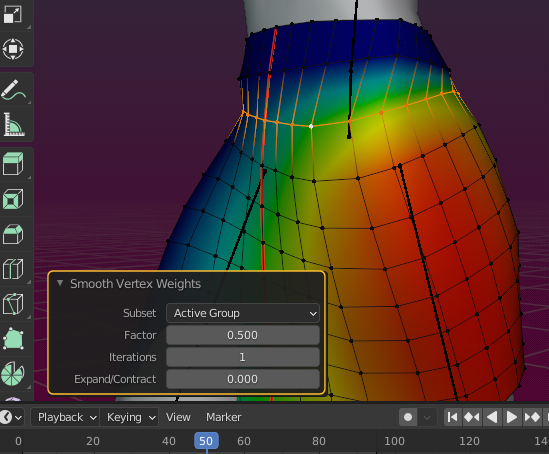
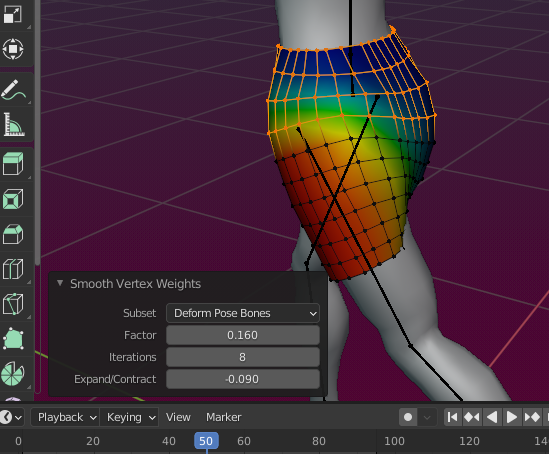
When the tool is done, then a new Box shows up on the left lower area of the 3D Viewport labelled Smooth Vertex weights. This is the Operator Redo Panel.
Note: When you call the weight tool the first time, the Redo Panel is probably collapsed. If that is the case just click on the text to open it.
Further reading: More about the Redo Panel can be found in the Blender Documentation:
In the Operator Redo Panel you can change the options used for the smoothing. And you can change those options. As soon as you changed an option, the operator resets and restarts its work but now it uses the changed set of options.
This is a cool way to experiment with “what would happen if” scenarios. Please feel free to change the settings for your specific purpose.
Below is a proposal for the starting values (in the image):
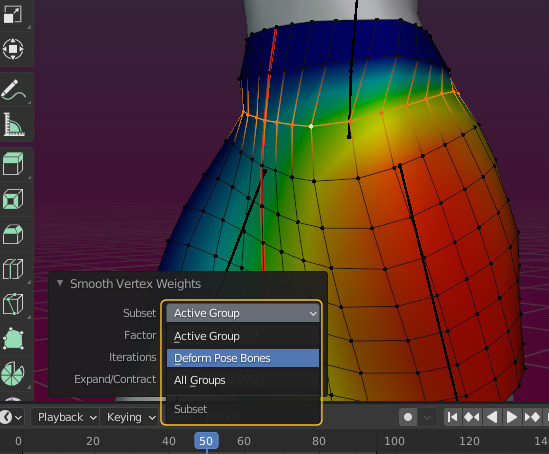
- Subset: Choose Deform Pose Bones to let the operator only modify bone weightmaps.
Note: If you only see Active and All then you are using Blender 9.1 or older. In that case please use All or update to the newest Blender development build. - Factor: The strength of the smoothing (higher value smooths faster)
- Iterations: How often the smooth is processed (higher numbers smooth more)
- expand/contract: to be figured out
On the image you see my results after playing a bit with the values.

You also can select multiple edge loops at the same time, then call the smooth tool again. It now has more vertices to change and can give you a smoother result. Here is another try with 4 edge loops selected all together. And finally, we managed to get the upper part of our mesh to work almost perfect.
But to be honest with you, we just have been lucky that the skirt already matches so well to the Avatar body in this case. So, lets take another Skirt that happens to be not so forgiving and see how we can get rid of its issues…
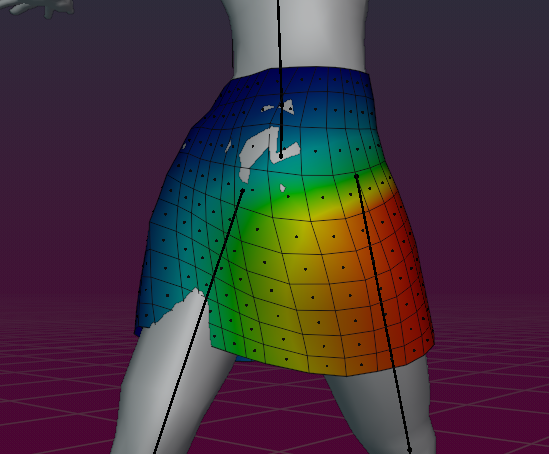
Cleaning minor issues
On the image you see some small spots with poke through – in the center of the yellow circle. Such issues can simply be fixed by adjusting the mesh itself.

I used Transformation Orientation Normal for moving the affected faces slightly outwards.
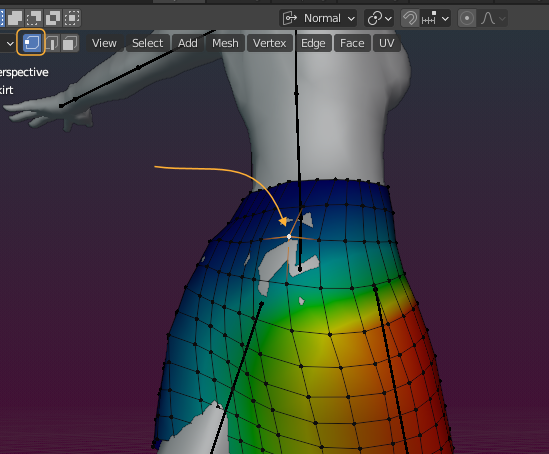
The Butt
On first sight the Butt looks ugly (when you move the timeline to frame 48 in our case). However, besides the Poke through the mesh behaves rather nicely. So we have 3 options here:
- We keep the weights as they are and use an Alpha mask to get rid of the poke through. This is the most efficient method (and thus the recommended method) to fix this.
- Go the long way and try to fix this by adjusting the weights. This is a challenge, although you can do it rather quickly.
- Just edit the skirt mesh until the poke through goes away.
Although this is somewhat tedious we will now use the Weights editor to fix this. But note: This is not something you should do often. We just do it here to show you how to work with the Weight editor.
The vertex weights editor
Sometimes you really want to fix the weights of just one single vertex by typing numbers. Although this is a tedious task, it is actually also very powerful because you can adjust your animation up to the smallest details:
- Select one of the vertices which you want to fix.
- Open the N-panel of the view port (by typing “n” on the keyboard).
- Open the Item tab
- Locate and open the Vertex Weights Panel
Now you can edit the weights in the Vertex weight editor by either typing the numbers, or dragging the values by using the LMB.
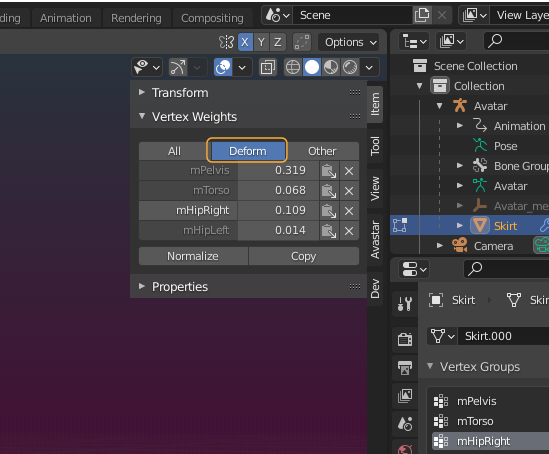
Important: When you have vertex groups unrelated to the armature bones, then you can restrict the panel to only show Bone weights (Deform Weights)
Note: at this moment the mHipRight weight group is displayed on the mesh. You can switch to another weight group by clicking on its name in the Vertex weights Editor.
About weight pollution
You see that the selected vertex has 4 weights. And 2 of these weights are very close to 0 (mTorso and mHipLeft). While this is in most cases not a big problem, this can occasionally cause some headache because it may become possible that far away bones influence mesh areas just a bit. But sometimes they add small and occasionally even very strong visible distortions.
Also with each additional Weight the mesh movement becomes much more complex and unpredictable. So it is in general a good idea to have as few weights as possible to avoid clutter of any form. And just in the case you do not yet know: SL supports no more than 4 weights on each vertex. It is not defined what SL does when you ignore this limitation. Although Avastar fixes this automatically for you during export of a rigged mesh, you should keep the control and keep this restriction in mind during your weighting.
Cleaning weights

Further reading: Blender has a manual and there you can find a lot more of information about its tools. For the available weight tools you might start at the Blender document:
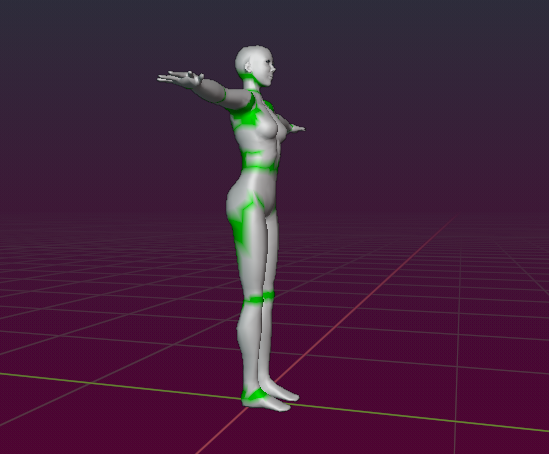
How many weights on a vertex?
The Classic case
In almost every case having more than 2 weights on a vertex is a good way to get into trouble. Of course sometimes you really need to use more weights, but actually you should avoid this as much as possible.
a good example …
Believe me or not, but LindenLabs have constructed the SL default Avatar rather nicely . You find only verts with one single weight (grey areas) or 2 weights (green areas) and we find no vertex with more than 2 weights.