
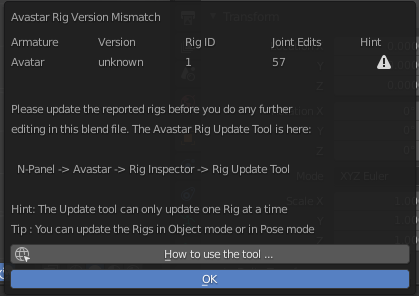
When you open a Blend file that contains an older version of an Avastar Armature, then Avastar checks if the older rig is compatible with the current Avastar version. If Avastar detects an incompatibility then it first tries to adjust the rig to match with the current Avastar version.
But for older Rigs this is often not possible, maybe even not wanted. when this happens, then Avastar greats you with a big Popup Window where it reports its finds and kindly asks you to do the manual Update.
For this purpose the Rig Inspector panel provides a Rig Update function (see further below what the Rig Update Tool does) where you can configure how the update shall be performed.
Lets step over the Update Tool Panel for this situation:
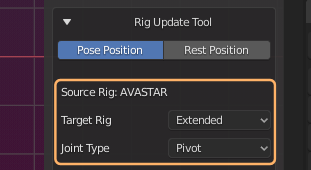
The Header Section
The header section begins with a convenient function to Switch your Rig from the Current Pose Position to Rest position. Note: The same selector is also in Blender’s Armature Rig data Properties section (right side of the Blender Screen)
Next you find some rig specific selections:
Source Rig: Is always AVASTAR
Target Rig: You can select either Basic Legacy Rig or Extended Bento Rig (with hands, face, wings, …)
Joint Type: ‘Pivot’ or ‘POS’ (Pivot is the most likely setting)
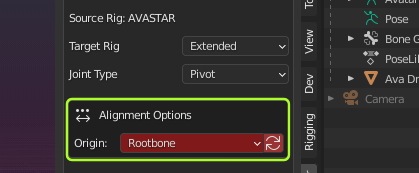
Sometimes you may see an additional section named Alignment Options
This section appears for example when the Origin of the Armature does not match with the origin of the Rootbone. Newer versions of Avastar do not at all like this. But you can let Avastar fix this for you. More details see further down.
The Rig Update Options
The Import Options allow you to define in more detail how exactly your old Rig shall be Updated. Finding the right options is tricky at times, depending on the nature of your Rig. The options are explained below:

Enforce SL Bone Roll: The Bone roll is the rotation of bones along their long axis. If the Bone Roll is wrong then you can end up with very odd issues. This option tries to reset the Bone Rolls of your armature Bones to the Roll as used with the Default SL Avatar. This option is only rarely necessary, but very handy when it is needed.
Apply Rot&Scale: Often your Meshes contain Scale and Rotation in Object space. While this is not entirely wrong, it often creates unwanted and unforeseeable issues. So it is normally best to apply Scale & Rotation during the update.
Rebuild Avastar Meshes: Often you do not want to see the Avastar Meshes. But sometimes it better to “recreate” the Avastar Meshes as reference. This option is rarely used.
Adjust Structure Bones: Avastar evolves and so does its rig. This option ensures that your updated Rig has all Bones used and recognized by the current Avastar version. This is also used to repair rigs of which Bones have been removed intentionally or by accident.
Check for Joint edits: When you update a rig then Avastar needs to make sure that the Rig was either not modified, or it must collect the exact modification information to setup the Rig.When this option appears, then Avastar can not find this information in the outdated Rig. In most cases you want to enable this option.
Keep Joint Edits: This option is related to the previous one, however Avastar actually has found Joint edits and allows you to keep those edits intact after updating. In most cases you want to enable this option.
Generate IK Offsets: IK Bones are normally placed automatically by Avastar. However when you have special custom Rigs where your IK Bones are placed at unusual places, this option attempts to treat the IK Bones just like all other bones and move the IK Bones along with the sliders . This option is not used normally as the automatic placement of IK Bones works nicely in most cases.
Generate Tail Offsets: Technically we only need the Bone Head information to support Sliders on edited Rigs. However sometimes you want to also edit the Bone tails for whatever reason. This option is there just for that. Normally you want to enable this option.
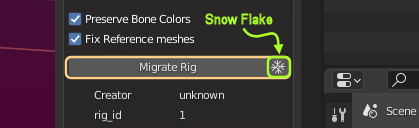
Preserve Bone Colors: Avastar uses a color scheme for Bone groups. However you might have edited the bone colors for your own purposes. When you enable this option then your custom colors are preserved.
Fix Reference meshes: This option is related to Appearance Sliders. The reference Meshes contain the meshes at the moment when they where bound to the Rig. But during a Rig Update it is possible that the reference Meshes no longer match with the updated rig and you might end up with highly distorted models. This option makes sure the reference meshes are rebuilt.
Alignment Options
In Avastar-2 the Rig must follow a couple of rules to preserve the entire Rig integrity. This has become necessary so that we can support Sliders also for edited rigs.
When a rig does not follow the rules, then the Update tool provides up to 3 more options to fix integrity. Those options only show up when needed!
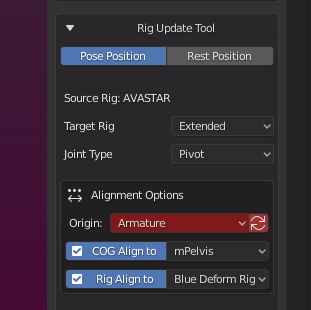
Origin: The origin of the Armature must match the location of the Armature’s Origin bone. The Origin Option allows to either move the Armature Origin to the Origin bone, or it moves the Origin Bone to the Armature. Click the double Arrow on the right side to apply the setting.
COG Align to: The COG must be aligned to the Pelvis. Also in some rigs Pelvis and mPelvis are not aligned. In this case you can specify which of the 2 pelvis bones is the master bone.
Rig Align to: Avastar 2 expects that the green Animation Rig is strictly aligned to the blue Deform Rig at all times. In earlier Avastar releases this was not necessarily needed. Although we always recommended to keep the 2 rigs aligned. This option allows the user to either align the Animation Bones to the Deform Bones or vice versa.
The Operator section
When the Rig Inspector tool is in update mode, then the Operator button is labeled Migrate Rig (see image below)
The Snowflake icon: When this option is enabled, then the original rig is applied to the meshes (the current pose is baked) before updating.
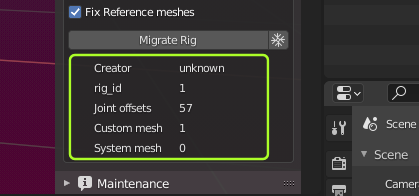
Below the Migrate Rig button you find an information section which tells you some details about your Rig and the bound meshes:
- Creator (avastar release that created the rig)
- Rig ID (the Rig Version number)
- Joint offsets (number of edited bones)
- Custom Mesh (number of custom meshes)
- System Mesh (number of Avastar meshes)
Questions and Answers
What happens during the update
When all settings are done, then you click the Migrate Rig button (see image above). Avastar will now step through following activities:
- The original Armature is applied to the Meshes (when snowflake icon enabled)
- The meshes are unbound
- A new Avastar armature is created (Basic or Extended)
- The Avastar bones are aligned to match the original rig (If check for joint edits is enabled)
- The meshes are bound to the new Avastar armature
- Depending on the other options the new Avastar meshes are kept, hidden or deleted
When the update fails
Sometimes the Update Tool creates odd or wrong results. This is either a bug in the tool or it is a wrong option setting. Here are some known cases:
- Meshes jump to different locations after update:
Enable the Snowflake Icon (see above) and try again - Armature reverts to Default rig:
Enable the option check for joint edits - Moving the sliders after update fails:
- Open the Skinning Tools Panel
- Select No Sliders
- Select SL Appearance