[PS-Youtube id=”oOC6LlaLNAY” w=”320″ h=”206″] After you have installed the Primstar-2 module you are ready to go with your first sculpted prim. I will step quickly through an easy task and reuse my famous top hat from a previous tutorial to show you the basics…

Intro

After you have installed the Primstar-2 module you are ready to go with your first sculpted prim. I will step quickly through an easy task and reuse my famous top hat from a previous tutorial to show you the basics.

Primstar-2 is still under development, so it may be possible that it changes its appearance and functionality over time. I try my best to keep the documentation up to date but i am not perfect. If you find something inconvenient, please feel free to report it to me.

The Video (Part I)

Below you find the First video of my Sculpted Prims beginners video series. You may want to watch the video first and then get back to this document and let you guide by the text.

About Keyboard Shortcuts

Wherever i want to describe a key combination like for example :

first press ‘s’, then press shift, then press z”

then i will use a shortcut: “s+shift+z” and of course the “+” signs are not meant to be typed. It is important to follow the order of appearance of the characters from left to right!

When i type a right arrow “->” followed by a literal name, that always means “left mouse click on a button with the given name on its label”.

Contact:

  • Register to the SL Chat group “blender primstar/jass”
  • Contact me in SL: “Gaia Clary”
  • Send me an email: gaia.clary@machinimatrix.org

Create a basic UV Shape

  1. Remove the default cube (del, or x on the keyboard)
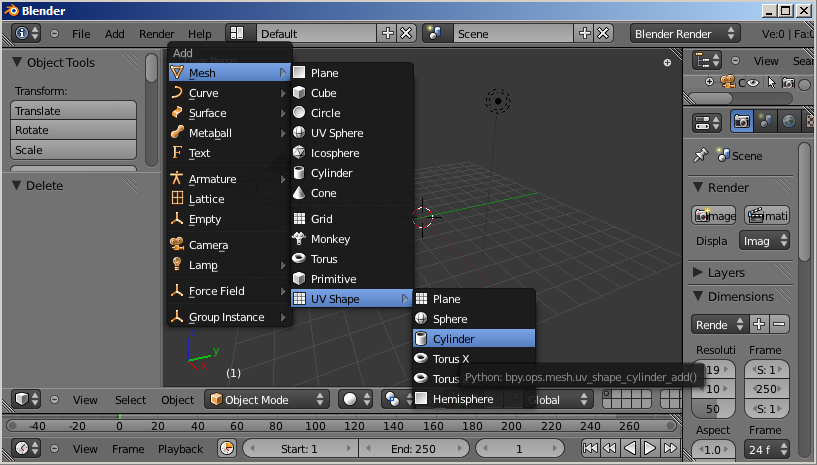
  2. Create a new object from the keyboard:shift+a -> Mesh -> UV Shape -> Cylinder
 

Take care to use only objects from the UV Shape section. These shapes are the only objects which are ready made to work as Sculpted Prims. All other shapes from Blender need significant manual changes to work as Sculpted Prims!

 
  1. Press Numpad 1 to get into front view (or View -> Front)
  2. Press Numpad 5 to toggle from perspective view to orthogonal view ( or View -> Persp/Ortho)
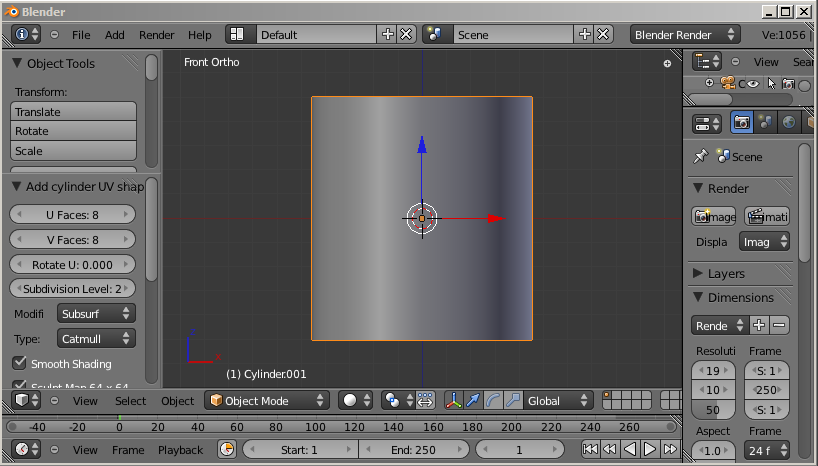
  3. Press Numpad , (or Numpad . on us keyboard) to focus the view on your object (or View -> Selected) You should now see this:
 
  1. Go to edit mode
  2. Now close the top side of the cylinder by first selecting the top face loop with alt+RMB (click on edge with alt key pressed and then right mouse button clicked) ,
  3. Then scale it down to zero with s+0 (‘0’  means zero here)
  4. And move it down into the plane of the secnd loop from the top ( use g+z )
  5. Now select the bottom edge loop and scale it up a bit (select with alt+RMB, then scale with s)
  1. Select the secnd loop from the bottom and crease it to create a sharp edge:
    • select it with alt+RMB
    • then shift+e
    • then move the mouse until the sharpness is to your likes.

    You can do the same on the top edge to also get a sharp definition of the hat.

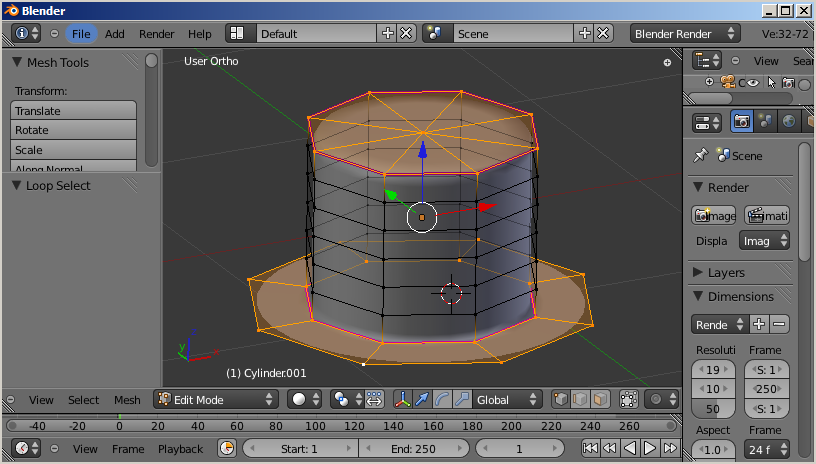
  2. Select the bottom row again and move it up into the plane of the secnd loop from the bottom. (select with alt+rmb, then use g+z to move it up) You end up with a basic hat. In the following image i have selected all edges which have been modified so far:


  1. Now we are ready to bake our object. But beforehand i will rearrange the screen so that i can see the UV-image editor and the 3D view at the same time. How this is done is exactly shown in the attached video tutorial (coming soon).
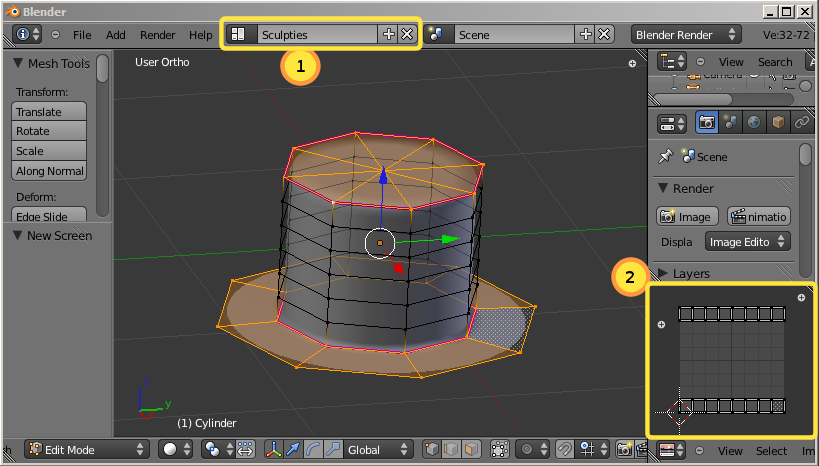
For your convenience i have added my customized startup.blend file into your download folder. You only need to download it, open it and then save it as your new defaults with: File -> Save User Settings. The rearranged screen looks like that:
  1. I have basically created a new screen layout named “sculpties” (1), removed the timeline window at the bottom of the screen and added a UV-image editor window at the lower right corner of the screen (2).
  1. Of course you can rearrange your defaults however you like. The screen layout here will be used for most of my upcoming tutorials (however it might change a bit over time).
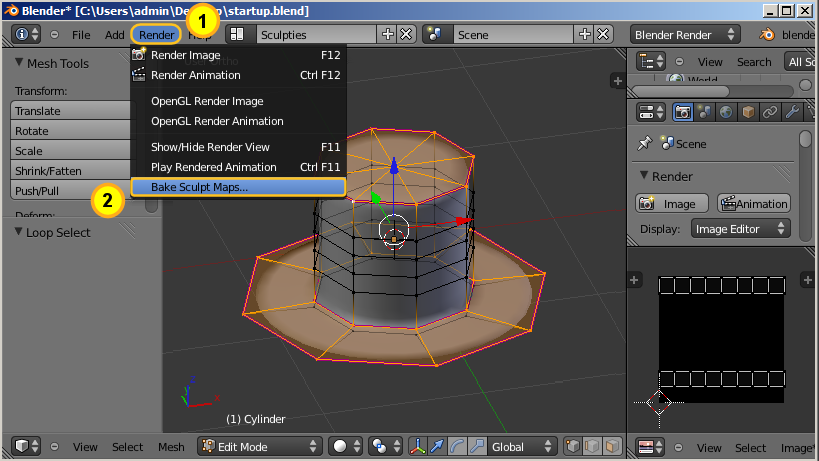
  2. So let us bake the hat now:
    Render-> Bake Sculpt Maps …
  1. The Bake tool pops up

You have 2 options :

  • The color range settings allow you to narrow down the number of used colors for red, green and blue color coding of your sculptmap. this is equivalent to shrink the visible portion of the object.The values are interpreted as “percent of available color space”. The color space is always reduced on both ends so that the visible portion of the object remains in the center of the Object Bounding Box.
 

  • The default behavior of Primstar-2 is to recalculate the geometric centers of each sculptie. If you do not want that to happen, because you need to keep the object center where you defined it, then you can check “Keep Center” and Primstar lets your Object-center where it is.In any case the Object Center is taken as the center of the sculptie’s bounding box. You find a more detailed explanation in the reference guide.

You do not have to worry about these settings and you can safelyy just hit the OK button to get your bake done.

Note for Primstar-1 users:

The Color range setup has changed significant compared to Primstar-1 where you could set the color range center to where ever you wanted.

  1. Now you can see your sculptie in the UV image editor
  2. And now you should see the rainbow colored sculptmap in the UV editor:
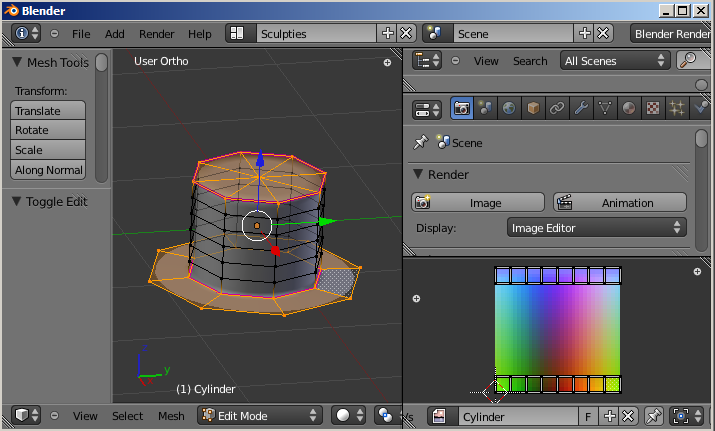
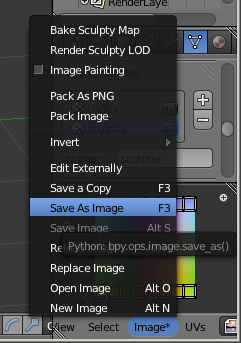
  1. The last step is to export the sculptmap. You do that in the image editor by clicking:Image -> Save As Image
  2. A file selector box pops up (see image below), where you can navigate to where you want your sculptmap to be exported
  3. You can change the file type (1). Note that OpenSim and similar online worlds support png and tga format.
    • You can specify the file name (2) and the directory where you want to put your file.
    • With clicking on “Save as Image” you store the image as file in your file system.

    When you are done with that, then you take the exported image to your online world and Rezz your sculptmap. Please ensure that you have checked “Lossless Compression” !
    Otherwise you get a distored result.

Please see the Reference guide for more detailed information about how to use Primstar-2

The Video series

You may want to proceed with the beginners video seris Sculpted Prims. Any feedback complains/questions are always very welcome.

We hope you enjoy your Primstar.

Contact:

  • Register to the SL Chat group “blender primstar/jass”
  • Contact me in SL: “Gaia Clary”
  • Send me an email: gaia.clary@machinimatrix.org