A Rig is an animation control system for a Model. Rigs can use different methods for animating. For example it is possible to animate a mesh only by using empties and constraints, so no single bone is involved, yet it is an animation system.
The most common form of Rigs is based on Bones. This special form of a Rig is also named Armature.
Rigging is the process of creating the Rig.
However since in Blender we clearly have to distinguish the processes and workflows, we should also use precise terminology. Thus we distinguish between Rigging (make the rig) and Skinning (weight the mesh).
Rigging Panel (Tool shelf)
The rigging panel basically contains a collection of properties which also are available at other regions in Blender. But having them all in one place is a time saver. The panel is provided It has 4 major sections:
- SL Rigging Style.
- Bone Display style.
- Bone Visibility.
- Bone Constraints (1).
(1) Bone constraints are only visible in Edit Mode and Pose mode.
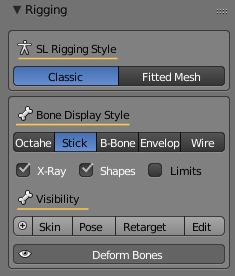
The + icon on the left of the preset buttons expands the Bone Panel
SL Rigging Style
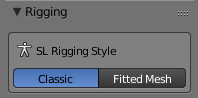
Attention: The Rigging Style selection only marks the corresponding bones as Deform Bones. The Weighting of the Bones is part of the Skinning Process.
Bone Display Style
The first row of buttons changes the bone shape. You probably will mostly select the Octahedron Style or the Stick Style.
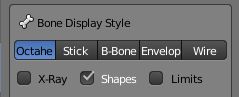
In the Second Row of the section we find 3 properties:
- X-ray: To display bones even when they are occluded (hidden) by the mesh.
- Shapes: To enable the usage of Custom shapes.
- Limits: To display the bone movement ranges.
Bone Visibility
The first row of the Bone Visibility section contains 4 Presets for different Workflows:
- Skin (the Weighting Workflow).
- Pose (the Animation Workflow).
- Retarget (import of BVH Animations).
- Edit (Modify the Rig).

The + sign expands the Bone set visibility buttons
For details about Workflow Presets see below.
Bone Workflow Presets (details)
The presets actually do a bit more than just controlling the Bone visibilities. They also control to some extend what you can do with the Bones in the various Bone Workflow Presets:
- Skin is used when you want to do weight painting on your Mesh. This preset will enable the SL Bones and also unblocks their rotation setting so that you can rotate the bones for testing your weights.
- Retarget is used when yuo want to import another Animation from a BVH file.
- Pose is used for all your animation work. This preset enables the green control bones which are optimized for your Animation tasks. This is also the default preset forAvastar.
- Edit is used when you want to edit the Bone’s Rest poses, for example when you create a non human character.
Bone Visibility expanded
Note: In the tool shelf the Bone Visibility Panel can be collapsed and expanded by clicking on the small (+)/(-) sign to the left of the Bone Presets.
Avastar Bone Sets are descriobed below in more detail.
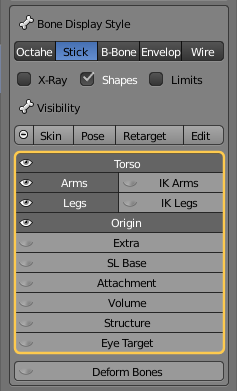
Bone Sets
- Torso, Arms, Legs, Origin: These buttons control which of the Control Bones (green) are visible
- IK Arms, IK Legs: These buttons control which of the IK Bones (yellow) are visible
- Extra: There are a few Extra bones which normaly are not used for Animation in SL. These bones are either not weighted to the default Avatar (Skull, Foot Bones and Toe Bones) or are automatically animated (Eye Bones). However you can use these Bones in your animations for custom meshes.
- SL Base: to display the SL Bones (Blue)
- Attachment: to display the Attachment Bones (red)
- Volume: to display the Volume Bones
- Structure: to display the Structure bones
- Eye Target: to display the Eye target (needed for animating the eyes)
- Deform Bones: to display all bones which have the Deform Option enabled. The content of this set can change dynamically (see fitted Mesh)
Bone Constraints (Available in Pose mode and Edit mode)
The (green) Control Bones and the (blue) SL Base Bones of the Avastar rig are closely related to each other. Actually the SL Base Bones by default inherit the control Bones Transformation matrices. Hence the control bone skeleton and the SL Base bone skeleton are like almost perfectly synchronized twins. You can see this best with Bone display mode set to Octahedral:
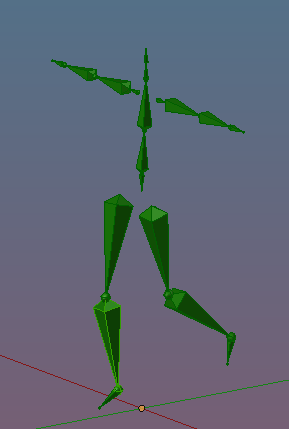
The Green Control Bones are the master bones used for Animation
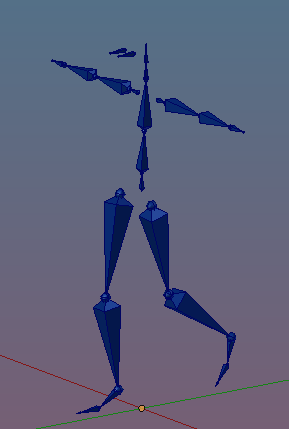
The SL Base Bones are used for Skinning (Weighting). They closely follow the green control bones
Since this behavior can be a bit tedious at times we have added the Bone Constraints panel to change the default behavior of the SL Base Bones on purpose (i.e. when you want or need it):
Constraints Panel (in Edit/Pose Mode)
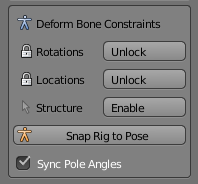
Note: The Bone Workflow Presets (see above) take this into account. So when you select the Skin preset, then the constraints are automatically set appropriate for the Weighting workflow.
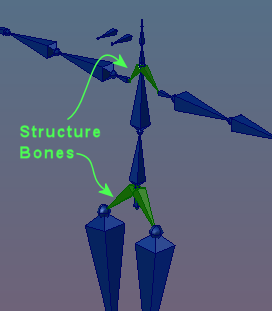
Structure Constraints
By default the Structure Bones are not selectable. But when you work on non human skeletons you often want to reposition the structure bones as well.
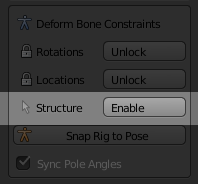
Snap Rig To Pose (available in Armature Pose Mode)
The Snap Rig to Pose button is a quick way to make the current Pose the new Rest Pose.
Snap Base to Rig (available in Armature Edit Mode)
The Snap Base to Rig button allows to snap the SL Base Bones to the Control bones. You need this function whenever you have modified your Rig in Edit mode.
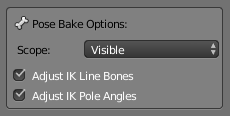
The Operator Panel gives you some control over which bones shall be snapped:
- Scope: Can be Selected Bones, Visible Bones, or All Bones.
- Adjust IK Line Bones: Will adjust the connection bones between the IK Pole Targets and their constrained Bones
- Adjust IK Pole Angles: Will adjust the Pole angle (see below)
Sync Pole Angles
Pole Angle show up when you are working with IK Targets. It is important to have the Pole angle set correctly because otherwise you will see remarkable changes of your pose when you switch between FK and IK mode.
So what is the Pole Angle? In short the pole angle is the relative Bone roll of the constrained Bone (the Elbow here) between a plane that is defined by the Bone’s IK Target Bone (the IKWrist in the example), its Pole Target, and the Chain End point of the IK Chain (the Collar Bone here):

Click to Zoom In
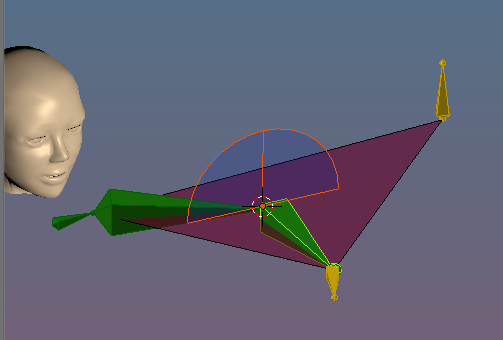
Click to Zoom In
Note: The definition of the pole angle is done in Rest Pose. The bending of the Arm in the images above just makes it easier to spot how the pole plane is constructed.
For a simple Rig like the Avastar Rig the Pole angle is typically 0°,90°,180° or 270° but it can have any angle actually. Blender allows to set the Pole angle manually. Avastar provides a function that calculates the optimal pole angle automatically whenever you switch from Edit mode to pose mode.
Our course Non Human character Creation tells more about this. You also find some information about the Pole Angle on the Web. You find some resources with Google, see blender pole target