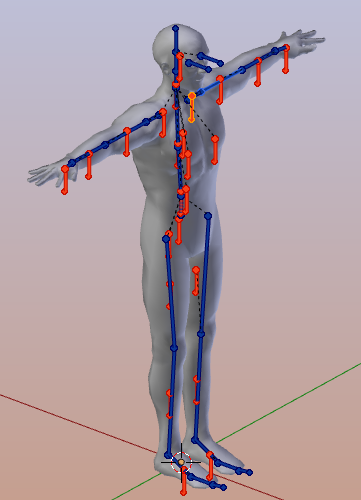
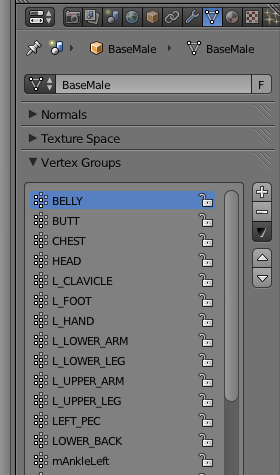
fitted_mesh.Blend for pure Blender (2.70 and newer)
Avastar users: Please ignore this page!
We have created fitted_mesh_270.blend based on the example files provided by Linden Lab with a female and a male mesh, a correct SL compatible skeleton, 2 bonegroups for SL Base Bones and Collision Volumes.
New since Blender 2.79 (best choice)
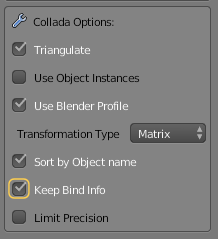
The customizable restpose matrix (or bind pose matrix) that was introduced in Blender 2.70 is no longer handled automatically. Blender now provides a new option keep bind info which is available for Collada imports into Blender and for the Collada exports as well.
Also the new export Collada option keep bind info is not part of the exporter presets and needs to be enabled manually. But you always can create your own export preset.
To clarify: You need to enable Keep Bind Info when you export fitted Mesh attachments.
New since Blender 2.70 (working solution)
Since Blender 2.70 the Collada exporter provides very limited support for fitted Mesh. technically this is support for a customizable Restpose Matrix (or bind pose matrix) as it is available for example in Maya. Blender handles this automatically (see last chapter of this page for more details).
Older than Blender 2.70 (Fitted mesh unsupported)
For versions lower than Blender 2.70 there is no support for exporting Collision Volume bones.
Quick Guide: How to Get the mesh to SL
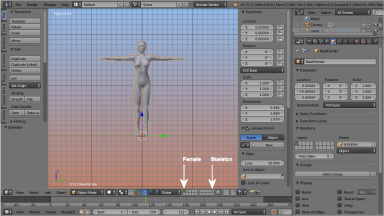
Step 1: Open the file in Blender
Note: The skeleton (Armature) is located on Layer 10. You can ignore the skeleton for now, the exporter takes care of it when it needs it (see below). If you want to see the Skeleton together with the meshes, then you enable additional layers by using SHIFT LMB (Left Mouse Button).
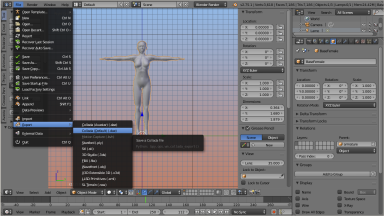
Step 2: Open Blender’s Collada Exporter
Note: If you have Avastar, then please use the Avastar Rig and the Avastar Collada exporter. Avastar does a lot of special calculations in the background (regarding bind pose matrix, correct rotation, scaling, etc.).
Warning: Never export the Avastar rig with the Blender Collada exporter unless you know exactly what you do !
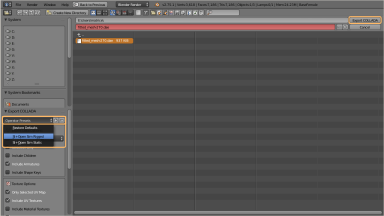
Step 3: Set the export options
- From the Operator Presets select the Preset “SL +OpenSim / rigged”
- Specify the export location
- Export Collada
Note: You find the operator presets at the bottom of the tool shelf (on the left side)
Step 4: Upload to SL
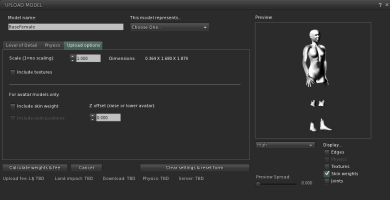
- In the SL Viewer: Build ->Upload Model
- take care to enable Include skin weights You find this option in the Upload options tab of the SL Importer.
- Calculate Weights & Fee
- Upload
Note: When you enable skin weights on the preview display (see image) then you often see that the mesh turns partially invisible. This seems to be a previewer Bug. The goods news is: We always found that the uploaded Meshes work properly and do not show these invisible parts.
In depth information (a bit technical)
Note: Avastar supports Maya’s bind pose matrix since we added support for Liquid Mesh (collision volume weighting). So Avastar always supported (and still supports) Fitted Mesh out of the box and independent from the Blender version.
The skeleton (quick Info)
- The meshes are ready for export with the default Collada exporter. Please use the export option “Export for Second Life”, otherwise your export will fail immensely!
- The blend file has 3 layers populated:
- Layer 1: The Female Mesh
- Layer 2: The Male Mesh
- Layer 10: The Armature (Skeleton)
- The meshes are fully weighted to a mix of Collision Volumes and SL Base Bones (as proposed by Linden Lab). All bones have been enabled as deform Bones.
- All mandatory weight Groups have been added.
- The meshes are rotated according to the SL conventions (i.e.: looking towards the scene’s positive X-axis)
Where are the Collision Bone weights ?
Note: You can see the weights in edit mode (you need to enable the “Show Weights” option in the Mesh display panel).
So how would i do weighting in more detail ?
Now it gets a bit fuzzy 🙁 However…
You have to take into account that many vertices of a mesh are typically weighted to only one single bone. Actually you “only” have to take care near the joints where you typically get 2 weights per vertex, in some cases 3 weights (as mentioned above for parts of the shoulders) But lets try to start easy (which is already complicated enough)
Vertices with one single weight
Most Collision Bones are immediate children of SL Bones. Hence when an SL Bone moves, then the corresponding Collision Bone follows tightly this movement. Hence it does not matter if you weight a vertex to only one SL Bone or if you weight it only to its corresponding Collision Bone. The character’s animation will work exactly in the same way for both cases ( Remind: This is true only when the vertex is weighted to a single bone ! )
But the mesh will react differently on the apperance sliders! as mentioned above: vertices weighted to SL Bones are influenced by other appearance sliders than vertices weighted to the Collision Bones. So its your decision what you want for a particular area of your mesh: either bone length changes or mesh morph changes (or a combination of them)
Vertices with 2 or more weights
Now it might get a bit tricky. You Still can weight to the collision volumes. This might give reasonable results. In fact in most cases the results are OK. However you might get curious and maybe you want the area around the joints to keep following the SL Bones. (and have no weights going to the joint areas to Collision Bones) In this case the mesh keeps nicely scaling with the Skeleton Sliders. But i am not sure if this is realy necessary (will update when i played with this a bit more)
So and what about the in between vertices ?
If you weight the joint areas to the SL Bones and the middle of the bone areas to the collision volumes, then you will have to define a weight transition from an SL Bone to its corresponding Collision Bone (the more you approach the middle of the bone, the less weight is put to the SL bone and the more weight is put to the Collision bone). After all the middle of the bone will follow the morph sliders and the joints will follow the Bone length sliders. And the transient vertices will follow a mixture of both. That should work in theory… Now lets go and practice 🙂
Ok, admittedly fitted Mesh creations are not an easy task. Maybe as a rule of thumb you can keep in mind that we have Skeleton Sliders for the SL Base Bones (also named mBones meanwhile) and Morph sliders for the Collision Bones (cBones). Eventually you have to decide which part of your mesh shall follow which set of bones.
It is all a matter of finding the right balance of the weights between the Collision volumes and their related mBone counterparts(mPelvis, mTorso, mChest, etc…).
Technical details about the Bind Pose matrix
The Bind pose matrix essentially allows to define a Pose for each Bone that will be treated as the rest pose. In Blender the rest pose is defined by how the skeleton is arranged in Edit Mode. thus Blender’s Bind pose matrix is always the identity matrix.
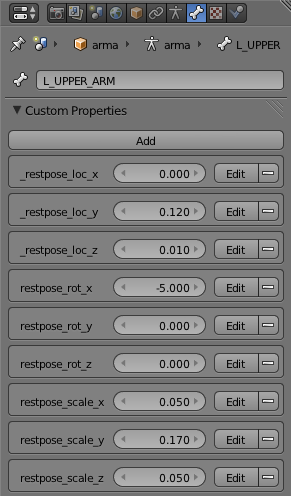
I have defined a set of properties which can be created as custom properties of the edit bones. If the properties are available, then the Collada exporter will also use them. If the properties are not available, the Collada exporter will fall back to use the identity matrix (as it did all the time before). The properties are:\
restpose_loc_x (default=0.0)
restpose_loc_y (default=0.0)
restpose_loc_z (default=0.0)
restpose_rot_x (default=0.0)
restpose_rot_y (default=0.0)
restpose_rot_z (default=0.0)
restpose_scale_x (default=1.0)
restpose_scale_y (default=1.0)
restpose_scale_z (default=1.0)
Note: This may be changed in the future as i will propose to add the Bind Pose matrix as an official Blender feature. This might possibly allow us in the future to bind a mesh to arbitrary poses with no extra work.
Important: I found by experiment that for the SL Importer we only need the restpose_scale and the restpose_rot properties. However, since Linden Lab has provided the complete rest pose matrix, i have kept the restpose_loc properties in the blend file, but i renamed them all to “_restpose_loc” (with a leading underscore) to hide them from the Blender Exporter.
You find the properties when you place the armature into Edit Mode. then the values show up in the properties sidebar, and they can be edited in the Object Properties window.
