|
|
What is the GridAlign Tool ?Sculpties are encoded using a 2d-image containing a 32-bit image map, where each axis is encoded in an 8 bit value. Thus There are only 256 valid vertex positions available along each axis. This property of sculpties is equivalent to using a size dependent grid for each axis where the bounding box of the sculptie defines the grid spacing. It is not straight forward to make your model manually align to these constraints, although some clever solutions to the problem already exist: |
- The easiest way is to just bake your sculptmap and then reimport it to blender. The resulting object will have all its vertices located at valid positions along the sculptie grid. The pro is that you can examine exactly what you will get in Secondlife. The con is that you always have to make the sculptmap prior to be able to examine it.
- You can use the linear grid of blender by rescaling your sculptie to a size of 2.55 in each axis. Then use a grid with a spacing of 0.1 and use snap to grid. The pro is that you can use the blender snap and align tools. The con is that you must work on a rescaled model.
What the GridAlign Tool does …
The tool determines the exact bounding box-size of your active object. Then it calculates the exact grid spacing for each space orientation (axis) that will be used within SL. Finally it moves all selected vertices to locations defined by the calculated grid. For the epxerts: Please note, that the tool works in edit mode and it does not take any object-intrinsic rotations into account.
What the GridAlign Tool does NOT …
The gridAlign tool does not improve your sculpties automatically. Nor does it solve any LOD problems or inprecision problems you may encounter with your sculptie. It simply can not do that. However it will modify your model. And what you will see will always be very close to what you will bake into your sculptmap. So do not blame us that we have added a “align to crap” tool. It is to the best an “Align to the truth” tool. It only can show you where you might have problems and it WILL do that independent whether you like the result or not. Remember: CTRL-z is your friend if you do not like what the tool calculated !
Where can i get the tool ?
The tool is distributed with Jass-2 Premium edition. If you want to use it with primstar or The Jass-2 Public edition, you need to download the tool
and install it as described below.
How to activate the GridAlign Tool…
In the Jass-2 enhanced version the GridAlign Tool has already been activated for you. However we will explain below exactly how the activation and the deactivation is done, so that you are not lost when something unexpected occurs.
- usage:
- Go to edit mode. We have provided a very simple example which will show you what the GridAlign Tool can do for you very explicitly. Here is a wand with a rounded end made out of a perfect sphere:
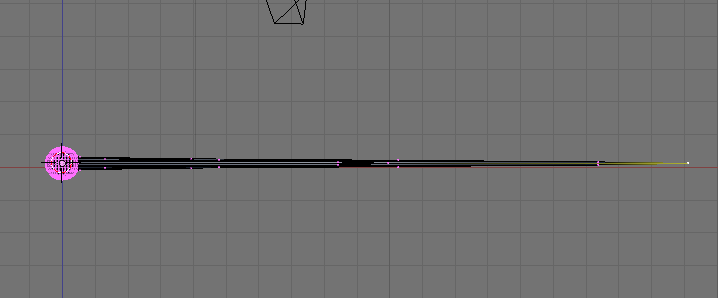
We will concentrate on the left part of the stick now. - Select a set of vertices (or all vertices to align the whole object) You are free to select ANY number of vertices, even if it only one single vertex, it will be aligned. We selected the left half of the spherical endcap of the wand here:
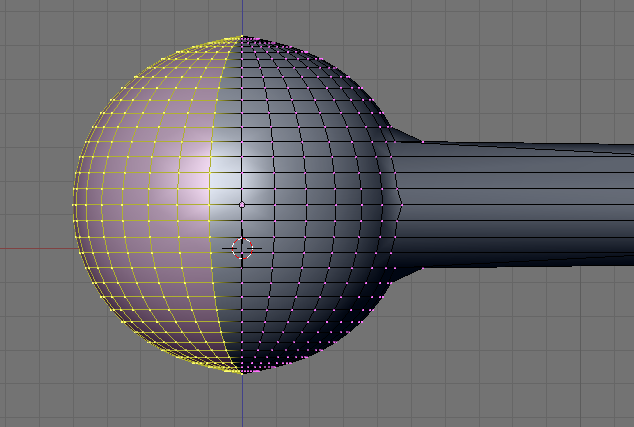
- press ALT ‘G’ (the “ALT” key followed by the “G” key. Now all selected vertices are shifted to the locations which would be used if the sculpties would be baked NOW and imported into SL:

Did you expected this to happen? If yes, then you already know why oblongs are sometimes not doing well… Because of the spatial resolution which clearly distorts the wand end here. Better know this in advance than after upload to SL…
Now the selected vertices should be realigned according to the SL grid. You can let the tool work on small sets of vertices time by time, or you can select all vertices to always align the whole object. At the end it depends on your personal workflow how you will use the tool.
NOTES:
- You can always press CTRL-z to get back to the previous state to cancel the effect.
- It does make not much sense to use the tool together with Subsurf enabled models (You can do it but since the GridAlign Tool will only influence the control points it just makes no reasonable effect. However you can “apply” the subsurf modifier before(!) the grid-aling tool is applied…
- It makes sense to use the tool when you are in Multires mode. You can use it on all multires levels.
- Using the tool before baking does no harm. Indeed sometimes it even assures that the baker bakes what you want and not what it thinks should be the best to do. But in general the baker works just fine and produces the same results if you have used the GridAlign Tool or not.
- You can use the tool selectively on parts of your sculptie. It does not matter in which order you grid align your vertices AS LONG AS you do not alter the vertex locations manually. So if you work on your sculptie after you grid aligned it, you better realign the vertices from time to time to be sure that what you see keeps what you get. Here is the fully grid aligned wand head:

- Go to edit mode. We have provided a very simple example which will show you what the GridAlign Tool can do for you very explicitly. Here is a wand with a rounded end made out of a perfect sphere:
- Enable/disable the tool:
- The tool is a so called “space handler” and you will find it in the menu bar of your 3D view at “View -> Space Handler Scripts” There you should find an entry named “gridAlignService.py” And this service should be checked if you want it to be active:
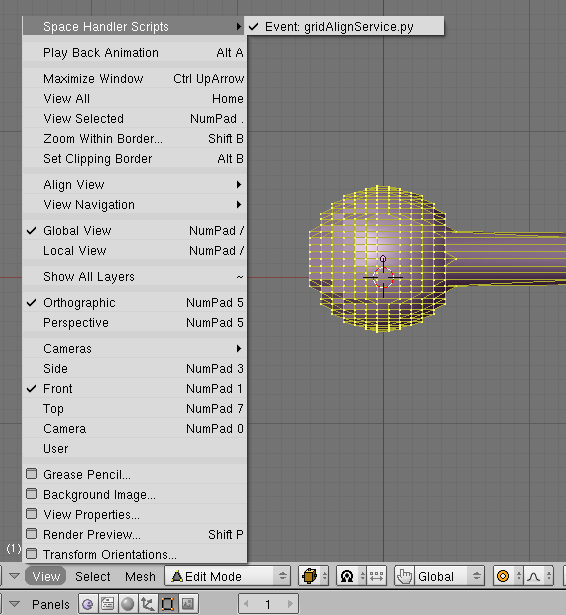
- Similar you can deactivate the tool by unchecking the service.
- The tool is a so called “space handler” and you will find it in the menu bar of your 3D view at “View -> Space Handler Scripts” There you should find an entry named “gridAlignService.py” And this service should be checked if you want it to be active:
Install the GridAlign Tool
If you have purchased the Jass-2 Premium Edition the tool is already installed and activated. It can be utilised by using the keyboard shortcut ALT-g. If you have reset your Jass-2 Premium Edition to the Blender factory settings, then here is what you need to do in order to get the tool to work for you:
- Locate the tool it in the scripts folder of jass-2 (open the blender console. The path to the scripts location is reported in the third line of the console window. locate the tool at /scripts/jass/gridAlignService.py
- Please start blender (or restart it if you had it already open!) Now you see your default screen. It may look like this:
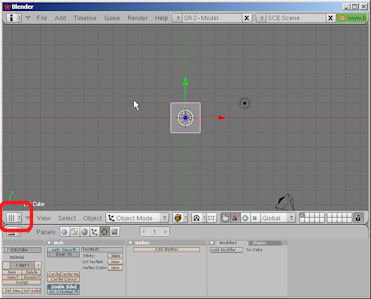
- In one of the visible windows temporarily switch to the “Text Editor” by selecting it from the Window Type Selector

- In the Text editor click on text -> open , then navigate to where you have found the gridAlignService.py and open it. Do NOT run it!!!
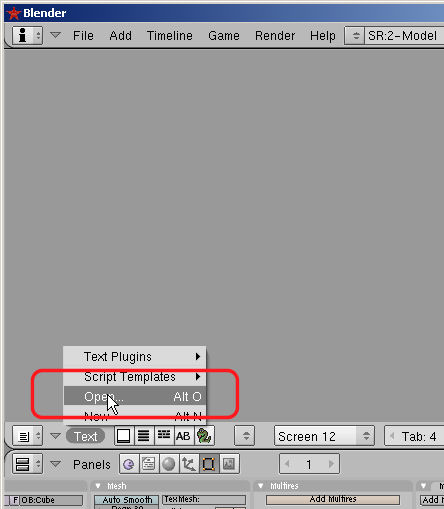
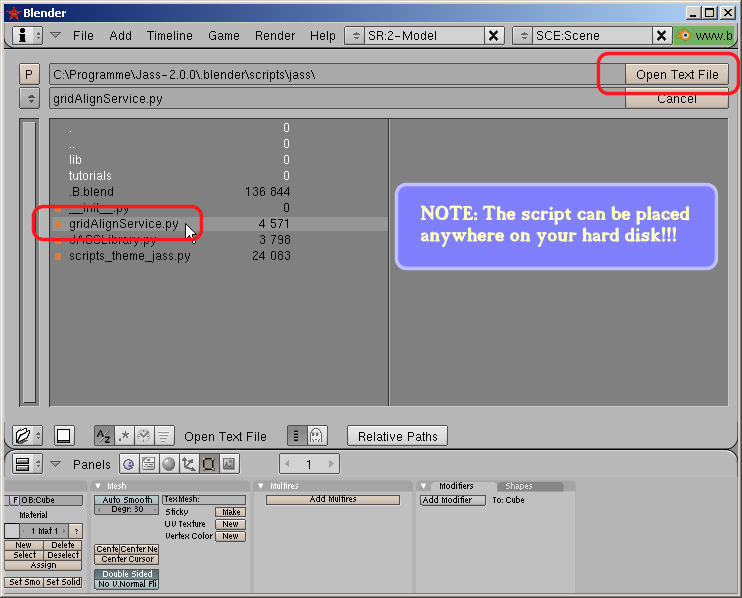

- Switch to the 3D view and there go to edit mode (You will need an object, so if none is present in the 3D view now then create one and then switch to Edit mode

- Right after opening it, the space handler is already available in the 3D-view under View -> spaceHandlers. You should check this now and set the checkmark left to the entry named “gridAlignService.py”.

- Now select at least one vertex of your object and press ALT “G” (Press the ALT key , hold it and the “G” key in addition!) Check that the gridAlign tool operates by looking at the Blender console. It should look similar to:

- Remember to save your default settings now if you want to keep the handler:
File -> Save Default settings - If you get lost during the process, just restart blender and start over again or forget the tool
- If you have already stored the handler in your settings and you want to return to scratch then:
File-> Load Factory Settings is your friend.
If you find any problems with the tool, please report here as a comment. We will take care of your problem as soon as we get to know it!
Have fun,
The Machinimatrix