| [PS-Youtube id=”xxx” w=”320″ h=”206″] | Video not yet available |
The Collision Bones Cheat Sheet |
|
Making the boots:
Weighting the Boots:
|
|
Add a new Avastar Character
add -> Avastar
This will create a new female Avastar character. After a short time (typically 2-4 secs) a new Avastar character is created in the 3D View and at the current 3D cursor location .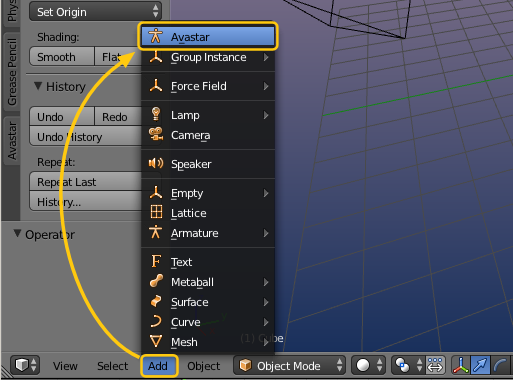

Avastar’s default Shape is compatible with SL’s default Shape.
Important: The Avastar figure is an exact representation of the SL Avatar, based on the SL Avatar definition from Linden Labs and so it is fully compatible with the character from Second Life and all similar online worlds like OpenSim for example.
We do not use any of the Ruth shapes, because there is no clear definition what Ruth is. While there is an official definition of the default shape. In SL you create the default shape from your Inventory:
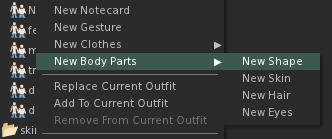

The SL default Shape (Create new Shape).
W<strong>hat you should know</strong>
- New Avastar characters can only be created when you are in Object Mode!
- A new character will be placed at the current 3D Cursor location.
- You can hide (‘h’) or remove (‘x’) not needed parts (like the skirt or the hair for example) without breaking the tools.
- You can create as many characters as you like and thus you can create multi-character animations. Multi-character animations will be explained in the reference guide.
-
The character that you know from avatar.blend or from the workbench (sometimes also named “ruth”) looks different from the default Avastar character. this is not a mistake. Further explanations can be found in the Avastar vs. Workbench Skeleton article.
Add a new Avastar Character
add -> Avastar -> With Triangles
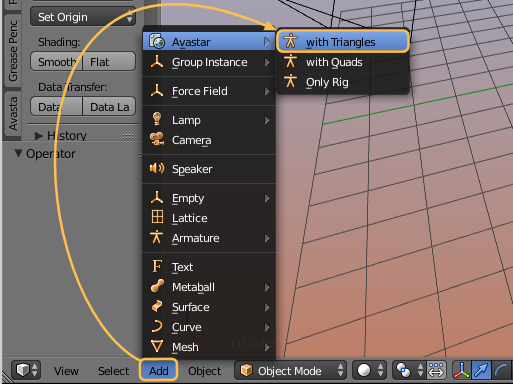
Note: The option “with Quads” is only available when you have Sparkles-pro
This will create a new female Avastar character. After a short time (typically 2-4 secs) a new Avastar character is created in the 3D View and at the current 3D cursor location .
Avastar’s default Shape is compatible with SL’s default Shape.
Important: The Avastar figure is an exact representation of the SL Avatar, based on the SL Avatar definition from Linden Labs and so it is fully compatible with the character from Second Life and all similar online worlds like OpenSim for example.
We do not use any of the Ruth shapes, because there is no clear definition what Ruth is. While there is an official definition of the default shape. In SL you create the default shape from your Inventory:
The SL default Shape (Create new Shape).
W<strong>hat you should know</strong>
- New Avastar characters can only be created when you are in Object Mode!
- A new character will be placed at the current 3D Cursor location.
- You can hide (‘h’) or remove (‘x’) not needed parts of the Avatar meshes (like the skirt or the hair for example) without breaking the tools.
- You can create as many characters as you like and thus you can create multi-character animations.
-
The character that you know from avatar.blend or from the workbench (sometimes also named “ruth”) looks different from the default Avastar character. this is not a mistake. Further explanations can be found in the Avastar vs. Workbench Skeleton article.
Make the Boots |
|
| I will show you a very simple method to create the boots as a partial copy of the Avastar mesh. This will not create the best results but it will serve well for the purpose of this tutorial. So let us first create a copy of the lower Avastar body by using the Freeze tool: | |
Freeze the Lower Body |
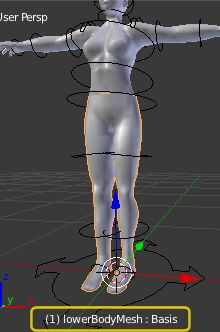 |
| The freeze tool is actually a copy tool that makes a copy of a rigged mesh with properties depending on the tool settings. We will use the tool to make a “standalone copy” of the lower body of the Avastar mesh.So, first select the lower body of the Avastar character (The “LowerBodyMesh”). Then locate the freeze Tool in the Tool Shelf (left sidebar of the 3D View).You need to know that the Freeze tool will place the created copies exactly at the same location where the original meshes are. So when the freeze tool is done, then by default you will see the originals and the new copies “on top of each other”. And thus you will see a flicker while you move around in the viewport. | |
| Therefore we have added the “Hide original mesh” option to the freeze tool. This will hide the original objects (the copy sources) and only the copies will remain visible when the tool is done. (You always can unhide the originals at any time later) And in almost every case (especially if you want to work on the created copies) you will want to enable this option.We also want to make the boots standalone (separate them from the Avastar-Armature). We will later parent the boots again, but we want to start with a clean mesh. You will see in a moment why this is a good idea. For now enable “Standalone Posed“.And finally we want to start with a “clean” mesh that has no shape keys, no Weight Groups, no Armature… just a clean simple mesh. That’s why we also enable “Remove Weight groups“. | 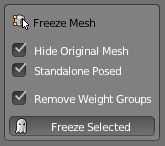 |
When you finally click on the “Freeze Selected” button, the following operations will be performed:
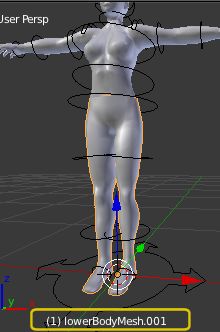
We end up with a new non rigged, plain and easy object with the name: “lowerBodyMesh.001” which we might want to rename to “Boots” for example. |
 |
Body to Boots |
|
| In the last step we will go to edit mode and cut away the upper part of the lower body. Thus we only keep the legs and feet. | 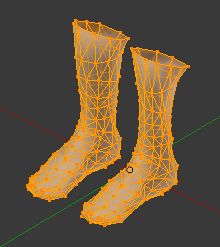 |
| In addition to that i have edited the top rim of the boots a bit. I added one extra loop and folded that back into the shaft, so that the “inside” of the shaft’s upper part does not look transparent. | |
| And finally i selected each of the boots separately and scaled them up a bit (by a factor of 1.1 ). And here they are, the most simple Boots made with just a few clicks. Not nice but very simple to create. Feel free to make your own boots with your own technique, make it better shining and beautiful. |
Rigging the Boots |
|
| Now we are ready to put the Boots back on the Skeleton. For this purpose we will use the rigging panel in the Tool shelf.It is important that you select the armature to where you want to rig your mesh, and the mesh itself at the same time. Only then the tool shelf will display the rigging tool.
Since we want to rig to the Collision Volumes instead of the SL Bones, we do not want to get any of the default weights copied over to the Boots. In fact we want to avoid to copy any weights at all. The rigging tool provides the necessary options. |
 |
| The first tool option “with Weight Copy” copies existing weights from the Avastar meshes to the SL Bones of the new mesh. We do not want this to happen. So we keep this option switched off.Since the following 2 options only apply to the weight copy function, they are now greyed out and we do not need to care about them.
The third option “Alter mesh to Rest Pose” only applies when we rig a mesh that is not created in T-Pose. This does not apply to our boots. they are in T-Pose, so we also keep this option unchecked. Finally we see the “Parent to Armature” button. The number in brackets specifies how many of the selected meshes are not yet parented to an armature and will be affected when you click the button. (1 in our case) |
 |
After clicking on the “Parent to Armature” button, a couple of tasks will be performed:
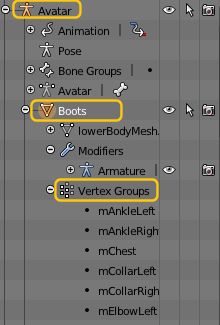
If you now look into the Outliner you indeed see that our Boots have been parented to the Avatar, they now got an Armature Modifier and vertex groups have been added for all deforming bones. However a closer inspection of the vertexgroup list shows that we do not see any vertex group for the Collision Volumes, only the SL bone related vertex groups have been created. That is because by default the Collision Volumes are set to non deforming. So we now have to prepare (reconfigure) the Skeleton. |
 |
Unhide the Volumes |
|
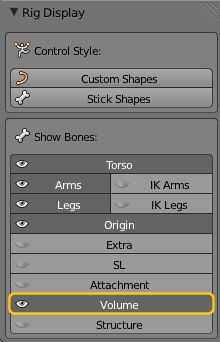
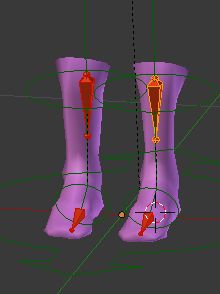
| The rigging to Collision Bones is a very special feature and it is certainly not the everyday workflow for Avastar. Therefor the Collision bones are by default not considered as deforming bones, thus they do not influence the mesh at all by default and consequently no vertex groups are created upon parenting the Mesh to Avastar. We will change that now:Let us first select the Armature in Pose mode, then in the Object Data properties section locate the “Rig Display -> Show Bones” panel. There you find an entry for “Volume”:
|
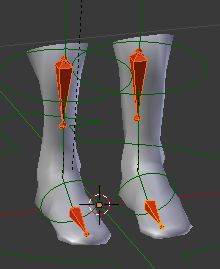
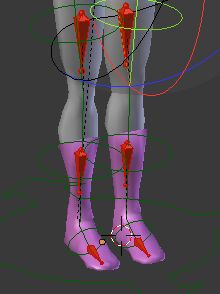
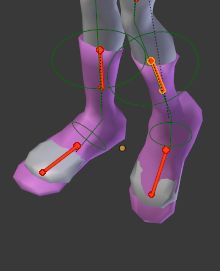
As soon as you enable that button, the 19 red Volume Bones appear in the 3D View.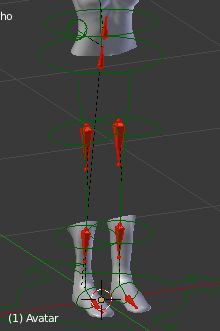
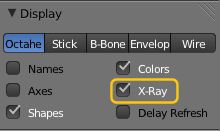
When you scroll the Object Data properties upwards to the “Display” panel, then you can enable “X-Ray”. This makes the bones always visible, regardless from where you look at the character:
|
Enable Deform for the Volumes |
|
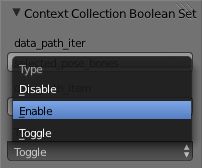
The Volume bones are normally not used for rigging and weighting (“normally” means here: “in the standard use case”). Therefore they are not enabled for weighting by default. We have to change that now for the foot bones and leg bones of the boots as follows:
Warning: If you forget to set the deform flag, then the bones can still be weighted, but the weights will not show any effect. From now on the Collision bones are prepared for our purpose. And we can use them for weighting just like the default SL bones. So, in the next step we will add weights to the Collision volumes. |
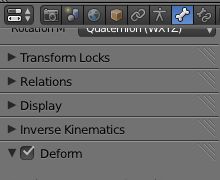
You can check if a bone is enabled for Deform in the Bone Properties section. Look for the “Deform checkmark”:
|
Considerations about Weighting |
|
| There is really nothing special about weighting the collision bones. But beware! You should never use the Collision volumes for posing. Remember to always use only the green control bones (and the yellow IK Target Bones) for positioning! Otherwise you might quickly break the rig and get unexpected results.There is one other consideration that you must understand to avoid unexpected results: Weighting the mesh means actually “define the influence of the bone movement on the Mesh vertices”. So if you weight one vertex to 4 bones, then the sum of all bone movements will take effect on the movement of that vertex. In particular: If you give weight to the Collision bones and to the corresponding SL bones, then the influence of the shape sliders on the mesh might be affected and they might not exactly work as you expect. | This is not an issue if the Collision Volume have corresponding SL Bones and both move in parallel (that is: have the same parent). It will be more an issue when collision Volumes and SL bones are animated differently. In that case unpredicted results may yield from weighting both (Collision volumes and SL Bones) at the same time.As a rule of thumb we keep with: Either weight the SL bones OR weight the Collision Volumes. Of course you can mix the bone weighting as you like. Just be aware that Collision Bone deformations and normal mesh deformation might not work well in combination. So to make it easy we will only use Collision Volume weighting for the boots. |
Prepare the Boots mesh |
|
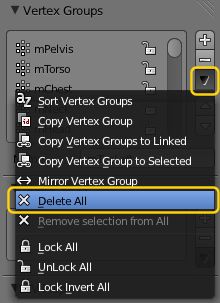
One nice property of Avastar is that it automatically takes care that all necessary weight groups are defined when you export your mesh. So actually we can just delete all weight groups now. This ensures we will not get any unexpected weighting from the SL bones.
Hint: Actually it would be better to keep all vertex groups intact, and use the “remove Selection from all” function instead (currently at Mesh -> Vertices -> Vertex Groups -> Remove from All ) However my proposal removes clutter from the vertex group listing and it works well for this usecase. |
 |
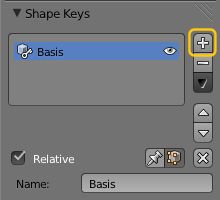
Enable Shape sliders for the Boots (optionally) |
|
| Maybe one of the most exciting features of Avastar is its ability to propagate the influence of the Avastar shape sliders to your own meshes. This feature allows you to directly simulate how your mesh will later react on the shape sliders.We will use this feature later to check the results of the Collision Volume weighting. But note this is not necessary to make Collision volumes work properly. Its only good for testing the feature in Blender.
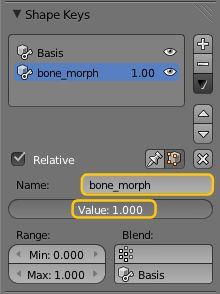
For now we only configure the Shape slider support:
|
 |
Note: If for any reason you want to get rid of the Slider influence then you either can get back to the Shape keys and turn the influence down to 0.0 or you even can delete the bone_morph shape key to get completely rid of the slider influence.
|
 |
Add a material (optional)This will help us later to distinguish between the lower body and the boots. I make the material pink because this color will never be possible in weight paint and thus you always see when you are in Weight paint mode and when you are in object mode. You will see later where this avoids confusion. |
 |
Prepare the Skeleton (part 2) |
|
Now that we have defined the boots we can reconfigure the Armature for the weighting task:
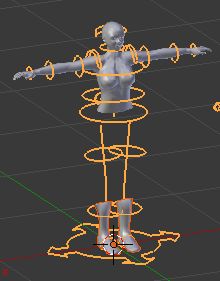
It is also helpful to make the lower body part of the Avastar visible again so you can immediately adjust the boots to the lower body and check the behaviour of the Boots in relation to the lowerBody mesh:
|
 |
And finally Weight the bones |
|
Since this tutorial is not about weighting, i will step through this task quickly. But i will give you a few hopefully useful hints:
If you have serious trouble with Weight Painting, then please try to get some basic knowledge about this topic. However you even go on here first without worrying too much about what you do. |
 You generally find useful information at cgcookie.com Here are some more interesting tutorials specific to the topic: You generally find useful information at cgcookie.com Here are some more interesting tutorials specific to the topic:
|
We will later see that we also can test the shape sliders. However that is a tiny bit user unfriendly because we have to switch between the mesh and the armature to get access to the shape sliders.
Now the weighting has been done. To be sure the other boot is also weighted, just right click the corresponding bone and see that indeed the weights have been copied over and the secnd boot has been automatically weighted while we worked on the first boot. |
  |
Check your Work (optionally) |
|
| Repose the BootsYou might have done this already while weighting the boot. If not now its time to see that you really have weighted the boots and it really reacts on the green(!) control bones. So grab and rotate the green control bones now and see how the boots follow. If you identify issues, go back to the weighting and fix the issues.
If you want to restart your weighting from the beginning, just delete the Vertex groups in the Object data properties and go ahead. |
|
Check the Collision volume sliders |
|
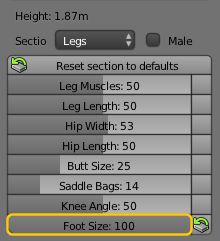
| Checking the Collision volume sliders only works properly if you have enabled shape sliders for the boots (see further above). btw you can enable the shape sliders at any time you like, or delete the necessary shape key at any time and redo it later. It just does not matter.so for now i assume you have the shape slider enabled. Then, if all is correct, you will now see the foot size react on the slider value. And that’s all about it.Now either you are satisfied, then you can now safely export what you have to SL.And see that indeed your boots now react to the SL shape sliders as well.
Or you detect more issues which you first want to solve. Please note that you can change the slider values for the Boots to see the influence of the Collision Volume on the mesh even when you are in weight paint mode! So you can check your mesh right in Blender without the need to frequently upload to SL for testing. However be prepared to find slight discrepancies between what Blender shows and what SL shows. We can not guarantee that all transformations under the hood are 100% correct. Attention: You must(!) use the Avastar Collada Exporter in order to get the export correct. The exporter will take care that the exported data gets compatible to the mesh Importer. |
  |
Frequently asked questions |
|
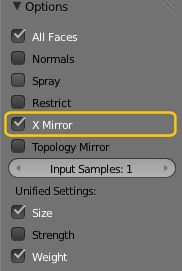
| The mirroring does not work | You most probably have forgotten to enable “X Mirror” in the tool shelf when in weight paint mode |
| The shape sliders have no influence on my mesh |
|
| my mesh explodes in my face |
|
| All is well, but i see unexpected distortions | Probably you have mixed weights to normal SL bones and Collision Volumes. While that can be done, you need to be careful and test, test, test, test. Its really not easy to get a mixed weighting done! |
| Some buttons are missing | Update at least to Avastar-728 |
| Does work in Blender, but not in SL |
|
| It works but it is not very precise. | That is expected. Go back to weighting and try to improve your work. |
| The shape does not update while weighting | this is expected. It would take too long to update the shape with every weighting stroke. Hence you have to switch back to the Avastar frequently and there click on “Refresh Shape” to see the effect of your weighting. |